What is a JavaScript module? A module usually refers to the code organization mechanism provided by a programming language. This mechanism can be used to decompose a program into independent and universal code units. The so-called modularization mainly solves many aspects such as code segmentation, scope isolation, dependency management between modules, and automated packaging and processing when publishing to the production environment. In this article, we share with you the most complete explanation of JavaScript modules, hoping to help you.
Maintainability. Because the module is independent, a well-designed module will make the external code less dependent on itself, so that it can be updated and improved independently.
Namespaces. In JavaScript, if a variable is declared outside the top-level function, it becomes globally available. Therefore, naming conflicts often occur accidentally. Using modular development to encapsulate variables can avoid polluting the global environment.
Reuse code. Sometimes we like to copy code from previously written projects to new projects. This is no problem, but a better way is to avoid duplicating code bases through module references.
CommonJS was originally a project started by Mozilla engineers in 2009. Its purpose is to make JavaScript outside the browser (such as server-side or Desktop) can be developed and collaborated in a modular manner.
In the CommonJS specification, each JavaScript file is an independent module context (module context), and the properties created in this context are private by default. In other words, variables (including functions and classes) defined in a file are private and invisible to other files.
It should be noted that the main applicable scenario of the CommonJS specification is server-side programming, so the strategy of synchronously loading modules is adopted. If we depend on 3 modules, the code will load them one by one.
This module implementation mainly includes the two keywords require and module, which allow a module to expose some interfaces to the outside and be imported and used by other modules.
//sayModule.js
function SayModule () {
    this.hello = function () {
        console.log('hello');
    };

    this.goodbye = function () {
        console.log('goodbye');
    };
}

module.exports = SayModule;

//main.js 引入sayModule.js
var Say = require('./sayModule.js');
var sayer = new Say();
sayer.hello(); //helloAs a server-side solution, CommonJS requires a compatible script loader as a prerequisite. The script loader must support functions called require and module.exports, which import and export modules to each other.
Node.jsNode takes some ideas from CommonJS and creates its own modular implementation. Due to Node's popularity on the server side, the module form of Node is (incorrectly) called CommonJS.
Node.js modules can be divided into two major categories, one is the core module and the other is the file module.
Core module is the module provided in the Node.js standard API, such as fs, http, net, etc. These are modules officially provided by Node.js and compiled into binary code. Get the core module directly through require, such as require('fs'). The core module has the highest loading priority. If there is a module naming conflict with the core module, Node.js will always load the core module.
File module is a module stored as a separate file (or folder), which may be JavaScript code, JSON or compiled C/C++ code. When the file module extension is not explicitly specified, Node.js will attempt to add .js, .json, and .node (compiled C/C++ code) respectively.
Loading method
Load module by path
If the require parameter starts with "/", then it will be absolute The module name is searched for by path. If the parameter starts with "./" or "../", then the module is searched for by relative path.
Load the module by searching the node_modules directory
If the require parameter does not start with "/", "./", "../" , and the module is not a core module, then the module must be loaded by searching node_modules. The packages we use npm to obtain are usually loaded in this way.
Loading cache
Node.js module will not be loaded repeatedly. This is because Node.js caches all loaded file modules through the file name, so it will not be accessed again in the future. Reloaded.
Note: Node.js is cached based on the actual file name, not the parameters provided by require(), which means that even if you pass require('express') and require(' respectively ./node_modules/express') is loaded twice, and it will not be loaded twice, because although the parameters are different twice, the parsed file is the same.
Modules in Node.js run as singletons after loading, and follow the value transfer principle: if it is an object, it is equivalent to a reference to this object.
Module loading process
The work of loading file modules is mainly implemented and completed by the native module module. The native module has been loaded at startup, and the process directly calls the runMain static method.
例如运行: node app.js

Module.runMain = function () {
    // Load the main module--the command line argument.
    Module._load(process.argv[1], null, true);
};

//_load静态方法在分析文件名之后执行
var module = new Module(id, parent);

//并根据文件路径缓存当前模块对象,该模块实例对象则根据文件名加载。
module.load(filename);具体说一下上文提到了文件模块的三类模块,这三类文件模块以后缀来区分,Node.js会根据后缀名来决定加载方法,具体的加载方法在下文require.extensions中会介绍。
.js 通过fs模块同步读取js文件并编译执行。
.node 通过C/C++进行编写的Addon。通过dlopen方法进行加载。
.json 读取文件,调用JSON.parse解析加载。
接下来详细描述js后缀的编译过程。Node.js在编译js文件的过程中实际完成的步骤有对js文件内容进行头尾包装。以app.js为例,包装之后的app.js将会变成以下形式:
//circle.js
var PI = Math.PI;
exports.area = function (r) {
    return PI * r * r;
};
exports.circumference = function (r) {
    return 2 * PI * r;
};

//app.js
var circle = require('./circle.js');
console.log( 'The area of a circle of radius 4 is ' + circle.area(4));

//app包装后
(function (exports, require, module, __filename, __dirname) {
    var circle = require('./circle.js');
    console.log('The area of a circle of radius 4 is ' + circle.area(4));
});

//这段代码会通过vm原生模块的runInThisContext方法执行(类似eval,只是具有明确上下文,不污染全局),返回为一个具体的function对象。最后传入module对象的exports,require方法,module,文件名,目录名作为实参并执行。这就是为什么require并没有定义在app.js 文件中,但是这个方法却存在的原因。从Node.js的API文档中可以看到还有__filename、__dirname、module、exports几个没有定义但是却存在的变量。其中__filename和__dirname在查找文件路径的过程中分析得到后传入的。module变量是这个模块对象自身,exports是在module的构造函数中初始化的一个空对象({},而不是null)。
在这个主文件中,可以通过require方法去引入其余的模块。而其实这个require方法实际调用的就是load方法。
load方法在载入、编译、缓存了module后,返回module的exports对象。这就是circle.js文件中只有定义在exports对象上的方法才能被外部调用的原因。
以上所描述的模块载入机制均定义在lib/module.js中。
require 函数
require 引入的对象主要是函数。当 Node 调用 require() 函数,并且传递一个文件路径给它的时候,Node 会经历如下几个步骤:
Resolving:找到文件的绝对路径;
Loading:判断文件内容类型;
Wrapping:打包,给这个文件赋予一个私有作用范围。这是使 require 和 module 模块在本地引用的一种方法;
Evaluating:VM 对加载的代码进行处理的地方;
Caching:当再次需要用这个文件的时候,不需要重复一遍上面步骤。
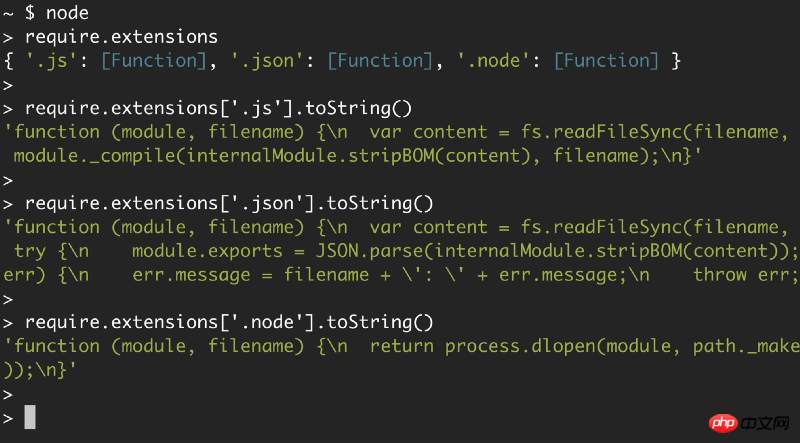
require.extensions 来查看对三种文件的支持情况

可以清晰地看到 Node 对每种扩展名所使用的函数及其操作:对 .js 文件使用 module._compile;对 .json 文件使用 JSON.parse;对 .node 文件使用 process.dlopen。
文件查找策略
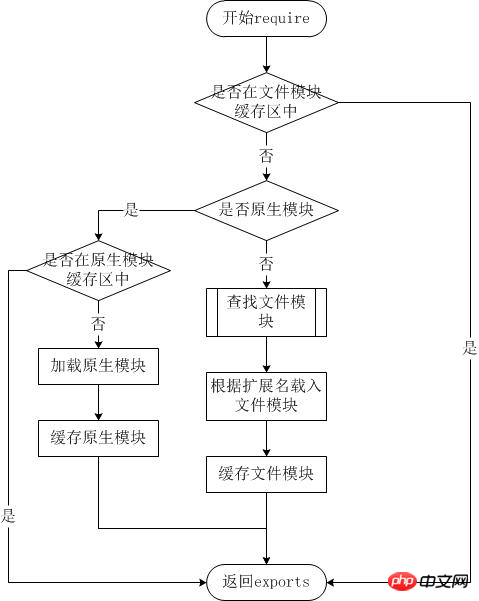
从文件模块缓存中加载
尽管原生模块与文件模块的优先级不同,但是优先级最高的是从文件模块的缓存中加载已经存在的模块。
从原生模块加载
原生模块的优先级仅次于文件模块缓存的优先级。require方法在解析文件名之后,优先检查模块是否在原生模块列表中。以http模块为例,尽管在目录下存在一个http、http.js、http.node、http.json文件,require(“http”)都不会从这些文件中加载,而是从原生模块中加载。
原生模块也有一个缓存区,同样也是优先从缓存区加载。如果缓存区没有被加载过,则调用原生模块的加载方式进行加载和执行。
从文件加载
当文件模块缓存中不存在,而且不是原生模块的时候,Node.js会解析require方法传入的参数,并从文件系统中加载实际的文件,加载过程中的包装和编译细节在前面说过是调用module._load方法。
··
当 Node 遇到 require(X) 时,按下面的顺序处理。

(1)如果 X 是内置模块(比如 require('http'))
  a. 返回该模块。
  b. 不再继续执行。

(2)如果 X 以 "./" 或者 "/" 或者 "../" 开头
  a. 根据 X 所在的父模块,确定 X 的绝对路径。
  b. 将 X 当成文件,依次查找下面文件,只要其中有一个存在,就返回该文件,不再继续执行。
        X
        X.js
        X.json
        X.node

  c. 将 X 当成目录,依次查找下面文件,只要其中有一个存在,就返回该文件,不再继续执行。
        X/package.json(main字段)
        X/index.js
        X/index.json
        X/index.node

(3)如果 X 不带路径
  a. 根据 X 所在的父模块,确定 X 可能的安装目录。
  b. 依次在每个目录中,将 X 当成文件名或目录名加载。

(4) 抛出 "not found"
模块循环依赖
//创建两个文件,module1.js 和 module2.js,并且让它们相互引用
    // module1.js
    exports.a = 1;
    require('./module2');
    exports.b = 2;
    exports.c = 3;

    // module2.js
    const Module1 = require('./module1');
console.log('Module1 is partially loaded here', Module1);在 module1 完全加载之前需要先加载 module2,而 module2 的加载又需要 module1。这种状态下,我们从 exports 对象中能得到的就是在发生循环依赖之前的这部分。上面代码中,只有 a 属性被引入,因为 b 和 c 都需要在引入 module2 之后才能加载进来。
Node 使这个问题简单化,在一个模块加载期间开始创建 exports 对象。如果它需要引入其他模块,并且有循环依赖,那么只能部分引入,也就是只能引入发生循环依赖之前所定义的这部分。
AMD 是 Asynchronous Module Definition 的简称,即“异步模块定义”,是从 CommonJS 讨论中诞生的。AMD 优先照顾浏览器的模块加载场景,使用了异步加载和回调的方式。
AMD 和 CommonJS 一样需要脚本加载器,尽管 AMD 只需要对 define 方法的支持。define 方法需要三个参数:模块名称,模块运行的依赖数组,所有依赖都可用之后执行的函数(该函数按照依赖声明的顺序,接收依赖作为参数)。只有函数参数是必须的。define 既是一种引用模块的方式,也是定义模块的方式。
// file lib/sayModule.js
define(function (){
    return {
        sayHello: function () {
            console.log('hello');
        }
    };
});

//file main.js
define(['./lib/sayModule'], function (say){
    say.sayHello(); //hello
})main.js 作为整个应用的入口模块,我们使用 define 关键字声明了该模块以及外部依赖(没有生命模块名称);当我们执行该模块代码时,也就是执行 define 函数的第二个参数中定义的函数功能,其会在框架将所有的其他依赖模块加载完毕后被执行。这种延迟代码执行的技术也就保证了依赖的并发加载。
RequireJSRequireJS 是一个前端的模块化管理的工具库,遵循AMD规范,通过一个函数来将所有所需要的或者说所依赖的模块实现装载进来,然后返回一个新的函数(模块),我们所有的关于新模块的业务代码都在这个函数内部操作,其内部也可无限制的使用已经加载进来的以来的模块。
<script data-main='scripts/main' src='scripts/require.js'></script> //scripts下的main.js则是指定的主代码脚本文件,所有的依赖模块代码文件都将从该文件开始异步加载进入执行。
defined用于定义模块,RequireJS要求每个模块均放在独立的文件之中。按照是否有依赖其他模块的情况分为独立模块和非独立模块。
1、独立模块 不依赖其他模块。直接定义
define({
    methodOne: function (){},
    methodTwo: function (){}
});

//等价于

define(function (){
    return {
        methodOne: function (){},
        methodTwo: function (){}
    };
});2、非独立模块,对其他模块有依赖
define([ 'moduleOne', 'moduleTwo' ], function(mOne, mTwo){
    ...
});

//或者

define( function( require ){
    var mOne = require( 'moduleOne' ),
        mTwo = require( 'moduleTwo' );
    ...
});如上代码, define中有依赖模块数组的 和 没有依赖模块数组用require加载 这两种定义模块,调用模块的方法合称为AMD模式,定义模块清晰,不会污染全局变量,清楚的显示依赖关系。AMD模式可以用于浏览器环境并且允许非同步加载模块,也可以按需动态加载模块。
CMD(Common Module Definition),在CMD中,一个模块就是一个文件。
全局函数define,用来定义模块。
参数 factory 可以是一个函数,也可以为对象或者字符串。
当 factory 为对象、字符串时,表示模块的接口就是该对象、字符串。
定义JSON数据模块:
define({ "foo": "bar" });factory 为函数的时候,表示模块的构造方法,执行构造方法便可以得到模块向外提供的接口。
define( function(require, exports, module) {
    // 模块代码
});SeaJSsea.js 核心特征:
遵循CMD规范,与NodeJS般的书写模块代码。
依赖自动加载,配置清晰简洁。
seajs.use用来在页面中加载一个或者多个模块
 // 加载一个模块
seajs.use('./a');

// 加载模块,加载完成时执行回调
seajs.use('./a',function(a){
    a.doSomething();
});

// 加载多个模块执行回调
seajs.use(['./a','./b'],function(a , b){
    a.doSomething();
    b.doSomething();
});AMD和CMD最大的区别是对依赖模块的执行时机处理不同,注意不是加载的时机或者方式不同。
很多人说requireJS是异步加载模块,SeaJS是同步加载模块,这么理解实际上是不准确的,其实加载模块都是异步的,只不过AMD依赖前置,js可以方便知道依赖模块是谁,立即加载,而CMD就近依赖,需要使用把模块变为字符串解析一遍才知道依赖了那些模块,这也是很多人诟病CMD的一点,牺牲性能来带来开发的便利性,实际上解析模块用的时间短到可以忽略。
为什么说是执行时机处理不同?
同样都是异步加载模块,AMD在加载模块完成后就会执行该模块,所有模块都加载执行完后会进入回调函数,执行主逻辑,这样的效果就是依赖模块的执行顺序和书写顺序不一定一致,看网络速度,哪个先下载下来,哪个先执行,但是主逻辑一定在所有依赖加载完成后才执行。
CMD加载完某个依赖模块后并不执行,只是下载而已,在所有依赖模块加载完成后进入主逻辑,遇到require语句的时候才执行对应的模块,这样模块的执行顺序和书写顺序是完全一致的。
统一模块定义(UMD:Universal Module Definition )就是将 AMD 和 CommonJS 合在一起的一种尝试,常见的做法是将CommonJS 语法包裹在兼容 AMD 的代码中。
(function(define) {
    define(function () {
        return {
            sayHello: function () {
                console.log('hello');
            }
        };
    });
}(
    typeof module === 'object' && module.exports && typeof define !== 'function' ?
    function (factory) { module.exports = factory(); } :
    define
));该模式的核心思想在于所谓的 IIFE(Immediately Invoked Function Expression),该函数会根据环境来判断需要的参数类别
ES6 的模块自动采用严格模式,不管有没有在模块头部加上"use strict";。
严格模式主要有以下限制。
变量必须声明后再使用
函数的参数不能有同名属性,否则报错
不能使用with语句
不能对只读属性赋值,否则报错
不能使用前缀0表示八进制数,否则报错
不能删除不可删除的属性,否则报错
不能删除变量delete prop,会报错,只能删除属性delete global[prop]
eval不会在它的外层作用域引入变量
eval和arguments不能被重新赋值
arguments不会自动反映函数参数的变化
不能使用arguments.callee
不能使用arguments.caller
禁止this指向全局对象
不能使用fn.caller和fn.arguments获取函数调用的堆栈
增加了保留字(比如protected、static和interface)
一个模块,就是一个对其他模块暴露自己的属性或者方法的文件。
作为一个模块,它可以选择性地给其他模块暴露(提供)自己的属性和方法,供其他模块使用。
// profile.js
export var firstName = 'qiqi';
export var lastName = 'haobenben';
export var year = 1992;

//等价于

var firstName = 'qiqi';
var lastName = 'haobenben';
var year = 1992;
export {firstName, lastName, year}1、 通常情况下,export输出的变量就是本来的名字,但是可以使用as关键字重命名。
function v1() { ... }
function v2() { ... }

export {
  v1 as streamV1,
  v2 as streamV2,
  v2 as streamLatestVersion
};

//上面代码使用as关键字,重命名了函数v1和v2的对外接口。重命名后,v2可以用不同的名字输出两次。2、 需要特别注意的是,export命令规定的是对外的接口,必须与模块内部的变量建立一一对应关系。
// 报错
export 1;

// 报错
var m = 1;
export m;

//上面两种写法都会报错,因为没有提供对外的接口。第一种写法直接输出1,第二种写法通过变量m,还是直接输出1。1只是一个值,不是接口。

/ 写法一
export var m = 1;

// 写法二
var m = 1;
export {m};

// 写法三
var n = 1;
export {n as m};

//上面三种写法都是正确的,规定了对外的接口m。其他脚本可以通过这个接口,取到值1。它们的实质是,在接口名与模块内部变量之间,建立了一一对应的关系。3、最后,export命令可以出现在模块的任何位置,只要处于模块顶层就可以。如果处于块级作用域内,就会报错,接下来说的import命令也是如此。
function foo() {
  export default 'bar' // SyntaxError
}
foo()作为一个模块,可以根据需要,引入其他模块的提供的属性或者方法,供自己模块使用。
1、 import命令接受一对大括号,里面指定要从其他模块导入的变量名。大括号里面的变量名,必须与被导入模块(profile.js)对外接口的名称相同。如果想为输入的变量重新取一个名字,import命令要使用as关键字,将输入的变量重命名。
import { lastName as surename } from './profile';2、import后面的from指定模块文件的位置,可以是相对路径,也可以是绝对路径,.js路径可以省略。如果只是模块名,不带有路径,那么必须有配置文件,告诉 JavaScript 引擎该模块的位置。
3、注意,import命令具有提升效果,会提升到整个模块的头部,首先执行。
foo();

import { foo } from 'my_module';

//上面的代码不会报错,因为import的执行早于foo的调用。这种行为的本质是,import命令是编译阶段执行的,在代码运行之前。4、由于import是静态执行,所以不能使用表达式和变量,这些只有在运行时才能得到结果的语法结构。
/ 报错
import { 'f' + 'oo' } from 'my_module';

// 报错
let module = 'my_module';
import { foo } from module;

// 报错
if (x === 1) {
  import { foo } from 'module1';
} else {
  import { foo } from 'module2';
}5、最后,import语句会执行所加载的模块,因此可以有下面的写法。
import 'lodash';
//上面代码仅仅执行lodash模块,但是不输入任何值。
每个模块支持我们导出一个没有名字的变量,使用关键语句export default来实现.
export default function(){
            console.log("I am default Fn");
        }
//使用export default关键字对外导出一个匿名函数,导入这个模块的时候,可以为这个匿名函数取任意的名字

//取任意名字均可
import sayDefault from "./module-B.js";
sayDefault();
//结果:I am default Fn1、默认输出和正常输出的比较
// 第一组
export default function diff() { // 输出
  // ...
}

import diff from 'diff'; // 输入

// 第二组
export function diff() { // 输出
  // ...
};

import {diff} from 'diff'; // 输入

//上面代码的两组写法,第一组是使用export default时,对应的import语句不需要使用大括号;第二组是不使用export default时,对应的import语句需要使用大括号。export default命令用于指定模块的默认输出。显然,一个模块只能有一个默认输出,因此export default命令只能使用一次。所以,import命令后面才不用加大括号,因为只可能对应一个方法。
2、因为export default本质是将该命令后面的值,赋给default变量以后再默认,所以直接将一个值写在export default之后。
/ 正确
export default 42;

// 报错
export 42;

//上面代码中,后一句报错是因为没有指定对外的接口,而前一句指定外对接口为default。
3、如果想在一条import语句中,同时输入默认方法和其他变量,可以写成下面这样。
import _, { each } from 'lodash';

//对应上面代码的export语句如下
export default function (){
    //...
}
export function each (obj, iterator, context){
    //...
}如果在一个模块之中,先输入后输出同一个模块,import语句可以与export语句写在一起。
export { foo, bar } from 'my_module';

// 等同于
import { foo, bar } from 'my_module';
export { foo, bar };

/ 接口改名
export { foo as myFoo } from 'my_module';

// 整体输出
export * from 'my_module';注意事项
1、声明的变量,对外都是只读的。但是导出的是对象类型的值,就可修改。
2、导入不存在的变量,值为undefined。
ES6 中,imports 是 exprts 的只读视图,直白一点就是,imports 都指向 exports 原本的数据,比如:
//------ lib.js ------
export let counter = 3;
export function incCounter() {
    counter++;
}

//------ main.js ------
import { counter, incCounter } from './lib';

// The imported value `counter` is live
console.log(counter); // 3
incCounter();
console.log(counter); // 4

// The imported value can’t be changed
counter++; // TypeError因此在 ES6 中处理循环引用特别简单,看下面这段代码:
//------ a.js ------
import {bar} from 'b'; // (1)
export function foo() {
  bar(); // (2)
}

//------ b.js ------
import {foo} from 'a'; // (3)
export function bar() {
  if (Math.random()) {
    foo(); // (4)
  }
}假设先加载模块 a,在模块 a 加载完成之后,bar 间接性地指向的是模块 b 中的 bar。无论是加载完成的 imports 还是未完成的 imports,imports 和 exports 之间都有一个间接的联系,所以总是可以正常工作。
//---module-B.js文件---
//导出变量:name
export var name = "cfangxu";

moduleA模块代码:
//导入 模块B的属性 name
import { name } from "./module-B.js";
console.log(name)
//打印结果:cfangxu批量导出
//属性name
var name = "cfangxu";
//属性age
var age  = 26;
//方法 say
var say = function(){
            console.log("say hello");
         }
//批量导出
export {name,age,say}批量导入
//导入 模块B的属性
import { name,age,say } from "./module-B.js";
console.log(name)
//打印结果:cfangxu
console.log(age)
//打印结果:26
say()
//打印结果:say hello重命名导入变量
import {name as myName} from './module-B.js';
console.log(myName) //cfangxu整体导入
/使用*实现整体导入
import * as obj from "./module-B.js";
console.log(obj.name)
//结果:"cfangxu"
console.log(obj.age)
//结果:26
obj.say();
//结果:say hello
相关推荐:
JavaScript的模块化:封装(闭包),继承(原型) 介绍_javascript技巧
Understand the modular development of Javascript_javascript skills
The above is the detailed content of The most complete explanation of JavaScript modules. For more information, please follow other related articles on the PHP Chinese website!


