This article mainly introduces the WebApi2 file and image upload and download functions. Friends in need can refer to
Asp.Net Framework webapi2 File upload and download The front-end interface is executed using Ajax
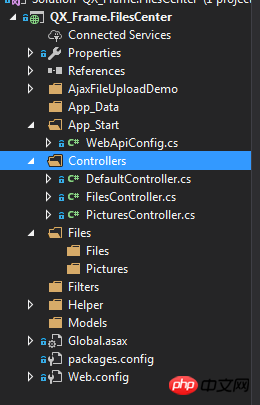
1. Project structure

1.App_Start is configured with cross- Domain access to avoid requests that cannot be submitted due to cross-domain issues. The specific cross-domain configuration method is as follows, if you know it, please skip it by yourself.
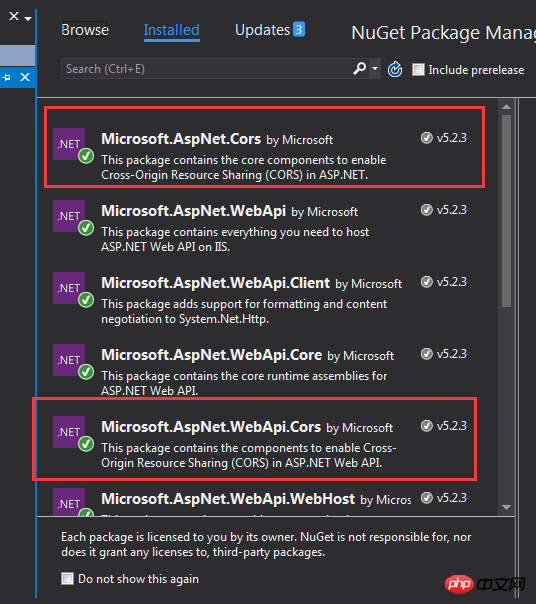
Cross-domain configuration: NewGet installs dll Microsofg.AspNet.Cors

Then write the cross-domain configuration code in WebApiConfig.cs under the App_Start folder .
public static class WebApiConfig
  {
    public static void Register(HttpConfiguration config)
    {
      // Web API configuration and services
      // Web API routes
      config.MapHttpAttributeRoutes();
      // Web API configuration and services
      //跨域配置 //need reference from nuget
      config.EnableCors(new EnableCorsAttribute("*", "*", "*"));
      config.Routes.MapHttpRoute(
        name: "DefaultApi",
        routeTemplate: "api/{controller}/{id}",
        defaults: new { id = RouteParameter.Optional }
      );
      //if config the global filter input there need not write the attributes
      //config.Filters.Add(new App.WebApi.Filters.ExceptionAttribute_DG());
    }
}Even if the cross-domain is completed, please test it yourself.
2. Create two new controllers, one PicturesController.cs and one FilesController.cs. Of course, pictures are also files. Here pictures and files are processed in different ways. Because the file upload of the picture method was not successful, the other Find another way. If anyone here has a better way, please feel free to enlighten me!
2. Project code
1. Let’s first talk about the image upload and download controller interface. There is actually nothing to say here, just Get Get the file, the parameter is the full name of the file; Post upload the file; directly upload the code.
using QX_Frame.App.WebApi;
using QX_Frame.FilesCenter.Helper;
using QX_Frame.Helper_DG;
using QX_Frame.Helper_DG.Extends;
using System;
using System.Collections.Generic;
using System.Diagnostics;
using System.IO;
using System.Linq;
using System.Net;
using System.Net.Http;
using System.Net.Http.Headers;
using System.Text;
using System.Threading.Tasks;
using System.Web.Http;
/**
* author:qixiao
* create:2017-5-26 16:54:46
* */
namespace QX_Frame.FilesCenter.Controllers
{
public class PicturesController : WebApiControllerBase
{
//Get : api/Pictures
public HttpResponseMessage Get(string fileName)
{
HttpResponseMessage result = null;
DirectoryInfo directoryInfo = new DirectoryInfo(IO_Helper_DG.RootPath_MVC + @"Files/Pictures");
FileInfo foundFileInfo = directoryInfo.GetFiles().Where(x => x.Name == fileName).FirstOrDefault();
if (foundFileInfo != null)
{
FileStream fs = new FileStream(foundFileInfo.FullName, FileMode.Open);
result = new HttpResponseMessage(HttpStatusCode.OK);
result.Content = new StreamContent(fs);
result.Content.Headers.ContentType = new System.Net.Http.Headers.MediaTypeHeaderValue("application/octet-stream");
result.Content.Headers.ContentDisposition = new ContentDispositionHeaderValue("attachment");
result.Content.Headers.ContentDisposition.FileName = foundFileInfo.Name;
}
else
{
result = new HttpResponseMessage(HttpStatusCode.NotFound);
}
return result;
}
//POST : api/Pictures
public async Task<IHttpActionResult> Post()
{
if (!Request.Content.IsMimeMultipartContent())
{
throw new Exception_DG("unsupported media type", 2005);
}
string root = IO_Helper_DG.RootPath_MVC;
IO_Helper_DG.CreateDirectoryIfNotExist(root + "/temp");
var provider = new MultipartFormDataStreamProvider(root + "/temp");
// Read the form data.
await Request.Content.ReadAsMultipartAsync(provider);
List<string> fileNameList = new List<string>();
StringBuilder sb = new StringBuilder();
long fileTotalSize = 0;
int fileIndex = 1;
// This illustrates how to get the file names.
foreach (MultipartFileData file in provider.FileData)
{
//new folder
string newRoot = root + @"Files/Pictures";
IO_Helper_DG.CreateDirectoryIfNotExist(newRoot);
if (File.Exists(file.LocalFileName))
{
//new fileName
string fileName = file.Headers.ContentDisposition.FileName.Substring(1, file.Headers.ContentDisposition.FileName.Length - 2);
string newFileName = Guid.NewGuid() + "." + fileName.Split('.')[1];
string newFullFileName = newRoot + "/" + newFileName;
fileNameList.Add($"Files/Pictures/{newFileName}");
FileInfo fileInfo = new FileInfo(file.LocalFileName);
fileTotalSize += fileInfo.Length;
sb.Append($" #{fileIndex} Uploaded file: {newFileName} ({ fileInfo.Length} bytes)");
fileIndex++;
File.Move(file.LocalFileName, newFullFileName);
Trace.WriteLine("1 file copied , filePath=" + newFullFileName);
}
}
return Json(Return_Helper.Success_Msg_Data_DCount_HttpCode($"{fileNameList.Count} file(s) /{fileTotalSize} bytes uploaded successfully! Details -> {sb.ToString()}", fileNameList, fileNameList.Count));
}
}
}There may be some code written in the Help class. In fact, it is just to obtain the server root path and create the directory if it is judged that the folder does not exist. The implementation of the code is as follows:
 public static string RootPath_MVC
     {
       get { return System.Web.HttpContext.Current.Server.MapPath("~"); }
     }
//create Directory
    public static bool CreateDirectoryIfNotExist(string filePath)
    {
      if (!Directory.Exists(filePath))
      {
        Directory.CreateDirectory(filePath);
      }
      return true;
}2. The file upload and download interface is similar to that of pictures.
using QX_Frame.App.WebApi;
using QX_Frame.FilesCenter.Helper;
using QX_Frame.Helper_DG;
using System.Collections.Generic;
using System.Diagnostics;
using System.IO;
using System.Linq;
using System.Net;
using System.Net.Http;
using System.Net.Http.Headers;
using System.Text;
using System.Threading.Tasks;
using System.Web;
using System.Web.Http;
/**
 * author:qixiao
 * create:2017-5-26 16:54:46
 * */
namespace QX_Frame.FilesCenter.Controllers
{
  public class FilesController : WebApiControllerBase
  {
    //Get : api/Files
    public HttpResponseMessage Get(string fileName)
    {
      HttpResponseMessage result = null;
      DirectoryInfo directoryInfo = new DirectoryInfo(IO_Helper_DG.RootPath_MVC + @"Files/Files");
      FileInfo foundFileInfo = directoryInfo.GetFiles().Where(x => x.Name == fileName).FirstOrDefault();
      if (foundFileInfo != null)
      {
        FileStream fs = new FileStream(foundFileInfo.FullName, FileMode.Open);
        result = new HttpResponseMessage(HttpStatusCode.OK);
        result.Content = new StreamContent(fs);
        result.Content.Headers.ContentType = new System.Net.Http.Headers.MediaTypeHeaderValue("application/octet-stream");
        result.Content.Headers.ContentDisposition = new ContentDispositionHeaderValue("attachment");
        result.Content.Headers.ContentDisposition.FileName = foundFileInfo.Name;
      }
      else
      {
        result = new HttpResponseMessage(HttpStatusCode.NotFound);
      }
      return result;
    }
    //POST : api/Files
    public async Task<IHttpActionResult> Post()
    {
      //get server root physical path
      string root = IO_Helper_DG.RootPath_MVC;
      //new folder
      string newRoot = root + @"Files/Files/";
      //check path is exist if not create it
      IO_Helper_DG.CreateDirectoryIfNotExist(newRoot);
      List<string> fileNameList = new List<string>();
      StringBuilder sb = new StringBuilder();
      long fileTotalSize = 0;
      int fileIndex = 1;
      //get files from request
      HttpFileCollection files = HttpContext.Current.Request.Files;
      await Task.Run(() =>
      {
        foreach (var f in files.AllKeys)
        {
          HttpPostedFile file = files[f];
          if (!string.IsNullOrEmpty(file.FileName))
          {
            string fileLocalFullName = newRoot + file.FileName;
            file.SaveAs(fileLocalFullName);
            fileNameList.Add($"Files/Files/{file.FileName}");
            FileInfo fileInfo = new FileInfo(fileLocalFullName);
            fileTotalSize += fileInfo.Length;
            sb.Append($" #{fileIndex} Uploaded file: {file.FileName} ({ fileInfo.Length} bytes)");
            fileIndex++;
            Trace.WriteLine("1 file copied , filePath=" + fileLocalFullName);
          }
        }
      });
      return Json(Return_Helper.Success_Msg_Data_DCount_HttpCode($"{fileNameList.Count} file(s) /{fileTotalSize} bytes uploaded successfully!   Details -> {sb.ToString()}", fileNameList, fileNameList.Count));
    }
  }
}After implementing the above two controller codes, we need front-end code to debug the docking, the code is as follows.
<!doctype>
<head>
<script src="jquery-3.2.0.min.js"></script>
<!--<script src="jquery-1.11.1.js"></script>-->
<!--<script src="ajaxfileupload.js"></script>-->
<script>
$(document).ready(function () {
var appDomain = "http://localhost:3997/";
$("#btn_fileUpload").click(function () {
/**
* 用ajax方式上传文件 -----------
* */
//-------asp.net webapi fileUpload
//
var formData = new FormData($("#uploadForm")[0]);
$.ajax({
url: appDomain + 'api/Files',
type: 'POST',
data: formData,
async: false,
cache: false,
contentType: false,
processData: false,
success: function (data) {
console.log(JSON.stringify(data));
},
error: function (data) {
console.log(JSON.stringify(data));
}
});
//----end asp.net webapi fileUpload
//----.net core webapi fileUpload
// var fileUpload = $("#files").get(0);
// var files = fileUpload.files;
// var data = new FormData();
// for (var i = 0; i < files.length; i++) {
// data.append(files[i].name, files[i]);
// }
// $.ajax({
// type: "POST",
// url: appDomain+'api/Files',
// contentType: false,
// processData: false,
// data: data,
// success: function (data) {
// console.log(JSON.stringify(data));
// },
// error: function () {
// console.log(JSON.stringify(data));
// }
// });
//--------end net core webapi fileUpload
/**
* ajaxfileupload.js 方式上传文件
* */
// $.ajaxFileUpload({
// type: 'post',
// url: appDomain + 'api/Files',
// secureuri: false,
// fileElementId: 'files',
// success: function (data) {
// console.log(JSON.stringify(data));
// },
// error: function () {
// console.log(JSON.stringify(data));
// }
// });
});
//end click
})
</script>
</head>
<title></title>
<body>
<article>
<header>
<h2>article-form</h2>
</header>
<p>
<form action="/" method="post" id="uploadForm" enctype="multipart/form-data">
<input type="file" id="files" name="files" placeholder="file" multiple>file-multiple属性可以选择多项<br><br>
<input type="button" id="btn_fileUpload" value="fileUpload">
</form>
</p>
</article>
</body>At this point, all our functions have been implemented, let’s test it:

Visible, file upload Success, returned in the expected format!
Next we test single image upload ->

Then we press the returned address to access the image address.

I found that there is no pressure at all!
Test multi-image upload below ->

Perfect~
At this point, we have implemented WebApi2 file and image upload and download all functions.
Here you need to pay attention to the total size supported by the Web.config configuration upload file. What I configured here is that the maximum supported file size is 1MB
<requestFiltering>
  <requestLimits maxAllowedContentLength="1048576" />
</requestFiltering>
  <system.webServer>
   <handlers>
    <remove name="ExtensionlessUrlHandler-Integrated-4.0" />
    <remove name="OPTIONSVerbHandler" />
    <remove name="TRACEVerbHandler" />
    <add name="ExtensionlessUrlHandler-Integrated-4.0" path="*." verb="*" type="System.Web.Handlers.TransferRequestHandler" preCondition="integratedMode,runtimeVersionv4.0" />
   </handlers>
   <security>
   <requestFiltering>
    <requestLimits maxAllowedContentLength="1048576" /><!--1MB-->
    </requestFiltering>
  </security>
</system.webServer>[Related recommendations]
1. ASP.NET Free Video Tutorial
2. Detailed introduction to ASP.NET MVC--routing
3. Detailed Introducing ASP.NET MVC--controller
4. Introducing ASP.NET MVC--View in detail
The above is the detailed content of Share WebApi2 file and image upload and download function examples. For more information, please follow other related articles on the PHP Chinese website!
 How to solve the problem that Apple cannot download more than 200 files
 Get window handle method
 The difference between rest api and api
 Introduction to architectural drawing software
 html set font color size
 Check if the port is open in linux
 How to hide IP address on TikTok
 Solution to socket error 10054


