


This article mainly introduces the code style of the second part of the most comprehensive Pycharm learning tutorial in detail. It has certain reference value. Interested friends can refer to
How to create a Python project. And make it have Pycharm's coding style, as follows
1, theme
This part of the tutorial mainly introduces how to create a Python project and make it have Pycharm's coding style . You will see that Pycharm makes your source code very concise and beautiful, with appropriate indentation, spaces, etc., so Pycharm is also a tool for code quality management.
This part of the tutorial does not introduce how to use Python for programming. For more knowledge about Python programming, please refer to: Python Programming
2, Preparation
Before you start, please confirm the situation:
(1) Install Pycharm2.7 or higher version software
(2) A new Python project has been created (File→New Project). For details, please refer to: Pycharm New Project File
(3) Two directories have been added under the project: src and test_dir (File→New or Alt+Insert), for details, refer to: Pycharm New Project File
(4) The corresponding Python file has been added to the project directory (File→New or Alt+Insert), for details, refer to :Pycharm new project file
3. Code error highlighting mode
Open a new Python file for editing (F4). There are two lines in this file by default. Code: Author name and project name. The reason why these two lines of code appear is because the Python file is created based on the file template when it is created, so these two variables are predefined.
Next, enter the keyword class. When you start typing, Pycharm’s spelling prompt mechanism will immediately list candidates to help you complete the code:
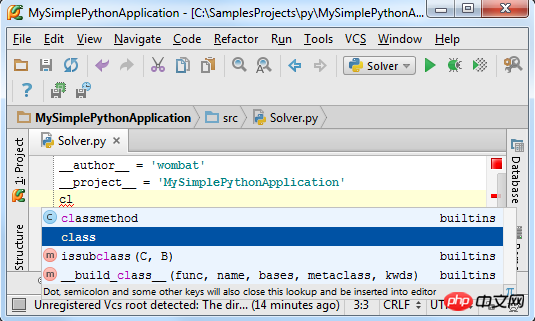
This red squiggly line marks the expected position of the next code entry, in this case, it is a typeahead delimiter. Type the class name Solver and the red wavy line will move after the class name. If you hover the mouse pointer over the wavy line, you will see the error message ("Colon expected"). Of course, the red mark on the right scroll bar will also give The same error message appears.

OK, enter a colon and press Enter. According to Python coding style standards, the next class declaration needs to be defined. Of course, we can cancel it by entering a space at this time.
4. Focus on PEP8 code style inspection
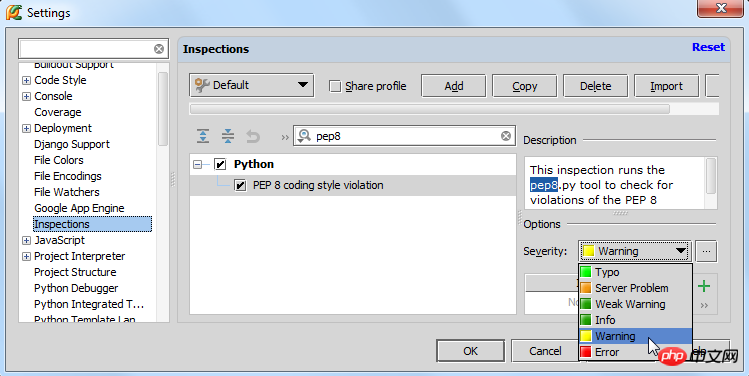
However, these warning reminders are invisible by default, so the first thing you need to do is to improve their Priority for display. Click the  Settings button, then on the Inspections page of the Settings/Preferences dialog box, type PEP8 to find all related options in the corresponding drop-down menu# Select the warning option in ##:
5. Detailed explanation of PEP8 code style
Now Ptcharm can display its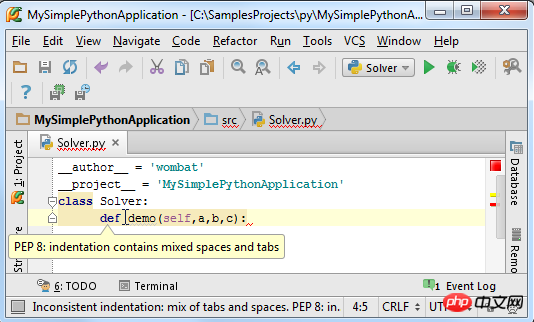

6, code inspection and related settings
By the way, if you carefully observe the default settings of the inspection profile in the Inspections page (if you are setting it up for the first time), you will find that Pycharm has applied all code rules to the current project.
Next we make two changes to the code inspection mechanism:
(1) In the test script, mark spelling errors in green
(2) In the description In the document (Comment), change the spelling error to a red prompt
Next we will introduce one by one
7. Create a scope
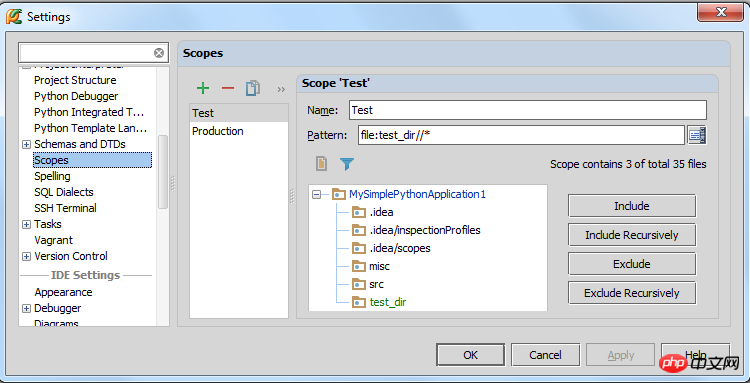
First we need to create two scopes to set up two different application scopes. Click the Settings button to enter the Settings/Preferences dialog box, open the Scopes page, click the green plus sign above to create a local type scope:

In Add New Scope In the dialog box, type the scope name, and then select the directory that needs to be included in the current scope in the project manager (tree structure): test_dir. Note that the Pattern bar at this time has automatically displayed the loading path:
Repeat the above steps to create a new Production scope.
8. Create a code inspection control file in the new scope
Next, create a copy of the default code control file (located in Security considerations):

Then name it, for example, we name it MyProjectProfile here. This new config file is a copy of the previous default configuration file, and the settings of the two are exactly the same.
Next, select the code control file we copied, locate the Spelling item and make corresponding changes. To quickly find the Spelling option leaf, just enter Spel in the Search field.
Then add the Test scope we created before by clicking the green plus sign, and then click again to add the Production scope:

In Test In the scope, the strict level of code inspection is shown on the left side of the figure. There are similar settings in the Production scope, but the security level in the selected drop-down list is different:
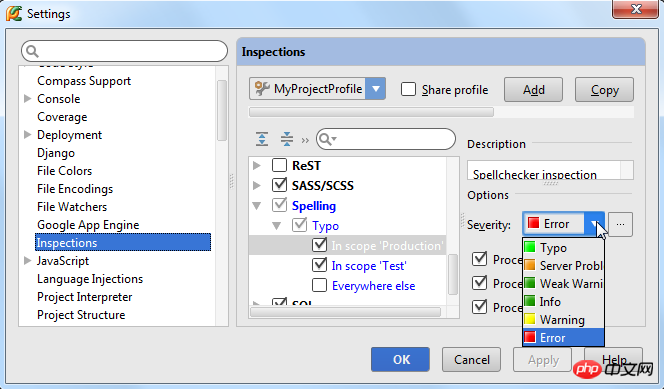
Pay attention to the font color of the scope name in the dialog box. If it is gray, it means that no changes have been made. If it is blue, it means that the relevant settings have been changed.
Apply the changed settings and close the dialog box.
At this point, the configuration file modified as required has been completed, named MyProjectProfile, which has different spell check settings in the Test scope and Production scope. Next, we apply this configuration to the corresponding code area, select Code→Inspect Code in the main program menu, and specify the defined scope and configuration file in the dialog box:
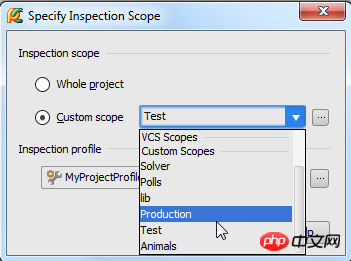
Of course we need to do it twice, because there are two definition domains that require related configuration changes, and the related configuration list can be exported.
Compare the spell check results of these two scopes:

As you can see, in the Production scope there are red wavy lines, in the Test scope Domains are green wavy lines.
9. Highlight code display of error prompts
In addition, Pycharm will also highlight some current errors based on configuration file control. .
For example, if your spell check configuration file contains the "Unresolved references" check rule, and you use a symbol that has not been imported, Pycharm will underline the unexplained Symbols to prompt you to import related modules:

Refer to the auto-import tutorial to complete the import of related modules
10, rapid prototyping and more Tips
Have you ever noticed that a yellow or red light bulb often appears on the left end of the code but you don’t expect to see it?
11. Automatic source code generation
Pycharm provides a lot of automatic code generation mechanisms. You can refer to the introduction of automatic code generation in the product documentation: Auto-generating code. Next, let’s explore Pycharm’s main code generation mechanism. Of course we need to delete the existing content in Solver.py first and start over.
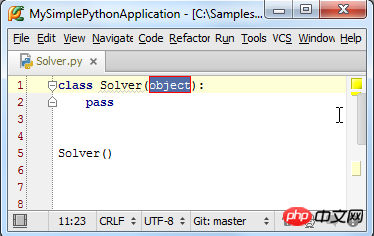
First, create a class instance:

OK, Pycharm successfully created a class:
Next we add a member method to the class. In order to achieve this, we first need to enter a period after the class instance, and then type the member function name. At this time, this member function is undefined, so Pycharm will prompt us to create one:

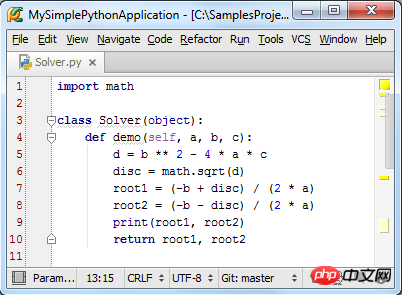
Then manually enter the source code in the function body, for example, we enter a section to calculate the quadratic The program for the equation discriminant, in which there is a function sqrt() from the math module, but it is not included yet, we continue to enter and see how Pycharm solves this problem:

Therefore , our final source code is as follows:
However, the code lacks some important logical analysis. We need to analyze the discriminant result d. If it is zero or a positive number, solve the root of the equation normally; if it is a negative number, we need to throw an exception. How will Pycharm help us complete this task?
Let’s use an if statement to include a block of code, that is, select the statement that needs to be executed when d is a non-negative number:

Then press Ctrl+Alt +T, or click the Code→Surround With option in the main menu, Pycharm will pop up a drop-down menu showing the range control structures available under the current situation:
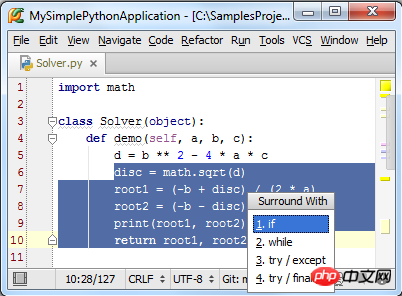
Select if option, Pycharm will automatically add if True: statement to the selected line:

Here we do not explain too much about the Boolean expression , according to We need to directly replace True with d >= 0, then position the cursor to the last line, press Enter, the cursor will appear on the next line, keep the same indentation as if, enter else: , and then observe the pre-input prompt given by Pycharm:

Enter again and move the cursor. Here we enter throws exception# under Pycharm’s powerful spelling prompt. ##'s code:
12. Code format modification
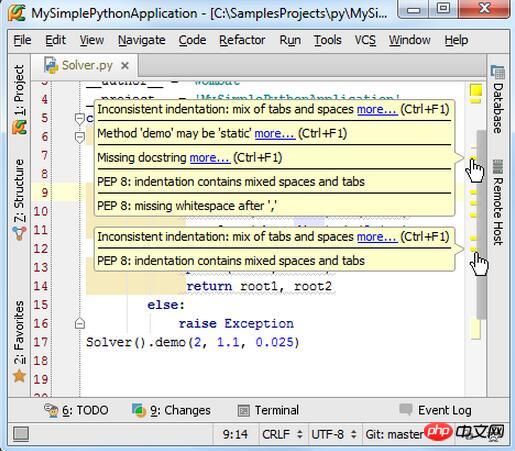
Observe the Solver.py file again and you will find that in the scroll slot on the right A lot of yellow marks are displayed. Hover the mouse over them and Pycharm will display the corresponding code format issues:
formatting, you might as well try it.
In order to call the formatting operation, just press the Ctrl+Alt+L shortcut key, or click Code→Reformat Code in the main menu. At this time, we were surprised to find that all PEP8 format problems have been eliminated. . Of course we can customize the formatting standard, open the code style settings dialog box, select the specified language (Python), and make the necessary changes:
13. Add annotation documents
After the code format is adjusted, there are still some yellow flags left on the left. After hovering the mouse A warning message similar to "Missing docstring" is prompted. The small yellow light bulb shining in front of the code also prompts the same message:
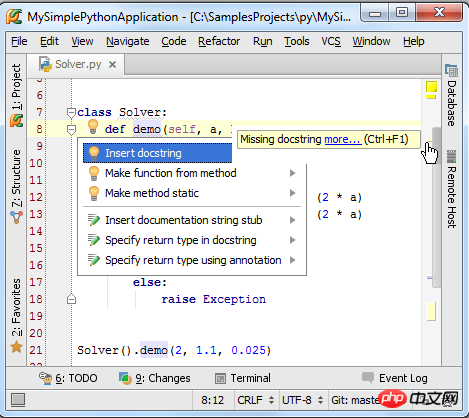
The solution is also It's very simple. Select Insert docstring in the pop-up drop-down menu, and Pycharm will automatically add a formatted text as a comment document:
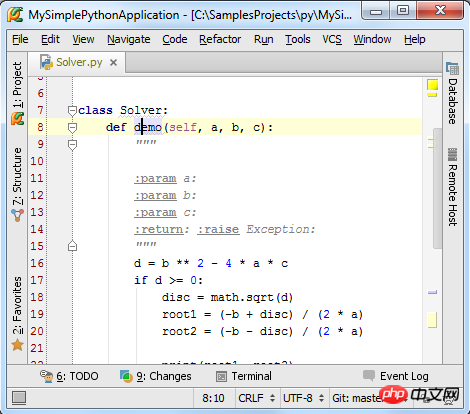
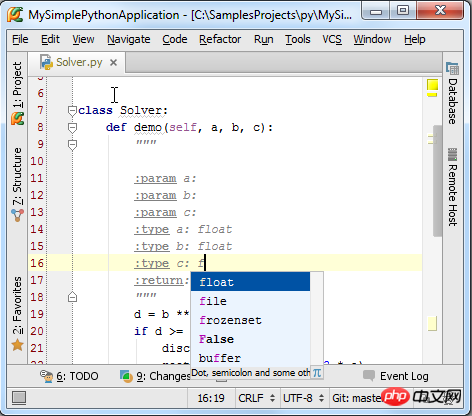
Pay attention here There are several formats for comment documents. You can set which format of comment document you currently need to insert on the Python Integrated Tools page, such as Epytext, plain text, etc.
14. Enter comments
Comments Documents are used to explain function parameters, return values, variable types and meanings. For example, if we need to control the input parameter type of demo(), we need to add the corresponding comment information in the comment document:
At this point, the comment document of the main function Finish.
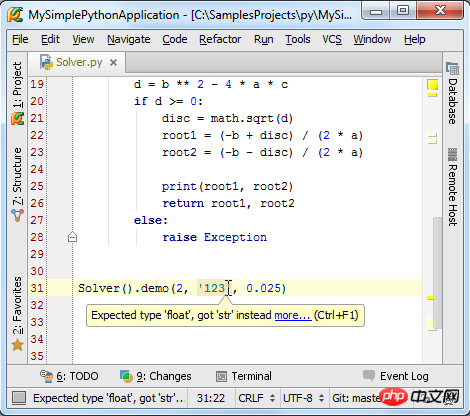
Next, during the function call, if there is a parameter type mismatch, Pycharm will give a response error message based on the annotation document:
【Related Recommendations】
2. Marco Education python basic grammar complete explanation video
The above is the detailed content of Graphical tutorial on setting code style in Pycharm. For more information, please follow other related articles on the PHP Chinese website!
 How to change pycharm to Chinese
 pycharm installation tutorial
 How to solve the problem that pycharm cannot find the module
 How to install pycharm
 The difference between python and pycharm
 How to configure the pycharm environment
 How to install the pycharm interpreter
 What does pycharm mean when running in parallel?


![[Web front-end] Node.js quick start](https://img.php.cn/upload/course/000/000/067/662b5d34ba7c0227.png)


