

Introduction
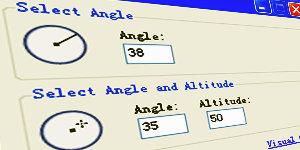
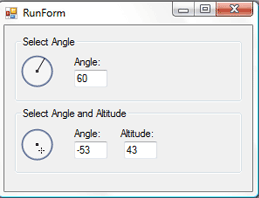
Adobe Photoshop has two very professional controls for setting special effects such as drop shadow, bevel and relief: One is the angle selector and the other is the angle and height selector (as shown in the image above).
This article will lead readers to create two custom controls to imitate the appearance and behavior of these two controls in Photoshop.
Basic Knowledge - Mathematics
Pythagorean Theorem
(That is, Pythagorean Theorem, to respect the original text, hereafter referred to as Pythagorean Theorem. Although it is a bit convoluted. ——Nobi's Note)
Using Pythagorean theorem, we can calculate the hypotenuse (longest side) of a right triangle. The calculation formula is  . In this way, the hypotenuse c is equal to
  .
.
Unit circle
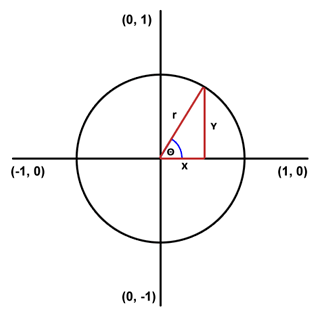
Since the next work is related to angles and circles, it is helpful for us to be familiar with the form of the unit circle first. The unit circle is a circle with center (0,0) and radius 1. In a regular grid (referring to the canvas - Nobi's note), 0 degrees (the coordinates) starts from the point (1,0) (right) and increases counterclockwise. Therefore, 90 degrees is (0,1), 180 degrees is (-1,0), 270 degrees is (0,-1), and finally 360 degrees coincide with the 0 point.
Trigonometric functions
Here we only need to know three basic trigonometric functions: sin, cos and tan (sine, cosine and tangent - Nobi Note). If we remember SOH-CAH-TOA (Annotation +), we know that the sine of a (right-angled) triangle is equal to the ratio of the opposite side to the hypotenuse, the cosine is equal to the ratio of the adjacent side to the hypotenuse, and the tangent is equal to the ratio of the opposite side to the adjacent side. .
Similarly, we know that the inverse trigonometric function is used to calculate unknown angles.
Translation Note+:
SOH-CAH-TOA is a formula used by foreigners to memorize trigonometric functions. Among them: O is the opposite (opposite side), H is the hypotenuse (the hypotenuse), and A is the adjacent side (the adjacent side).
SOH: Sine = Opposite ÷ Hypotenuse
CAH: Cosine = Adjacent ÷ Hypotenuse
TOA: Tangent = Opposite ÷ Adjacent
Commonly used functions
The custom controls we make will use the following two important functions (methods):
A function receives angle and radius as parameters and returns the angle around a certain origin. Corresponding point location. (To put it simply, it converts angles into points)
A function that completes the opposite, taking points (X, Y) as parameters to find the best matching angle.
The first function should be simpler:
private PointF DegreesToXY(float degrees, float radius, Point origin)
{
  PointF xy = new PointF();
  double radians = degrees * Math.PI / 180.0;
  xy.X = (float)Math.Cos(radians) * radius + origin.X;
  xy.Y = (float)Math.Sin(-radians) * radius + origin.Y;
  return xy;
}It should be noted that first We need to convert angles to radians. Generally speaking, we only need to study in the unit circle:

This function knows the angle and radius. Using trigonometric functions, we calculate the X and Y values, and then Just add the given initial coordinates of the origin.
It should also be noted that the negative value of the Y component is used in the function code. This is because the grid on the computer monitor is upside down (downward is positive).
The function of the second function is to convert the point position that the user clicks on the control into the corresponding angle value. This is a little trickier because we have to think about adding a few things. Due to the limited length of the article, I post part of the code here:
private float XYToDegrees(Point xy, Point origin)
{
  double angle = 0.0;
  if (xy.Y < origin.Y)
  {
    if (xy.X > origin.X)
    {
      angle = (double)(xy.X - origin.X) / (double)(origin.Y - xy.Y);
      angle = Math.Atan(angle);
      angle = 90.0 - angle * 180.0 / Math.PI;
    }
    else if (xy.X < origin.X)
    {
      //如此这般
    }
  }
  else if (xy.Y > origin.Y)
  {
    //如此这般
  }
  if (angle > 180) angle -= 360; //控制角度范围
  return (float)angle;
}This function mainly determines the position of the mouse relative to the center point by checking its position. Quadrant. Once we know the quadrants, we can use the trigonometric function (arctangent) to calculate the angle.
If the angle is greater than 180 degrees, subtract 360 degrees. This is the same as Photoshop, controlling the angle between -180 degrees and 180 degrees. Of course, you don’t need to do this step. The control can still be used without adding this line of code.
Making controls
Drawing controls
The backgrounds of these two controls are the same:
Use a Pen with a width of 2 to draw the outside Circle
Fill it with white at 40% (about 100) opacity
The center of the control is a 3x3 pixel square
protected override void OnPaint(PaintEventArgs e)
{
  //...

  //Draw
  g.SmoothingMode = SmoothingMode.AntiAlias;
  g.DrawEllipse(outline, drawRegion);
  g.FillEllipse(fill, drawRegion);

  //...光标

  g.SmoothingMode = SmoothingMode.HighSpeed;
  g.FillRectangle(Brushes.Black, originSquare);

  //...
}注意SmoothMode属性。在绘制圆圈时将该属性设置为AntiAlias(抗锯齿),这样看起来既光滑又专业。但是如果画正方形时也用抗锯齿,就会显得模糊难看,所以将SmoothMode设置为HighSpeed(高速),这样画出的正方形边缘整齐犀利。
根据控件不同,光标也有不同绘制方法。角度选择器比较简单,只需要从圆心到DegreesToXY函数返回的点连一条直线即可。角度与高度选择器则是在这点上绘制一个1x1的矩形,然后在周围绘制一个十字型光标。
处理用户点击
多亏我们有了XYToDegrees函数,处理用户点击变得特别简单。为了让我们的控件用起来和Photoshop一模一样,我们需要设置MouseDown和MouseMove事件。这样,各项数值将实时更新。这里是一个附注函数的代码:
private int findNearestAngle(Point mouseXY)
{
  int thisAngle = (int)XYToDegrees(mouseXY, origin);
  if (thisAngle != 0)
    return thisAngle;
  else
    return -1;
}高度控件需要额外的处理,就是找到中心点和鼠标点击点的距离:
private int findAltitude(Point mouseXY)
{
  float distance = getDistance(mouseXY, origin);
  int alt = 90 - (int)(90.0f * (distance / origin.X));
  if (alt < 0) alt = 0;
  return alt;
}在Photoshop中,选择点(指鼠标点击点)在圆心时,高度为90,在边缘处则为0。这样,我们可以通过找到点击点到圆心距离和半径高度比值来计算出高度。然后,用90减去该值(实际上是按90到0来翻转一下)。
自定义事件
为了让我们的自定义控件更加专业,需要控件能够在数值发生变化时以编程方式进行提醒。这就是我们要设置事件的原因。
例如,像这样给角度变化添加一个事件:
public delegate void AngleChangedDelegate();
public event AngleChangedDelegate AngleChanged;
然后,我们要做的就是每次变更Angle属性时,调用AngleChanged()(需要先判断是否为null)。
限制与改进
闪烁
没有闪烁!只需要在制作控件时设置DoubleBuffered属性为true,.NET Framework 2.0会处理剩下的工作,保证控件能流畅的重绘。
尺寸
因为控件使用基于半径(圆)的数学计算方法,因此需要保证控件的长度和宽度相等。
颜色
我是照着Photoshop的样子来的,所以并没包含背景颜色、外圈颜色这些属性。但是,浏览下代码,你会发现改成你喜欢的颜色或者让颜色可以动态修改并不是什么难事。
结论
我建议你下载项目文件(或者至少下载DEMO),这样你可以看到这俩控件用起来很爽。
协议
本文及有关代码、程序均基于CPOL(Codeproject Open License)协议。
更多Photoshop样式的角度和高度选择器控件 相关文章请关注PHP中文网!


