This time I will introduce the commonly used image uploading in mini programs.
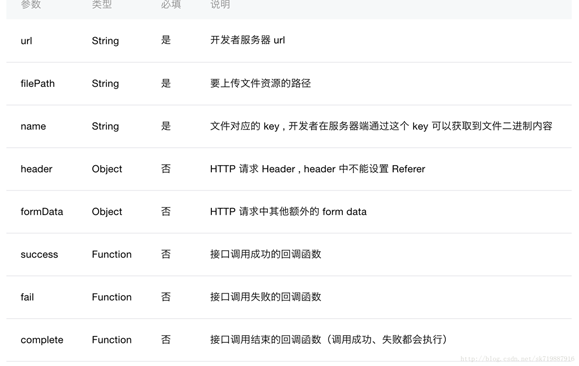
I made the image upload function a few days ago, but I was fooled. Next, let’s take a look at WeChat’s upload API.

The filePath here is the storage path of the image, and the type is actually a String, which means that only one image can be transmitted at a time. My previous interface received an array. I myself am a half-experienced PHP user, so I can only change the interface for receiving images by myself.
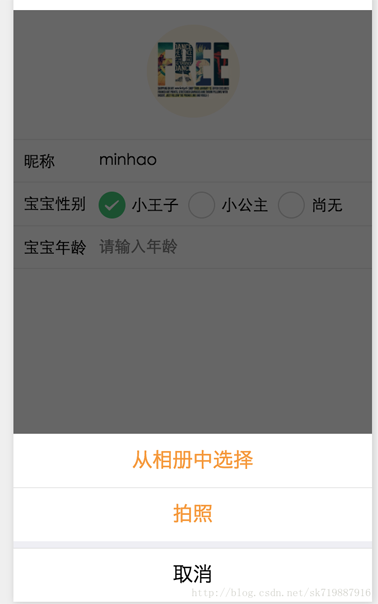
Look at the page renderings

A very common effect of modifying the avatar is to select a picture (take a photo) and then upload it.
The following is the code
The first is the wxml code of the mini program
<view class="xd-container">
<form bindsubmit="bindSaveTap">
<image class="xd-img-user1" catchtap="chooseImageTap" src="{{logo}}"></image>
<view class="xd-view-section">
 <text class="xd-abs xd-flex-left xd-text-nick">昵称</text>
 <input name="nick_name" placeholder="请输入昵称" class="xd-input" value="{{userInfo.user_name}}"/>
</view>
<view class="xd-view-section1">
 <text class="xd-abs xd-flex-left xd-text-nick">宝宝性别</text>
 <radio-group class="xd-abs xd-radio-group" name="baby_sex">
 <label class="xd-label-radio" wx:for="{{sex_items}}" wx:key="item">
 <radio color="#3cc975" value="{{item.name}}" wx:if="{{item.name==userInfo.baby_sex}}" checked="true"/>
 <radio color="#3cc975" value="{{item.name}}" wx:else checked="false"/>
 <text class="xd-radio-text">{{item.value}}</text>
 </label>
 </radio-group>
</view>
<view class="xd-view-section1">
 <text class="xd-abs xd-flex-left xd-text-nick">宝宝年龄</text>
 <input placeholder="请输入年龄" wx:if="{{userInfo.baby_age != 0}}" value="{{userInfo.baby_age}}" class="xd-input"/>
 <input name="baby_age" placeholder="请输入年龄" wx:else value="" class="xd-input"/>
</view>
<button size="default" class="xd-abs xd-subBtn" formType="submit" hover-class="xd-subBtn-hover">保存</button>
</form>
</view>I will not post the css code, just some styles.
Corresponding JS code
var util = require('../../../utils/util.js')
var app = getApp()
Page({
 data: {
sex_items: [
 {name:'1', value:'小王子'},
 {name:'2', value:'小公主'},
 {name:'0', value:'尚无'}
],
logo:null,

userInfo: {}
 },

 //事件处理函数
 bindViewTap: function() {
wx.navigateTo({
 // url: '../logs/logs'
// url: '../load/load'
})
 },
 onLoad: function () {
console.log('onLoad')
var that = this
//调用应用实例的方法获取全局数据
app.getUserInfo(function(userInfo){
 //更新数据
 console.log(userInfo);
 that.setData({
 userInfo:userInfo,
 logo:userInfo.logo
 })
})
 },

 bindSaveTap: function(e){
console.log(e)
var formData = {
 uid:util.getUserID(),
 user_name:e.detail.value.nick_name,
 baby_sex:e.detail.value.baby_sex,
 baby_age:e.detail.value.baby_age
}
 console.log(formData)
app.apiFunc.upload_file(app.apiUrl.modify_user, this.data.logo, 'photos', formData,
function(res){
 console.log(res);
},
function(){
})
 },

 chooseImageTap: function(){
let _this = this;
wx.showActionSheet({
 itemList: ['从相册中选择', '拍照'],
 itemColor: "#f7982a",
 success: function(res) {
 if (!res.cancel) {
 if(res.tapIndex == 0){
 _this.chooseWxImage('album')
 }else if(res.tapIndex == 1){
 _this.chooseWxImage('camera')
 }
 }
 }
})

 },
chooseWxImage:function(type){
let _this = this;
wx.chooseImage({
 sizeType: ['original', 'compressed'],
 sourceType: [type],
 success: function (res) {
 console.log(res);
 _this.setData({
 logo: res.tempFilePaths[0],
 })
 }
 })
 }
})Mainly explain the JS code
1, chooseImageTap method
is used to display a method for selecting pictures and taking pictures The pop-up window uses the showActionSheet, a page interactive api of WeChat. Click to view the detailed usage
Display the operation menu
2, chooseWxImage method
Mainly It is a monitor used to select pictures and receive picture path callbacks. Click to view detailed usage
Select pictures from the local album or use the camera to take pictures
3. Upload
In the success callback of the chooseWxImage method, we can see that I assigned the returned image path res.tempFilePaths[0] to the logo. Next, we only need to call the upload method. WeChat’s uploadFile method is encapsulated by me. After a while it became upload_file.
uploadFile method
//上传文件
function upload_file(url, filePath, name, formData, success, fail) {
console.log('a='+filePath)
wx.uploadFile({
 url: rootUrl + url,
 filePath:filePath,
 name:name,
 header: {
 'content-type':'multipart/form-data'
 }, // 设置请求的 header
 formData: formData, // HTTP 请求中其他额外的 form data
 success: function(res){
 console.log(res);
 if(res.statusCode ==200 && !res.data.result_code){
 typeof success == "function" && success(res.data);
 }else{
 typeof fail == "function" && fail(res);
 }
 },
 fail: function(res) {
 console.log(res);
 typeof fail == "function" && fail(res);
  }
 })
}filePath is the logo variable we passed in in upload_file, which is the absolute path of the image.
Server’s image receiving code
Anyone who has read my previous article on the login process is familiar with the fact that my server uses the PHP framework Laravel.
Here I will only post the code for receiving the image;
if(!empty($_FILES['photos'])){
  $up_arr['logo'] = upload_logo('photos','manage/images/user','logo',$user_id,0);
  $up_arr['logo'] = $up_arr['logo'][0];
  $user_info['logo'] = $Server_Http_Path . $up_arr['logo'];
}The core method is in upload_log.
Picture Receiving and Saving
if( !function_exists('upload_logo')){
 function upload_logo( $key_name='photos', $logo_path='manage/images/nurse', $pre_name='logo', $salt='20160101',$encode = 1,$make=0 ){
  $result_arr = array();
  global $Server_Http_Path,$App_Error_Conf;
  //分文件夹保存
  $date_info = getdate();
  $year = $date_info['year'];
  $mon = $date_info['mon'];
  $day = $date_info['mday'];
  $logo_path = sprintf("%s/%s/%s/%s",$logo_path,$year,$mon,$day);
  if(!is_dir($logo_path)){
   $res=mkdir($logo_path,0777,true);
  }
  //图片上传
  //foreach($photos as $key => $photo ){
  $photo = $_FILES['photos'];
  $name = $key_name;

  $file_id = Input::file($name);
  if(!empty($file_id) && $file_id -> isValid()){
   $entension = $file_id -> getClientOriginalExtension();
   if($pre_name == 'baby'){
    $new_name = $pre_name . "_" . intval($salt) ."_" .time() . "_" . salt_rand(2,2);
   }else {
    $new_name = $pre_name . "_" . intval($salt) ."_" . salt_rand(2,2);
   }
   $path_id = $file_id -> move($logo_path,$new_name."_b.".$entension);
   if(!empty($path_id)){
    $path_name = $path_id->getPathName();
    $image_size=getimagesize($path_name);
 $weight=$image_size["0"];////获取图片的宽

$height=$image_size["1"];///获取图片的高
if($pre_name == "baby" || $pre_name == "video") {

   $photo_info['url'] = $path_name;

   $photo_info['width'] = $weight;
  $photo_info['height'] = $height;
 $result_arr[] = $photo_info;
 }else{
 $result_arr[] = $path_name;
 }
    //处理图片
if($make == 1){
 $img = Image::make($path_name)->resize(200, $height*200/$weight);
$img->save($logo_path ."/".$new_name."_s.".$entension);
 //dd($img);
 // return $img->response('jpg');
    }
   }
if(empty($result_arr)){
 $response['result_code'] = -1006;
 $response['result_msg'] = $App_Error_Conf[-1006];
  return response($response);
   }
 if($encode == 1){
    $result_arr = json_encode($result_arr);
   }
  }
  return $result_arr;
 }
}This code format is really annoying, so I just sorted it out.
In this way, we have started to get started with the image upload and interface functions of the mini program.
The above is the content of the image uploading + server receiving tutorial for WeChat applet development. For more related content, please pay attention to the PHP Chinese website (m.sbmmt.com)!


