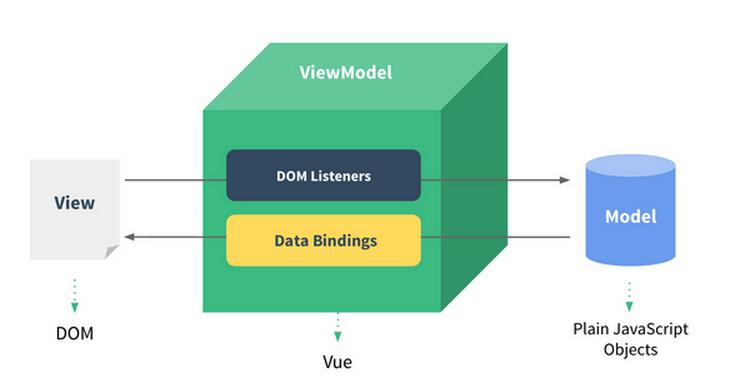
Now let’s learn Vue systematically (refer to vue.js official documentation):
Vue.js is a library for building data-driven web interfaces. Its goal is to achieve response data binding and combination view component.
Vue.js embraces the concept of data-driven views, which means that we can use special usage in ordinary HTML templates to "bind" the DOM to the underlying data. Once the binding is created, the DOM will keep the data in sync.

The following reference code corresponds to the above model
<!-- 这是我们的 View -->
<div id="example-1">
Hello {{ name }}!
</div>
// 这是我们的 Model
var exampleData = {
name: 'Vue.js'
}
// 创建一个 Vue 实例或 "ViewModel"
// 它连接 View 与 Model
var exampleVM = new Vue({
el: '#example-1', // 在一个id为'example-1'的实体上挂载
data: exampleData // 数据流
})Usually we will write the Model in the Vue instance. The following writing method has the same effect as the above writing method:
<!-- 这是我们的 View -->
<div id="example-1">
Hello {{ name }}! <!--- Vue的数据模型用{{datamodel}}包裹起来 --->
</div>
// 创建一个 Vue 实例或 "ViewModel"
// 它连接 View 与 Model<br><script>
var exampleVM = new Vue({
el: '#example-1', // 在一个id为'example-1'的实体上挂载
data: {
name: 'Vue.js'
} // 数据流
})<br></script>After such a program is executed, 'Hello Vue.js!' will be displayed in the #example-1 control.
Let’s take a look at directives:
Directives are special features with the prefix v-. The value of the directive is limited to a binding expression, such as an if directive:
hello!
There are also binding instructions, which bind certain attribute values to some values, such as:
The "v-bind" is omitted here, making the input attribute Value assignment has the effect of "computation".
Computed properties
Here is an introduction to the usage of $watch, which is used when a data needs to change based on other data:
<script><br>var vm = new Vue({
el: '#demo',
data: {
firstName: 'Foo',
lastName: 'Bar',
fullName: 'Foo Bar'
}
})<br></script>
vm.$watch('firstName', function (val) { // 当firstname改变时,立马更新vm.fullname
this.fullName = val + ' ' + this.lastName
})
vm.$watch('lastName', function (val) { // 当lastname改变时,立马更新vm.fullname
this.fullName = this.firstName + ' ' + val
})Here , all data objects can be accessed through vm.firstname, etc.
v-model
As the name suggests, it is the data model in Vue. It is used to bind data in Vue instances:
<!--- bi-direction bound --->
<div id="app">
<p>{{message}}</p>
<input v-model="message"> <!--Model,input输入的数据会立即反馈到Vue实例中-->
</div>
<script>
new Vue({
el: '#app', // View
data: {
message: 'Hello Vue.js'
}
})
</script>For example, to bind Defining a form control is to display the selected value:
<!--- 表单控件绑定-单选 --->
<div id="myselect"> // 外面这一层我一开始没有加,然后就出错了,el好像一般是挂载在<div>构件上
<select v-model="selected"> // data的数据类型是selected,值是选取的值
<option seleceted>A</option>
<option>B</option>
<option>C</option>
</select>
<span>Selected: {{ selected }}</span>
</div>
<script>
new Vue({
el: '#myselect',
data:{
selected:[]
}
})
</script><div v-if="questItem.type === 'textarea'"> // 注意是三个等号
<textarea></textarea>
</div>
<div v=else>
<div></div>
</div><ul id="demo">
<li
v-for="item in items"
class="item-{{$index}}"> <!--- $index指的是当前数组元素在数组中的位置 --->
{{parentMessage}} - {{$index}} - {{item.message}} <!--一个view结构-->
</li>
</ul>
<button id="btn1">点击我</button>
<script>
var demo= new Vue({
el: '#demo',
data:{
parentMessage: 'Parent',
items:[
{message: 'Foo'},
{message: 'Bar'}
]
}
})
</script><template>
<div> </div>
</template>
<script>
export default{
data(){ ...
},
methods:{ // 自定义方法,可对data进行处理
method1(){ ... }
...
},
components: { ... }
vuex: {
getters:{ // 获取store的数据
questionnaire: state => state.currentQuestionnaire
}
actions: { //用来分发数据容器store中mutations方法
action1(){ dispatch("SET_QUEST", item) } // dispatch用来调用父组件store的"SET_QUEST"方法
action2(){ ... }
}
directives: {
'my-directive': {
bind: function(){ //钩子函数,只调用一次,在指令第一次绑定到元素上时调用 }
update: function(newValue, oldValue) { //钩子函数,在bind之后以初始值为参数第一次调用,之后每当绑定至变化时调用 }
unbind: function(){ //钩子函数,只调用一次,在指令从元素上解绑时调用 }
}
}
// 自定义指令,在<template>中以<div v-my-directives = ""> 方式调用
}
</script>
<style> </style>


