
前言
组件(Component)是 Vue.js 最强大的功能之一。组件可以扩展 HTML 元素,封装可重用的代码。在较高层面上,组件是自定义元素,Vue.js 的编译器为它添加特殊功能。在有些情况下,组件也可以是原生 HTML 元素的形式,以 is 特性扩展。
组件开发的基础
组件可以扩展 HTML 元素,封装可重用的代码。我理解为功能模块的模板吧。
对于vue来说,组件是这个样子的,我们在html里面写
<div id="example">
 <my-component></my-component>
</div>edx
然后就出来
<div id="example">
<div>A custom component!</div>
</div>
代码
所以我们需要定义它,把 my-component的标签和代码关联起来,所以我们要定义它
// 定义
var MyComponent = Vue.extend({
template: '<div>A custom component!</div>'
})定义了之后,我们要让页面能够渲染它,让Vue知道它的存在
// 注册
 Vue.component('my-component', MyComponent)
// 创建根实例
new Vue({
 el: '#example'
})以上,是官网一个非常简单的例子 ,其实觉得和一个function的封装也差不多,定义,引入,然后执行。
然后一个组件可以引用别的组件的东西,有点像函数的互相调用啊。
var Child = Vue.extend({ /* ... */ })
var Parent = Vue.extend({
template: '...',
components: {
// <my-component> 只能用在父组件模板内
'my-component': Child
}
})一个表格组件的实例
这是官网的例子
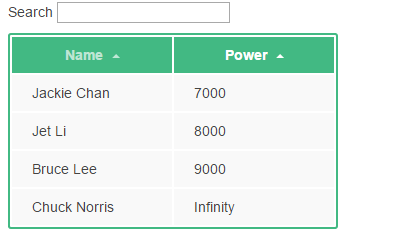
这个是一个可以排序的表格的例子。我们从头开始来制作一个可以排序的表格。
基本结构
首先分成两个部分,一个是搜索框,一个是表格本身,我们可以得到这样的结构
<div id="demo">
 <form id="search">
 Search <input name="query">
 </form>
<table>
 <thead>
 <tr>
 <th>name</th>
 <th>power</th>
 </tr>
 </thead>
 <tbody>
 <tr>
 <td>Jack Chan</td>
 <td>7000</td>
 </tr>
 </tbody>
</table>
</div>
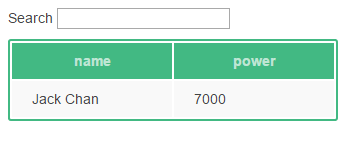
显示效果

加上基本的css
body {
 font-family: Helvetica Neue, Arial, sans-serif;
 font-size: 14px;
 color: #444;
}

table {
 border: 2px solid #42b983;
 border-radius: 3px;
 background-color: #fff;
}

th {
 background-color: #42b983;
 color: rgba(255,255,255,0.66);
 cursor: pointer;
 -webkit-user-select: none;
 -moz-user-select: none;
 -user-select: none;
}

td {
 background-color: #f9f9f9;
}

th, td {
 min-width: 120px;
 padding: 10px 20px;
}

#search {
 margin-bottom: 10px;
}显示效果如下,
提取组件
我们是想要让表格成为单独的组件,所以我们定义一个叫做 demo-grid的组件,用它来生成表格
<div id="demo">
 <form id="search">
 Search <input name="query" >
 </form>
 <demo-grid>
 </demo-grid>
</div>
代码里面关于表格的那部分给放到组件模板里面,我们定义组件。也就是用script来定义,
<script type="text/x-template" id="grid-template">
 <table>
 <thead>
 <tr>
  <th>name</th>
  <th>power</th>
 </tr>
 </thead>
 <tbody>
 <tr>
  <td>Jack Chan</td>
  <td>7000</td>
 </tr>
 </tbody>
 </table>
</script>
定义完了之后我们要在给Vue注册组件模块,然后进行Vue的渲染
Vue.component('demo-grid',{
template:"#grid-template",
});

var demo = new Vue({
el:'#demo'
})然后最后的效果是一样的,这个时候并没有数据流。
组件数据流
我们要让表格知道表格的头部和表格的内容,也就是有一个gridColumns和gridData,这个数据最开始放在Vue的Data里面
// bootstrap the demo
var demo = new Vue({
el: '#demo',
data: {
 gridColumns: ['name', 'power'],
 gridData: [
 { name: 'Chuck Norris', power: Infinity },
 { name: 'Bruce Lee', power: 9000 },
 { name: 'Jackie Chan', power: 7000 },
 { name: 'Jet Li', power: 8000 }
 ]
}
})然后我们的组件也要接受这个数据,这里我们通过类似属性的形式给组件模板传入数据,
<demo-grid
  :data="gridData"
  :columns="gridColumns">
 </demo-grid>
然后我们在组件里面把相应的数据继承下来。
Vue.component('demo-grid',{
template:"#grid-template",
props: {
 data: Array,
 columns: Array
}
});然后在模板里面替换掉
<script type="text/x-template" id="grid-template">
 <table>
 <thead>
 <tr>
  <th v-for="key in columns">{{key}}</th>
 </tr>
 </thead>
 <tbody>
 <tr v-for="entry in data">
  <td v-for="key in columns">{{entry[key]}}</td>
 </tr>
 </tbody>
 </table>
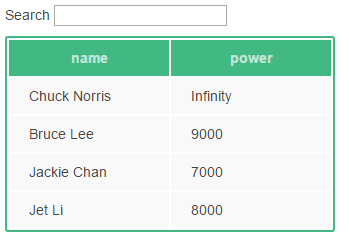
</script>效果如下
搜索功能增加
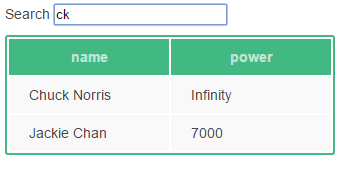
这个时候,我们想加入一个交互,也就是在搜索框增加关键词的时候,表格能够相应地变化。
首先我们要绑定搜索框的模型,也就是用searchQuery来绑定Input
<form id="search">
Search <input name="query" v-model="searchQuery">
</form>
在Vue里面增加data的初始化
var demo = new Vue({
el: '#demo',
data: {
 searchQuery: '',
 ...
})同时,在组件模板里面也进行参数传入
<demo-grid
 :data="gridData"
 :columns="gridColumns"
 :filter-key="searchQuery">
</demo-grid>
组件的定义里面要继承模板的数据,也就是在模板里面是filter-key,注意要转化驼峰写法
Vue.component('demo-grid', {
 template: '#grid-template',
 props: {
  data: Array,
  columns: Array,
  filterKey: String
 }
})
这个时候,我们的模板里面要过滤符合filterKey的数据,这里就用到了过滤器,vue提供了一个叫做filterBy的过滤器。|与过滤器,第一个为过滤器的名字,后面的是参数,| filterBy filterKey使用的就是filterBy的过滤器,参数是filterKey
<tr v-for="
 entry in data
 | filterBy filterKey>
  <td v-for="key in columns">
  {{entry[key]}}
  </td>
</tr>效果如下,我们这样就有了一个 能够过滤的表格
表格排序
这部分逻辑比前面稍微复杂一点点。首先我们给表格加一个三角形,三角形有两种,一种是正序的,一种是逆序的,我们用span来作为三角形的容器
<th v-for="key in columns"
@click="sortBy(key)"
:class="{active: sortKey == key}">
{{key | capitalize}}
<span class="arrow">
</span>
</th>三角形的样式有两种,上升的和下降的
.arrow {
 display: inline-block;
 vertical-align: middle;
 width: 0;
 height: 0;
 margin-left: 5px;
 opacity: 0.66;
}

.arrow.asc {
 border-left: 4px solid transparent;
 border-right: 4px solid transparent;
 border-bottom: 4px solid #fff;
}

.arrow.dsc {
 border-left: 4px solid transparent;
 border-right: 4px solid transparent;
 border-top: 4px solid #fff;
}dsc的效果如下

我们希望能够在不同的状态里面切换,所以我们选择在组件里面有数据存储排序的状态信息,用一个sortOrders的对象来存储排序信息 ,同时用一个sortKey来表示当前用来排序的键,我们设置为name
// register the grid component
Vue.component('demo-grid', {
template: '#grid-template',
...
data: function () {
 var sortOrders = {}
 this.columns.forEach(function (key) {
 sortOrders[key] = 1
 })
 return {
 sortKey: 'name',
 sortOrders: sortOrders
 }
}然后使用orderBy来排序
<tbody>
<tr v-for="
entry in data
| filterBy filterKey
| orderBy sortKey sortOrders[sortKey]">
 <td v-for="key in columns">
 {{entry[key]}}
 </td>
</tr>
</tbody>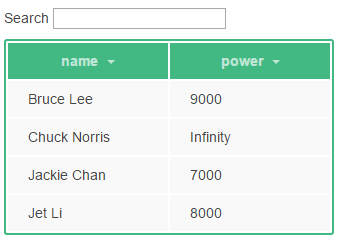
增加交互
我们希望能够通过点击表格头部来自动升序降序,所以添加鼠标事件,另外把span的样式和sortOrders[key]的值相关联,增加active的样式
<th v-for="key in columns"
@click="sortBy(key)"
:class="{active: sortKey == key}">
{{key | capitalize}}
<span class="arrow"
:class="sortOrders[key] > 0 ? 'asc' : 'dsc'">
</span>
</th>相关active的样式如下
th.active .arrow {
 opacity: 1;
}对于鼠标事件,我们定义在表格内部,也就是把sortKey定位当前活跃的元素,同时改变sortOrders[key]的值
// register the grid component
Vue.component('demo-grid', {
template: '#grid-template',
props: {
 ...
},
data: function () {
...
},
methods: {
 sortBy: function (key) {
 this.sortKey = key
 this.sortOrders[key] = this.sortOrders[key] * -1
 }
}
});总结
以上就是关于vue.js组件开发的全部内容了,希望这篇文章对大家学习或者使用vue.js能有一定的帮助,如果有疑问大家可以留言交流。
更多Detailed explanation of examples of vue.js table component development相关文章请关注PHP中文网!
 String array assignment method
 Why disabling automatic updates in Windows 11 is invalid
 How to embed CSS styles in HTML
 The difference between official replacement phone and brand new phone
 Can't open app store
 The role of parseint function
 Android desktop software recommendations
 Ethereum today's market price


