The previous section talked about the introduction of the tree control Tree Control, notification messages and related data structures. This section continues to talk about the second half, including the creation of the tree control, the main member functions and application examples of the CTreeCtrl class.
Creation of tree control
MFC provides the CTreeCtrl class for the tree control, which encapsulates all operations of the tree control.
There are two ways to create a tree control. One is to drag the Tree Control directly into the dialog box template, and the other is to create it through the Create member function of the CTreeCtrl class. The following mainly talks about the latter.
The prototype of the Create member function of the CTreeCtrl class is as follows:
virtual BOOL Create(
   DWORD dwStyle,
   const RECT& rect,
   CWnd* pParentWnd,
   UINT nID
);
The prototype of this function is similar to the Create function of all control classes mentioned earlier. dwStyle specifies the combination of tree control styles, rect specifies the position and size of the tree control window, pParentWnd is the pointer to the tree control's parent window, and nID specifies the ID of the tree control. Next, we will mainly talk about the main styles and meanings of tree controls.
TVS_DISABLEDRAGDROP: Prohibit the tree control from sending TVN_BEGINDRAG notification messages, that is, drag operations are not supported
TVS_EDITLABELS: Users can edit the label text of nodes
TVS_HASBUTTONS: Display with " A small box with +" or "-" indicates whether an item can be expanded or has been expanded
TVS_HASLINES: Connect lines between parent nodes and child nodes to display the structure of the tree more clearly
TVS_LINESATROOT: Connect the line at the root node
TVS_SHOWSELALWAYS: Even if the control loses the input focus, the selection status of the item is still displayed
Similarly, when creating a tree control dynamically, in addition to being able to specify the above In addition to the combination of styles, the WS_CHILD and WS_VISIBLE styles are generally specified.
When you directly drag the Tree Control into the dialog box template to create a tree control, you can set its style in the property page of the tree control, which corresponds to the above style. For example, the property Has Lines corresponds to It’s TVS_HASLINES style.
Main member functions of the CTreeCtrl class
CImageList* SetImageList(CImageList * pImageList,int nImageListType);
If the tree node needs to display an icon, you must first create an object of the CImageList class and add multiple images to it Form an image sequence, and then call the SetImageList function to set the image sequence for the tree control. When inserting a node with InsertItem, just pass in the index of the desired image in the image sequence. This will be demonstrated in later examples. The parameter pImageList is a pointer to an object of the image sequence class CImageList. If it is NULL, all images in the tree control will be deleted. The parameter nImageListType specifies the type of image sequence, which can be TVSIL_NORMAL (normal image sequence) or TVSIL_STATE (state image sequence, using images to represent the status of nodes).
UINT GetCount( ) const;
Get the number of nodes in the tree control.
DWORD_PTR GetItemData(HTREEITEM hItem) const;
Get additional 32-bit data of a specified node in the tree control. The parameter hItem is the handle of the specified tree node.
BOOL SetItemData(HTREEITEM hItem,DWORD_PTR dwData);
Set additional 32-bit data for a specified node in the tree control. The parameter hItem is the same as above, and dwData is the 32-bit data to be set.
CString GetItemText(HTREEITEM hItem) const;
Get the label text of a specified node in the tree control. The parameter hItem is the same as above. The return value is a string containing the label text.
BOOL SetItemText(HTREEITEM hItem,LPCTSTR lpszItem);
Set the label text for a specified node in the tree control. The parameter hItem is the same as above, and lpszItem is the pointer to the string containing the label text.
HTREEITEM GetNextSiblingItem(HTREEITEM hItem) const;
Get the next sibling node of a specified node in the tree control. The parameter hItem is the same as above. The return value is the handle to the next sibling node.
HTREEITEM GetPrevSiblingItem(HTREEITEM hItem) const;
Get the previous sibling node of a specified node in the tree control. The parameter hItem is the same as above. The return value is the handle of the previous sibling node.
HTREEITEM GetParentItem(HTREEITEM hItem) const;
Get the parent node of a specified node in the tree control. The parameter hItem is the same as above. The return value is a handle to the parent node.
HTREEITEM GetRootItem( ) const;
Get the handle of the root node of the tree control.
HTREEITEM GetSelectedItem( ) const;
Get the handle of the currently selected node of the tree control.
BOOL DeleteAllItems( );
Delete all nodes in the tree control. Returns TRUE if the deletion is successful, otherwise returns FALSE.
BOOL DeleteItem(HTREEITEM hItem);
Delete a node in the tree control. The parameter hItem is the handle of the node to be deleted. Returns TRUE if the deletion is successful, otherwise returns FALSE.
HTREEITEM InsertItem(LPCTSTR lpszItem,int nImage,int nSelectedImage,HTREEITEM hParent = TVI_ROOT,HTREEITEM hInsertAfter = TVI_LAST);
Insert a new node in the tree control. The parameter lpszItem is the pointer to the label text string of the new node, the parameter nImage is the index of the new node's icon in the tree control image sequence, the parameter nSelectedImage is the index of the new node's icon in the image sequence when it is selected, and the parameter hParent is The handle of the parent node of the inserted node. The parameter hInsertAfter is the handle of the previous node of the new node, that is, the new node will be inserted after the hInsertAfter node.
BOOL SelectItem(HTREEITEM hItem);
Select the specified tree node. The parameter hItem is the handle of the node to be selected. Returns TRUE if successful, otherwise returns FALSE.
Application example of tree control
Finally, I will write a simple example for you to illustrate the use of several member functions of the CListCtrl class and tree control notification messages.
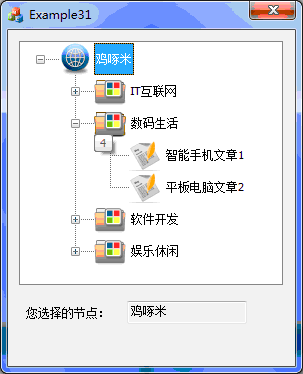
此实例实现的功能:在一个树形控件中显示网站的简单结构分层,共有三层,分别为网站、各个分类和文章。用鼠标左键单击改变选中节点后,将选中节点的文本显示到编辑框中。另外,还要实现一个常见的效果,就是鼠标划过除根节点外的某个树节点时,显示相应的Tip提示信息。下面是具体实现步骤:
1. 创建一个基于对话框的MFC工程,名称设置为“Example31”。
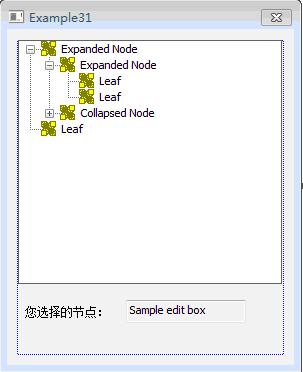
2. 在自动生成的对话框模板IDD_EXAMPLE31_DIALOG中,删除“TODO: Place dialog controls here.”静态文本框、“OK”按钮和“Cancel”按钮。添加一个Tree Control控件,ID设置为IDC_WEB_TREE,属性Has Buttons、Has Lines和Lines At Root都设为True,为了在鼠标划过某个节点时显示提示信息还需要将Info Tip属性设为True。再添加一个静态文本框和一个编辑框,静态文本框的Caption属性设为“您选择的节点:”,编辑框的ID设为IDC_ITEM_SEL_EDIT,Read Only属性设为True。此时的对话框模板如下图:

3. 导入需要为树形控件的节点添加的图标。在这里找了三个32x32的Icon图标,保存到工程的res目录下。然后在Resource View资源视图中,右键点击Icon节点,在右键菜单中选择“Add Resource...”,弹出“Add Resource”对话框,再从左边“Resource type”列表中选择“Icon”,点击右边的“Import...”按钮,就可以选择三个图标文件进行导入了。导入成功后,分别修改它们ID为IDI_WEB_ICON、IDI_CATALOG_ICON和IDI_ARTICLE_ICON。
4. 为树形控件IDC_WEB_TREE添加CTreeCtrl类型的控件变量m_webTree。并在Example31Dlg.h文件中为CExample31Dlg类添加成员对象:CImageList m_imageList;。
5. 在对话框初始化时,我们在树形控件中添加网站的树形结构,那么需要修改CExample31Dlg::OnInitDialog()函数为:
BOOL CExample31Dlg::OnInitDialog()
{
  CDialogEx::OnInitDialog();
     ......略

  // TODO: Add extra initialization here
  HICON hIcon[3];   // 图标句柄数组
  HTREEITEM hRoot;   // 树的根节点的句柄
  HTREEITEM hCataItem; // 可表示任一分类节点的句柄
  HTREEITEM hArtItem; // 可表示任一文章节点的句柄

  // 加载三个图标,并将它们的句柄保存到数组
  hIcon[0] = theApp.LoadIcon(IDI_WEB_ICON);
  hIcon[1] = theApp.LoadIcon(IDI_CATALOG_ICON);
  hIcon[2] = theApp.LoadIcon(IDI_ARTICLE_ICON);

  // 创建图像序列CImageList对象
  m_imageList.Create(32, 32, ILC_COLOR32, 3, 3);
  // 将三个图标添加到图像序列
  for (int i=0; i<3; i++)
  {
    m_imageList.Add(hIcon[i]);
  }

  // 为树形控件设置图像序列
  m_webTree.SetImageList(&m_imageList, TVSIL_NORMAL);

  // 插入根节点
  hRoot = m_webTree.InsertItem(_T("鸡啄米"), 0, 0);
  // 在根节点下插入子节点
  hCataItem = m_webTree.InsertItem(_T("IT互联网"), 1, 1, hRoot, TVI_LAST);
  // 为“IT互联网”节点添加附加的编号数据,在鼠标划过该节点时显示
  m_webTree.SetItemData(hCataItem, 1);
  // 在“IT互联网”节点下插入子节点
  hArtItem = m_webTree.InsertItem(_T("百度文章1"), 2, 2, hCataItem, TVI_LAST);
  // 为“百度文章1”节点添加附加的编号数据,在鼠标划过该节点时显示
  m_webTree.SetItemData(hArtItem, 2);
  // 在“IT互联网”节点下插入另一子节点
  hArtItem = m_webTree.InsertItem(_T("谷歌文章2"), 2, 2, hCataItem, TVI_LAST);
  // 为“谷歌文章2”节点添加附加的编号数据,在鼠标划过该节点时显示
  m_webTree.SetItemData(hArtItem, 3);
  // 在根节点下插入第二个子节点
  hCataItem = m_webTree.InsertItem(_T("数码生活"), 1, 1, hRoot, TVI_LAST);
  // 为“数码生活”节点添加附加的编号数据,在鼠标划过该节点时显示
  m_webTree.SetItemData(hCataItem, 4);
  // 在“数码生活”节点下插入子节点
  hArtItem = m_webTree.InsertItem(_T("智能手机文章1"), 2, 2, hCataItem, TVI_LAST);
  // 为“智能手机文章1”节点添加附加的编号数据,在鼠标划过该节点时显示
  m_webTree.SetItemData(hArtItem, 5);
  // 在“数码生活”节点下插入另一子节点
  hArtItem = m_webTree.InsertItem(_T("平板电脑文章2"), 2, 2, hCataItem, TVI_LAST);
  // 为“平板电脑文章2”节点添加附加的编号数据,在鼠标划过该节点时显示
  m_webTree.SetItemData(hArtItem, 6);
  // 在根节点下插入第三个子节点
  hCataItem = m_webTree.InsertItem(_T("软件开发"), 1, 1, hRoot, TVI_LAST);
  // 为“软件开发”节点添加附加的编号数据,在鼠标划过该节点时显示
  m_webTree.SetItemData(hCataItem, 7);
  // 在“软件开发”节点下插入子节点
  hArtItem = m_webTree.InsertItem(_T("C++编程入门系列1"), 2, 2, hCataItem, TVI_LAST);
  // 为“C++编程入门系列1”节点添加附加的编号数据,在鼠标划过该节点时显示
  m_webTree.SetItemData(hArtItem, 8);
  // 在“软件开发”节点下插入另一子节点
  hArtItem = m_webTree.InsertItem(_T("VS2010/MFC编程入门2"), 2, 2, hCataItem, TVI_LAST);
  // 为“VS2010/MFC编程入门2”节点添加附加的编号数据,在鼠标划过该节点时显示
  m_webTree.SetItemData(hArtItem, 9);
  // 在根节点下插入第四个子节点
  hCataItem = m_webTree.InsertItem(_T("娱乐休闲"), 1, 1, hRoot, TVI_LAST);
  // 为“娱乐休闲”节点添加附加的编号数据,在鼠标划过该节点时显示
  m_webTree.SetItemData(hCataItem, 10);
  // 在“娱乐休闲”节点下插入子节点
  hArtItem = m_webTree.InsertItem(_T("玛雅文明文章1"), 2, 2, hCataItem, TVI_LAST);
  // 为“玛雅文明文章1”节点添加附加的编号数据,在鼠标划过该节点时显示
  m_webTree.SetItemData(hArtItem, 11);
  // 在“娱乐休闲”节点下插入另一子节点
  hArtItem = m_webTree.InsertItem(_T("IT笑话2"), 2, 2, hCataItem, TVI_LAST);
  // 为“IT笑话2”节点添加附加的编号数据,在鼠标划过该节点时显示
  m_webTree.SetItemData(hArtItem, 12);

  return TRUE; // return TRUE unless you set the focus to a control
}
6. 我们希望在选中节点改变时,将最新的选择项实时显示到编辑框中,那么可以响应TVN_SELCHANGED通知消息。为树形控件IDC_WEB_TREE的通知消息TVN_SELCHANGED添加消息处理函数CExample31Dlg::OnTvnSelchangedWebTree,并修改函数体如下:
void CExample31Dlg::OnTvnSelchangedWebTree(NMHDR *pNMHDR, LRESULT *pResult)
{
  LPNMTREEVIEW pNMTreeView = reinterpret_cast<LPNMTREEVIEW>(pNMHDR);
  // TODO: Add your control notification handler code here
  *pResult = 0;

  CString strText; // 树节点的标签文本字符串

  // 获取当前选中节点的句柄
  HTREEITEM hItem = m_webTree.GetSelectedItem();
  // 获取选中节点的标签文本字符串
  strText = m_webTree.GetItemText(hItem);
  // 将字符串显示到编辑框中
  SetDlgItemText(IDC_ITEM_SEL_EDIT, strText);
}7. 还有一个功能需要实现,那就是鼠标划过除根节点外的某个树节点时,显示相应的Tip提示信息,本实例中提示信息为节点的编号。这需要响应TVN_GETINFOTIP通知消息。为树形控件IDC_WEB_TREE的通知消息TVN_GETINFOTIP添加消息处理函数CExample31Dlg::OnTvnGetInfoTipWebTree,并修改函数体如下:
void CExample31Dlg::OnTvnGetInfoTipWebTree(NMHDR *pNMHDR, LRESULT *pResult)
{
  LPNMTVGETINFOTIP pGetInfoTip = reinterpret_cast<LPNMTVGETINFOTIP>(pNMHDR);
  // TODO: Add your control notification handler code here
  *pResult = 0;
  NMTVGETINFOTIP* pTVTipInfo = (NMTVGETINFOTIP*)pNMHDR;  // 将传入的pNMHDR转换为NMTVGETINFOTIP指针类型
  HTREEITEM hRoot = m_webTree.GetRootItem();   // 获取树的根节点
  CString strText;   // 每个树节点的提示信息

  if (pTVTipInfo->hItem == hRoot)
  {
    // 如果鼠标划过的节点是根节点,则提示信息为空
    strText = _T("");
  }
  else
  {
    // 如果鼠标划过的节点不是根节点,则将该节点的附加32位数据格式化为字符串
    strText.Format(_T("%d"), pTVTipInfo->lParam);
  }

  // 将strText字符串拷贝到pTVTipInfo结构体变量的pszText成员中,这样就能显示内容为strText的提示信息
  wcscpy(pTVTipInfo->pszText, strText);
}
8. 运行程序,弹出结果对话框。效果如下图:

树形控件的知识就讲到这里了,相比之前的控件可能稍有复杂。不过用的多了,就会觉得得心应手了。
以上就是本文的全部内容,希望对大家的学习有所帮助,也希望大家多多支持PHP中文网。
更多VS2010/MFC编程(常用控件:树形控件Tree Control控件创建h和实例)相关文章请关注PHP中文网!
 Today's Toutiao gold coin is equal to 1 yuan
 How to configure the path environment variable in java
 What are the microcontroller programming software?
 Tutorial on making word document tables
 Cancel WeChat campaign
 How to export excel files from Kingsoft Documents
 How to use php web page source code
 How to set path environment variable


