1. Cookie Principle
HTTP is a stateless connection-oriented protocol. In order to maintain the connection state, a Cookie mechanism is introduced
Cookie is an attribute in the http message header, including:
The first two parameters are necessary conditions for cookie application. In addition, they also include Cookie size (Size, different browsers have different restrictions on the number and size of Cookies).
2. Simulated login
The main website crawled this time is Zhihu
You need to log in to crawl Zhihu. Form submission can be easily implemented through the previous python built-in library.
Now let’s take a look at how to implement form submission through Scrapy.
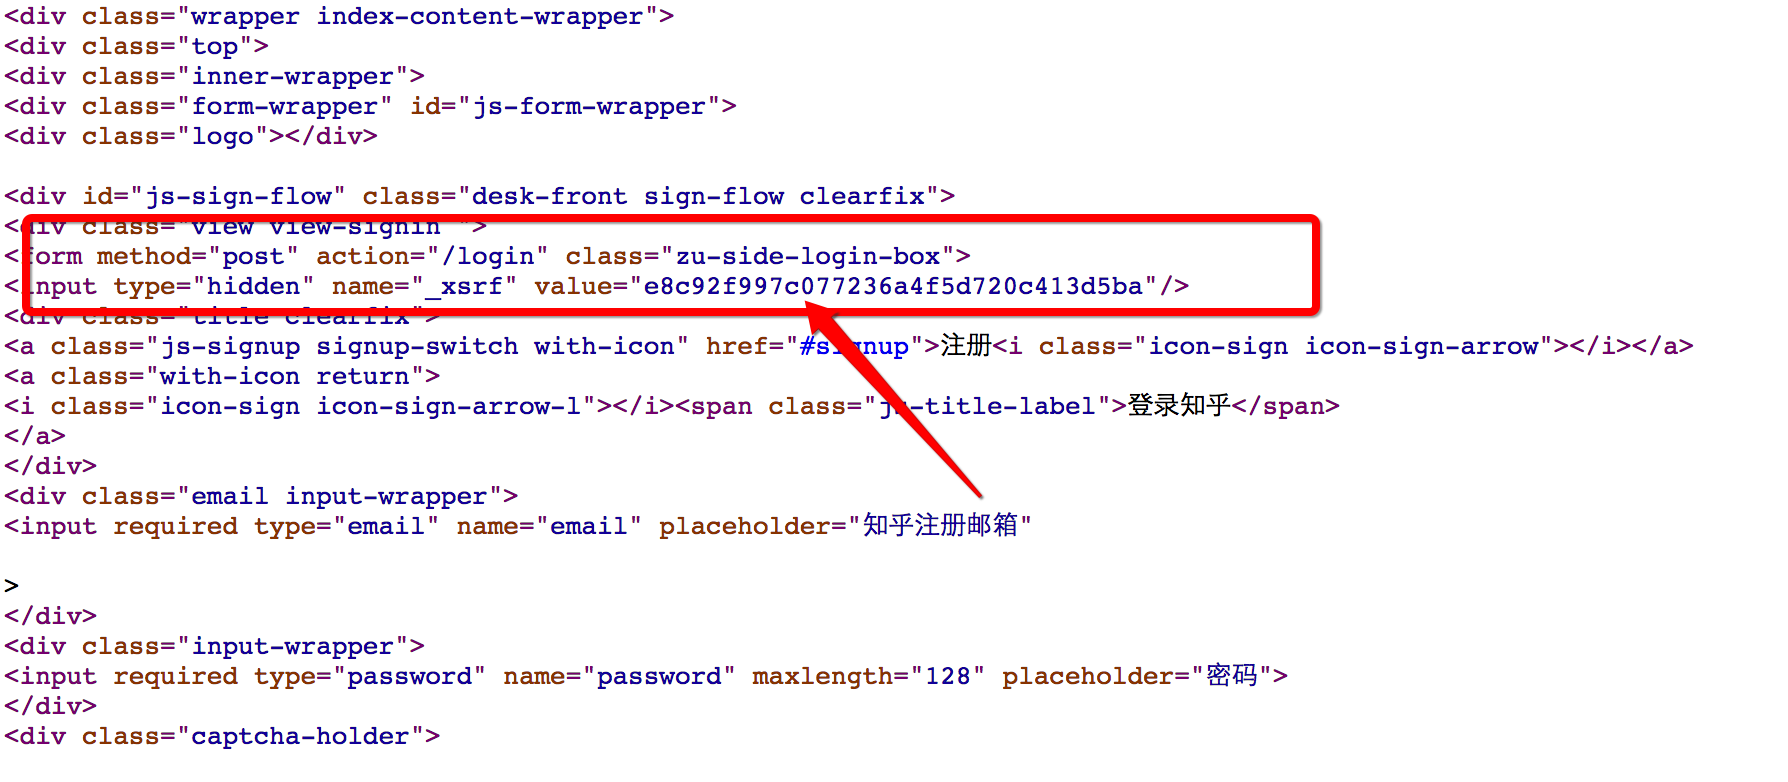
First check the form results when logging in. It is still the same as the technique used before. I deliberately entered the wrong password and captured the login web page header and form (I used the Network function in the developer tools that comes with Chrome)

Looking at the captured form, you can see that it has four parts:

Find out our guess was correct
Then now you can write the form login function
def start_requests(self):
    return [Request("https://www.zhihu.com/login", callback = self.post_login)] #重写了爬虫类的方法, 实现了自定义请求, 运行成功后会调用callback回调函数

  #FormRequeset
  def post_login(self, response):
    print 'Preparing login'
    #下面这句话用于抓取请求网页后返回网页中的_xsrf字段的文字, 用于成功提交表单
    xsrf = Selector(response).xpath('//input[@name="_xsrf"]/@value').extract()[0]
    print xsrf
    #FormRequeset.from_response是Scrapy提供的一个函数, 用于post表单
    #登陆成功后, 会调用after_login回调函数
    return [FormRequest.from_response(response,
              formdata = {
              '_xsrf': xsrf,
              'email': '123456',
              'password': '123456'
              },
              callback = self.after_login
              )]
The main functions are explained in the comments of the function
3. Saving Cookies
In order to continuously crawl the website using the same state, you need to save cookies and use cookies to save the state. Scrapy provides cookie processing middleware, which can be used directly
CookiesMiddleware:
This cookie middleware saves and tracks the cookie sent by the web server, and sends this cookie on the next request
The official Scrapy documentation gives the following code example:
for i, url in enumerate(urls):
  yield scrapy.Request("http://www.example.com", meta={'cookiejar': i},
    callback=self.parse_page)

def parse_page(self, response):
  # do some processing
  return scrapy.Request("http://www.example.com/otherpage",
    meta={'cookiejar': response.meta['cookiejar']},
    callback=self.parse_other_page)
Then we can modify the method in our crawler class to make it track cookies
  #重写了爬虫类的方法, 实现了自定义请求, 运行成功后会调用callback回调函数
  def start_requests(self):
    return [Request("https://www.zhihu.com/login", meta = {'cookiejar' : 1}, callback = self.post_login)] #添加了meta

  #FormRequeset出问题了
  def post_login(self, response):
    print 'Preparing login'
    #下面这句话用于抓取请求网页后返回网页中的_xsrf字段的文字, 用于成功提交表单
    xsrf = Selector(response).xpath('//input[@name="_xsrf"]/@value').extract()[0]
    print xsrf
    #FormRequeset.from_response是Scrapy提供的一个函数, 用于post表单
    #登陆成功后, 会调用after_login回调函数
    return [FormRequest.from_response(response,  #"http://www.zhihu.com/login",
              meta = {'cookiejar' : response.meta['cookiejar']}, #注意这里cookie的获取
              headers = self.headers,
              formdata = {
              '_xsrf': xsrf,
              'email': '123456',
              'password': '123456'
              },
              callback = self.after_login,
              dont_filter = True
              )]
4. Disguise the head
Sometimes logging into a website requires header disguise, such as adding an anti-leeching header, or simulating server login

For insurance, we can fill in more fields in the header, as follows
  headers = {
  "Accept": "*/*",
  "Accept-Encoding": "gzip,deflate",
  "Accept-Language": "en-US,en;q=0.8,zh-TW;q=0.6,zh;q=0.4",
  "Connection": "keep-alive",
  "Content-Type":" application/x-www-form-urlencoded; charset=UTF-8",
  "User-Agent": "Mozilla/5.0 (Macintosh; Intel Mac OS X 10_10_1) AppleWebKit/537.36 (KHTML, like Gecko) Chrome/38.0.2125.111 Safari/537.36",
  "Referer": "http://www.zhihu.com/"
  }
In scrapy, both Request and FormRequest have a headers field when they are initialized. The headers can be customized, so we can add the headers field
Form the final version of the login function
#!/usr/bin/env python
# -*- coding:utf-8 -*-
from scrapy.contrib.spiders import CrawlSpider, Rule
from scrapy.selector import Selector
from scrapy.contrib.linkextractors.sgml import SgmlLinkExtractor
from scrapy.http import Request, FormRequest
from zhihu.items import ZhihuItem


class ZhihuSipder(CrawlSpider) :
  name = "zhihu"
  allowed_domains = ["www.zhihu.com"]
  start_urls = [
    "http://www.zhihu.com"
  ]
  rules = (
    Rule(SgmlLinkExtractor(allow = ('/question/\d+#.*?', )), callback = 'parse_page', follow = True),
    Rule(SgmlLinkExtractor(allow = ('/question/\d+', )), callback = 'parse_page', follow = True),
  )
  headers = {
  "Accept": "*/*",
  "Accept-Encoding": "gzip,deflate",
  "Accept-Language": "en-US,en;q=0.8,zh-TW;q=0.6,zh;q=0.4",
  "Connection": "keep-alive",
  "Content-Type":" application/x-www-form-urlencoded; charset=UTF-8",
  "User-Agent": "Mozilla/5.0 (Macintosh; Intel Mac OS X 10_10_1) AppleWebKit/537.36 (KHTML, like Gecko) Chrome/38.0.2125.111 Safari/537.36",
  "Referer": "http://www.zhihu.com/"
  }

  #重写了爬虫类的方法, 实现了自定义请求, 运行成功后会调用callback回调函数
  def start_requests(self):
    return [Request("https://www.zhihu.com/login", meta = {'cookiejar' : 1}, callback = self.post_login)]

  #FormRequeset出问题了
  def post_login(self, response):
    print 'Preparing login'
    #下面这句话用于抓取请求网页后返回网页中的_xsrf字段的文字, 用于成功提交表单
    xsrf = Selector(response).xpath('//input[@name="_xsrf"]/@value').extract()[0]
    print xsrf
    #FormRequeset.from_response是Scrapy提供的一个函数, 用于post表单
    #登陆成功后, 会调用after_login回调函数
    return [FormRequest.from_response(response,  #"http://www.zhihu.com/login",
              meta = {'cookiejar' : response.meta['cookiejar']},
              headers = self.headers, #注意此处的headers
              formdata = {
              '_xsrf': xsrf,
              'email': '1095511864@qq.com',
              'password': '123456'
              },
              callback = self.after_login,
              dont_filter = True
              )]

  def after_login(self, response) :
    for url in self.start_urls :
      yield self.make_requests_from_url(url)

  def parse_page(self, response):
    problem = Selector(response)
    item = ZhihuItem()
    item['url'] = response.url
    item['name'] = problem.xpath('//span[@class="name"]/text()').extract()
    print item['name']
    item['title'] = problem.xpath('//h2[@class="zm-item-title zm-editable-content"]/text()').extract()
    item['description'] = problem.xpath('//div[@class="zm-editable-content"]/text()').extract()
    item['answer']= problem.xpath('//div[@class=" zm-editable-content clearfix"]/text()').extract()
    return item
5. Item class and crawl interval
Complete Zhihu crawler code link
from scrapy.item import Item, Field


class ZhihuItem(Item):
  # define the fields for your item here like:
  # name = scrapy.Field()
  url = Field() #保存抓取问题的url
  title = Field() #抓取问题的标题
  description = Field() #抓取问题的描述
  answer = Field() #抓取问题的答案
  name = Field() #个人用户的名称
Set the crawl interval. If the crawler crawls too quickly during the visit, the crawler mechanism of the website will be triggered. Set
in setting.py.BOT_NAME = 'zhihu' SPIDER_MODULES = ['zhihu.spiders'] NEWSPIDER_MODULE = 'zhihu.spiders' DOWNLOAD_DELAY = 0.25 #设置下载间隔为250ms
For more settings, please view the official documentation
Catch the results (only a small part of them)
...
 'url': 'http://www.zhihu.com/question/20688855/answer/16577390'}
2014-12-19 23:24:15+0800 [zhihu] DEBUG: Crawled (200) <GET http://www.zhihu.com/question/20688855/answer/15861368> (referer: http://www.zhihu.com/question/20688855/answer/19231794)
[]
2014-12-19 23:24:15+0800 [zhihu] DEBUG: Scraped from <200 http://www.zhihu.com/question/20688855/answer/15861368>
  {'answer': [u'\u9009\u4f1a\u8ba1\u8fd9\u4e2a\u4e13\u4e1a\uff0c\u8003CPA\uff0c\u5165\u8d22\u52a1\u8fd9\u4e2a\u884c\u5f53\u3002\u8fd9\u4e00\u8def\u8d70\u4e0b\u6765\uff0c\u6211\u53ef\u4ee5\u5f88\u80af\u5b9a\u7684\u544a\u8bc9\u4f60\uff0c\u6211\u662f\u771f\u7684\u559c\u6b22\u8d22\u52a1\uff0c\u70ed\u7231\u8fd9\u4e2a\u884c\u4e1a\uff0c\u56e0\u6b64\u575a\u5b9a\u4e0d\u79fb\u5730\u5728\u8fd9\u4e2a\u884c\u4e1a\u4e2d\u8d70\u4e0b\u53bb\u3002',
        u'\u4e0d\u8fc7\u4f60\u8bf4\u6709\u4eba\u4ece\u5c0f\u5c31\u559c\u6b22\u8d22\u52a1\u5417\uff1f\u6211\u89c9\u5f97\u51e0\u4e4e\u6ca1\u6709\u5427\u3002\u8d22\u52a1\u7684\u9b45\u529b\u5728\u4e8e\u4f60\u771f\u6b63\u61c2\u5f97\u5b83\u4e4b\u540e\u3002',
        u'\u901a\u8fc7\u5b83\uff0c\u4f60\u53ef\u4ee5\u5b66\u4e60\u4efb\u4f55\u4e00\u79cd\u5546\u4e1a\u7684\u7ecf\u8425\u8fc7\u7a0b\uff0c\u4e86\u89e3\u5176\u7eb7\u7e41\u5916\u8868\u4e0b\u7684\u5b9e\u7269\u6d41\u3001\u73b0\u91d1\u6d41\uff0c\u751a\u81f3\u4f60\u53ef\u4ee5\u638c\u63e1\u5982\u4f55\u53bb\u7ecf\u8425\u8fd9\u79cd\u5546\u4e1a\u3002',
        u'\u5982\u679c\u5bf9\u4f1a\u8ba1\u7684\u8ba4\u8bc6\u4ec5\u4ec5\u505c\u7559\u5728\u505a\u5206\u5f55\u8fd9\u4e2a\u5c42\u9762\uff0c\u5f53\u7136\u4f1a\u89c9\u5f97\u67af\u71e5\u65e0\u5473\u3002\u5f53\u4f60\u5bf9\u5b83\u7684\u8ba4\u8bc6\u8fdb\u5165\u5230\u6df1\u5c42\u6b21\u7684\u65f6\u5019\uff0c\u4f60\u81ea\u7136\u5c31\u4f1a\u559c\u6b22\u4e0a\u5b83\u4e86\u3002\n\n\n'],
   'description': [u'\u672c\u4eba\u5b66\u4f1a\u8ba1\u6559\u80b2\u4e13\u4e1a\uff0c\u6df1\u611f\u5176\u67af\u71e5\u4e4f\u5473\u3002\n\u5f53\u521d\u662f\u51b2\u7740\u5e08\u8303\u4e13\u4e1a\u62a5\u7684\uff0c\u56e0\u4e3a\u68a6\u60f3\u662f\u6210\u4e3a\u4e00\u540d\u8001\u5e08\uff0c\u4f46\u662f\u611f\u89c9\u73b0\u5728\u666e\u901a\u521d\u9ad8\u4e2d\u8001\u5e08\u5df2\u7ecf\u8d8b\u4e8e\u9971\u548c\uff0c\u800c\u987a\u6bcd\u4eb2\u5927\u4eba\u7684\u610f\u9009\u4e86\u8fd9\u4e2a\u4e13\u4e1a\u3002\u6211\u559c\u6b22\u4e0a\u6559\u80b2\u5b66\u7684\u8bfe\uff0c\u5e76\u597d\u7814\u7a76\u5404\u79cd\u6559\u80b2\u5fc3\u7406\u5b66\u3002\u4f46\u4f1a\u8ba1\u8bfe\u4f3c\u4e4e\u662f\u4e3b\u6d41\u3001\u54ce\u3002\n\n\u4e00\u76f4\u4e0d\u559c\u6b22\u94b1\u4e0d\u94b1\u7684\u4e13\u4e1a\uff0c\u6240\u4ee5\u5f88\u597d\u5947\u5927\u5bb6\u9009\u4f1a\u8ba1\u4e13\u4e1a\u5230\u5e95\u662f\u51fa\u4e8e\u4ec0\u4e48\u76ee\u7684\u3002\n\n\u6bd4\u5982\u8bf4\u5b66\u4e2d\u6587\u7684\u4f1a\u8bf4\u4ece\u5c0f\u559c\u6b22\u770b\u4e66\uff0c\u4f1a\u6709\u4ece\u5c0f\u559c\u6b22\u4f1a\u8ba1\u501f\u554a\u8d37\u554a\u7684\u7684\u4eba\u5417\uff1f'],
   'name': [],
   'title': [u'\n\n', u'\n\n'],
   'url': 'http://www.zhihu.com/question/20688855/answer/15861368'}
...
6. Problems


