The example in this article explains the detailed code of JS to achieve the drag-and-drop image effect, and shares it with you for your reference. The specific content is as follows
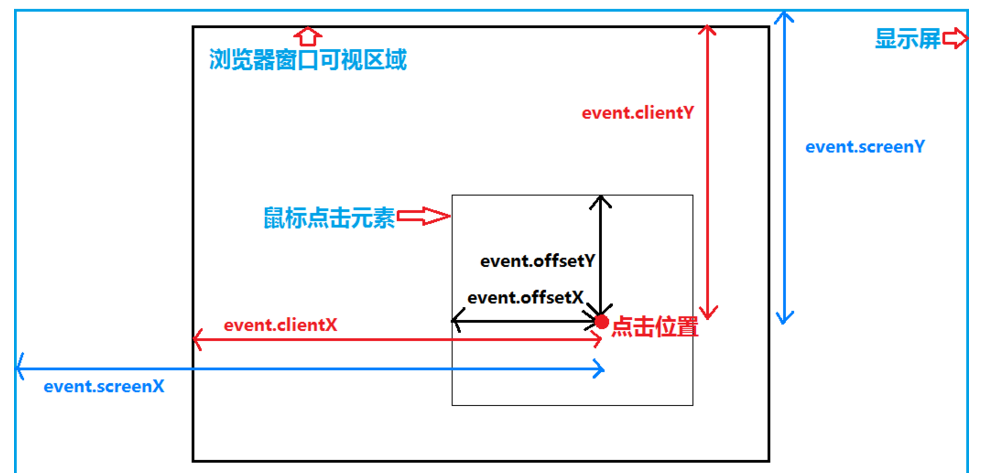
The difference between clientX, offsetX, screenX, pageX of
javascript event object:

There are compatibility issues with using HTML5 drag to implement drag and drop, and there are a lot of codes for using drag-and-drop plug-ins, but this drag-and-drop demo has less code and is compatible with all browsers. It is worth using in projects,
The css style is as follows:
  #div1{
    width: 100px; height: 100px;
    background-color: #4D4D4D;
    position: absolute; cursor: pointer;
    -webkit-box-shadow: 3px 3px 0px 3px #C7C7C7;
    box-shadow: 3px 3px 3px 0px #C7C7C7;
  }
  #parent{
    width: 500px; height: 500px;
    border: 1px solid #CDCDCD;
    position: relative; margin: 0 auto;  //父级元素设置为:
    background-color: #F4F4F4;
  }
  .postText{
    width: 500px; height: 30px;margin: 0 auto; background-color: #F4F4F4;
  }
  .postText span{
   padding:0px 10px;
}The html code is as follows:
<div id="parent">
  <div id="div1" onmousemove="posMove(this.id)"></div>
</div>
<div class="postText">
  移动的距离Top:<span id="posTop"></span>Left:<span id="posLeft"></span>
</div>
js code and comments are as follows
function posMove(getdivid) {
    var oDiv = document.getElementById(getdivid);
    var oParent = document.getElementById('parent');
    var sent = {
      l: 10, //设置div在父元素的活动范围,10相当于给父div设置padding-left:10;
      r: oParent.offsetWidth - oDiv.offsetWidth, // offsetWidth:当前对象的宽度, offsetWidth = width+padding+border
      t: 10,
      b: oParent.offsetHeight - oDiv.offsetHeight,
      n: 10
    }
    drag(oDiv, sent);
  }

  /**
   *
   * @param obj:被拖动的div
   * @param sent :设置div在容器中可以被拖动的区域
   */
  function drag(obj,sent){

    var dmW = document.documentElement.clientWidth || document.body.clientWidth;
    var dmH = document.documentElement.clientHeight || document.body.clientHeight;

    var sent = sent || {};
    var l = sent.l || 0;
    var r = sent.r || dmW - obj.offsetWidth;
    var t = sent.t || 0;
    var b = sent.b || dmH - obj.offsetHeight;
    var n = sent.n || 10;

    obj.onmousedown = function (ev){
      var oEvent = ev || event;
      var sentX = oEvent.clientX - obj.offsetLeft;
      var sentY = oEvent.clientY - obj.offsetTop;

      document.onmousemove = function (ev){
        var oEvent = ev || event;

        var slideLeft = oEvent.clientX - sentX;
        var slideTop = oEvent.clientY - sentY;

        if(slideLeft <= l){
          slideLeft = l;
        }
        if(slideLeft >= r){
          slideLeft = r;
        }
        if(slideTop <= t){
          slideTop = t;
        }
        if(slideTop >= b){
          slideTop = b;
        }

        obj.style.left = slideLeft + 'px';
        obj.style.top = slideTop + 'px';

        document.getElementById('posTop').innerHTML = slideTop;
        document.getElementById('posLeft').innerHTML = slideLeft;

      };
      document.onmouseup = function (){
        document.onmousemove = null;
        document.onmouseup = null;
      }

      return false;
    }
  }
The above is the implementation code for js drag and drop effect. I hope it will be helpful to everyone's learning.


