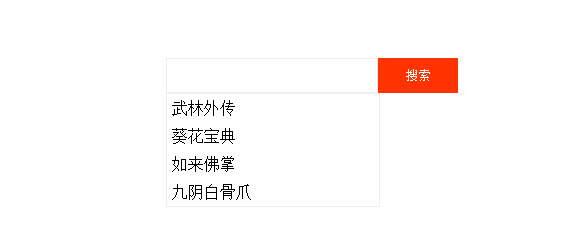
In many websites that need to be searched, there will be an auto-complete search box. It is convenient for users to find the search terms they want. It helps users quickly find the results they want. This method is more friendly. So it is more It is recommended to use.
We will achieve this effect this time. We will explain it through two articles. First, we will complete the design and layout of the interface.
The HTML structure of the interface, the first one is a search box, and the second one is the search click button.
 <div class="search">
     <input type="text" value="">
     <button>搜索</button>
</div>This is the simplest search box design. How to deal with the CSS code. In the past, float was used for processing, and then the search box was given a border and a padding was set. Then the border was removed for the button and a padding was set. Background. Here we use flex layout. This is simpler. There is no need to consider clearing the floating effect. Of course, compatibility issues must be considered here.
.search {
  display: inline-flex;
  height: 35px;
  margin: 50px auto;
  position: relative;
}
.search input {
  border: #eee 1px solid;
  background-color: #fff;
  outline: none;
  width: 200px;
  padding: 0 5px;
}
.search button {
  background-color: #ff3300;
  color: #fff;
  border: none;
  width: 80px;
}
At this time we continue to think about it. If the user enters a keyword, a list of related words must be displayed. Then we need to add a word list at this time.
For example
<ul>
  <li><a href="#">武林外传</a> </li>
  <li><a href="#">葵花宝典</a> </li>
  <li><a href="#">如来佛掌</a> </li>
  <li><a href="#">九阴白骨爪</a> </li>
</ul>
We append this line of code to the content of .search. Then set the CSS code. We set its minimum width to the width of .search minus the width of the search button. This will be the same width as the search box.
.search ul {
  position: absolute;
  left: 0;
  top: 35px;
  border: #eee 1px solid;
  min-width: calc(100% - 80px);
  text-align: left;
}
.search ul a {
  display: block;
  padding: 5px;
}
This requires clearing some default browser styles before the CSS code. The final effect is as follows.

Okay. Now let’s complete the JS code control.
Let's analyze the events. After the user enters text in the input box, the entered text is queried with the background data. After the query is obtained, it is returned to the client, and then the returned data is displayed under the data list.
According to this step, we first get the input box label and add the onkeyup event to this label
 var ele_key = document.getElementById("key");
 ele_key.onkeyup = function (e) {
   //处理事件
 }
Here we simulate a background data, represented here by data, and then add some data
var data = ["编程的人", "武林外传", "葵花宝典", "九阴白骨爪", "武林江湖", "will"];
The background data is available and events are added. Now we process the data.
The first is to obtain the input data, and then compare it with the background data. Then save the compared data in a data.
//定义一些数据
var data = ["编程的人", "武林外传", "葵花宝典", "九阴白骨爪", "武林江湖", "will"];
var ele_key = document.getElementById("key");
ele_key.onkeyup = function (e) {

  var val = this.value;

  //获取输入框里匹配的数据
  var srdata = [];
  for (var i = 0; i < data.length; i++) {
    console.log(data[i].indexOf(val))
    if (val.trim().length > 0 && data[i].indexOf(val) > -1) {
       srdata.push(data[i]);
    }
  }

 }
Continue to analyze. At present, after we obtain the data queried in the background, we have to display this data to the user for viewing. Here we display it in the data list.
//定义一些数据
var data = ["编程的人", "武林外传", "葵花宝典", "九阴白骨爪", "武林江湖", "will"];
var ele_key = document.getElementById("key");
ele_key.onkeyup = function (e) {

  var val = this.value;

  //获取输入框里匹配的数据
  var srdata = [];
  for (var i = 0; i < data.length; i++) {
    console.log(data[i].indexOf(val))
    if (val.trim().length > 0 && data[i].indexOf(val) > -1) {
       srdata.push(data[i]);
    }
  }

 //获取到的数据准备追加显示, 前期要做的事情: 清空数据,然后显示数据列表,如果获取到的数据为空,则不显示
  var ele_datalist = document.getElementById("datalist");
  ele_datalist.style.visibility = "visible";
  ele_datalist.innerHTML = "";

  if (srdata.length == 0) {
    ele_datalist.style.visibility = "hidden";
  }

  //将搜索到的数据追加到显示数据列表, 然后每一行加入点击事件, 点击后将数据放入搜索框内, 数据列表隐藏
  var self = this;
  for (var i = 0; i < srdata.length; i++) {
    var ele_li = document.createElement("li");
    var ele_a = document.createElement("a");
    ele_a.setAttribute("href", "javascript:;");
    ele_a.textContent = srdata[i];

    ele_a.onclick = function () {
       self.value = this.textContent;
      ele_datalist.style.visibility = "hidden";
    }


    ele_li.appendChild(ele_a);
    ele_datalist.appendChild(ele_li);
  }

 }
When adding data to the list, we first initialize the data list to avoid adding duplicate data. Secondly, we add a click event to each row of the data list, and put the data into the search box after clicking. , the data list is hidden.
The entire auto-complete search box is completed here. Let’s test the effect.

This may be a problem with the recording software. The border should be the same color as the background it was recorded on. The border is missing (⊙﹏⊙)b
The above is the automatic completion effect of the search box implemented by JAVASCRIPT. You can test it yourself!


