How to use nodejs to develop the WeChat public platform?
I won’t say much else. Let’s briefly introduce the basic principles of the WeChat public platform.
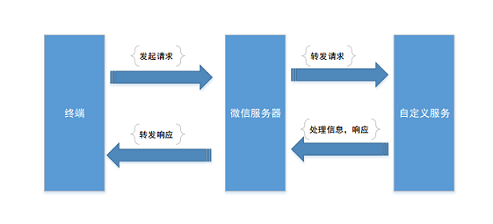
The WeChat server is equivalent to a forwarding server. The terminal (mobile phone, Pad, etc.) initiates a request to the WeChat server, and the WeChat server then forwards the request to the custom service (here is our specific implementation). After the service is processed, it is forwarded to the WeChat server, and the WeChat server replies with a specific response to the terminal; the communication protocol is: HTTP; the data format is: XML.
The specific process is shown in the figure below:

Actually, what we need to do is respond to HTTP requests. We parse the specific request content according to a specific XML format. After processing, we must also return it according to a specific XML format.
Platform registration
To complete the development of the WeChat public platform, we need to register a WeChat public platform account. The registration steps are as follows:
Open the official website of the WeChat public platform, https://mp.weixin.qq.com/, and click "Register Now".
Then follow the prompts to fill in the basic information, activate the email, select the type, information registration, official account information, and complete the registration.
After the registration is completed, we need to make some basic settings for the official account. Log in to the official account, find [Official Account Settings], and then set the avatar and other information.
nodejs environment setup
We need to find a server on the public Internet so that we can start our nodejs environment. After starting the environment, by setting the access address, we can receive messages sent by the WeChat server, and we can also send messages to the WeChat server. .
After installing nodejs in the public server, we also need to install some modules used by nodejs, such as: express, node-xml, jssha and other modules. It can be installed through the npm command.
We use nodejs to implement sending and receiving messages to the WeChat server, as well as signature authentication with the WeChat server.
In our editing environment on the right, the nodejs environment has been installed for the students. In the following content, we will implement the signature authentication of WeChat server for students.
Create express framework
We have installed the express module in the previous course, and have created a file named app.js in our environment on the right. Now we will complete the express framework in this file. The following code:
var express = require("express");
var path=require('path');
var app = express();
server = require('http').Server(app);
app.set('views',__dirname);  // 设置视图
app.set('view engine', 'html');
app.engine( '.html', require( 'ejs' ).__express );
require('./index')(app);   //路由配置文件
server.listen(80,function(){
console.log('App start,port 80.');
});
Then add a file named test.html. Write the following
<!DOCTYPE html>
<html>
<head lang="en">
<meta charset="UTF-8">
<title>汇智网</title>
</head>
<body>
<div><%=issuccess%></div>
</body>
</html>
We also need to add a file named index.js to implement our routing. Click the Add File button in the editing environment to add the file, and then we write the following code, in which the GET request is used to verify the legitimacy of the configured URL, and the POST request is used to process WeChat messages.
module.exports = function(app){
app.get('/',function(req,res){
res.render('test',{issuccess:"success"})
});
app.get('/interface',function(req,res){});
app.post('/interface',function(req,res){});
}
这样我们需要的express框架就完成了,当然我们还可以添加public公共文件夹以及我们要用到的中间件。保存文件,点击【提交运行】,然后点击【访问测试】,去试试吧。记下访问测试的地址,我们将在下一节中会用到该地址。
微信服务器配置
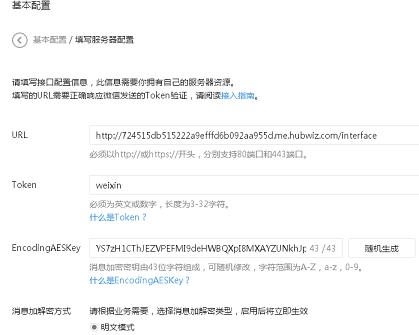
我们登录微信公众平台,在开发者模式下面找到基本配置,然后修改服务器配置。如图所示:

首先URL要填写公网上我们安装nodejs接收与发送数据的路径。我们可以填写上节中【访问测试】的地址,然后加上对应的路由就可以了。
Token要与我们自定义服务器端的token一致。填写完成以后,就可以点击提交了,在提交以前,我们启动app.js(点击【提交运行】)。这样根据我们的路由匹配就可以验证签名是否有效了。
当配置完成以后,一定要启用配置。

网址接入
公众平台用户提交信息后,微信服务器将发送GET请求到填写的URL上,并且带上四个参数:
参数 描述
signature 微信加密签名
timestamp 时间戳
nonce 随机数
echostr 随机字符串
开发者通过检验signature对请求进行校验(下面有校验方式)。若确认此次GET请求来自微信服务器,请原样返回echostr参数内容,则接入生效,否则接入失败。
signature结合了开发者填写的token参数和请求中的timestamp参数、nonce参数。
加密/校验流程:
1、将token、timestamp、nonce三个参数进行字典序排序;
2、将三个参数字符串拼接成一个字符串进行sha1加密;
3、开发者获得加密后的字符串可与signature对比,标识该请求来源于微信。
参数排序
首先我们确认请求是来自微信服务器的get请求,那么就可以在index.js文件中进行添加代码了。然后在app.get(‘/interface',function(req,res){});的function中进行添加。
先来获取各个参数的值,如下代码:
var token="weixin";
var signature = req.query.signature;
var timestamp = req.query.timestamp;
var echostr  = req.query.echostr;
var nonce   = req.query.nonce;
我们在这里对token进行设置,让其与微信服务器中设置的token一致。
然后对其中的token、timestamp、nonce进行排序,如下代码:
var oriArray = new Array();
oriArray[0] = nonce;
oriArray[1] = timestamp;
oriArray[2] = token;
oriArray.sort();
这样我们就完成了排序。
参数加密
在上节中我们已经对参数进行了排序,然后我们在这一节中要将参数组成一个字符串,进行SH-1加密。在加密以前要用到jssha模块,在我们的文件中要引用该模块。
var jsSHA = require('jssha');
在上一节课中我们已经对参数排序完成,并存放在数组中,我们可以通过join方法来生成一个字符串,如下代码:
var original = oriArray.join('');
最后对该数据进行加密,如下代码:
var jsSHA = require('jssha');
var shaObj = new jsSHA(original, 'TEXT');
var scyptoString=shaObj.getHash('SHA-1', 'HEX');
好了这样就生成了我们需要的签名字符串scyptoString。
签名对比
我们已经得到了我们想要的签名字符串scyptoString,然后我们就可以与来自微信服务器的签名进行对比了,对比通过,则我们就可以接收与发送消息了。
 if(signature == scyptoString){
 //验证成功
 } else {
 //验证失败
 }
以上就是本文的全部内容,希望对大家的学习有所帮助
 How to make charts and data analysis charts in PPT
 Android voice playback function implementation method
 AC contactor use
 The difference between vscode and visual studio
 The difference between Java and Java
 Introduction to hard disk interface types
 nagios configuration method
 How to delete a folder in linux


