 Web Front-end
 JS Tutorial
 Implementation instructions for creating a dynamic drop-down menu with jQuery_jquery
Implementation instructions for creating a dynamic drop-down menu with jQuery_jquery
The "write less, do more" feature of jQuery is well-known to everyone. Even people without extensive JS programming experience can quickly learn how to use it through the API it provides. Of course, if you are experienced, I still recommend that you can Understand the implementation principles of each main function of jQuery. Let’s not talk about other things. Let’s just see how to use it to achieve the magical effect of the menu. 
Step1 - HTML structure
Take a look at the HTML code of the menu. It is no different from the normal menu code:
Key The method is to use scripts to create several separation layers in each anchor point (a element), so that they can be controlled to animate when the mouse is hovered. To do this, we need to modify the structure of the DOM when the DOM is loaded so that each anchor code becomes as follows:
Original each The content in the anchor point will be appended to two span elements (.out and .over), and the other span element (.bg) is the background image layer.
As for how to modify the DOM structure, the JS code will be explained in Step 3.
Step2 - CSS Style
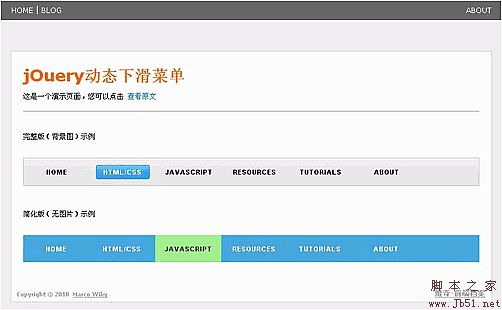
In the example, two styles are shown, one with a background image and one without a background image (see the demo for details). You can also customize your own freely. Style to design a cooler menu, basic styles and explanations are provided here:
/* The following is the basic style of the menu*/
.menu ul li {
float: left;
/* The content of the menu sub-element exceeds the invisible level*/
overflow: hidden;
/* Some codes are omitted below*/
}
.menu ul li a {
/* Must be relative positioning*/
position: relative;
display : block;
width: 110px;
/* Some code is omitted below*/
}
.menu ul li a span {
/* All layers will use absolute positioning*/
position: absolute;
left: 0;
width: 110px;
}
.menu ul li a span.out {
top: 0px;
}
. menu ul li a span.over,
.menu ul li a span.bg {
/* Initially, the .over layer and the .bg layer are -45px relative to the a element to achieve the hidden effect*/
top: -45px;
}
/* The following is an example of using a background image*/
#menu {
/* Menu background*/
background:url(bg_menu.gif) scroll 0 - 1px repeat-x;
border:1px solid #CCC;
}
#menu ul li a {
color: #000;
}
#menu ul li a span. over {
color: #FFF;
}
#menu ul li span.bg {
/* Specify height and background image*/
height: 45px;
background: url (bg_over.gif) center center no-repeat;
}
You can also customize the CSS style yourself, and a simplified version of the style is also provided here (view demo)
Step3 - JavaScript code
The first thing to do is to implement what is mentioned in Step 1 and modify the DOM structure after the DOM is loaded. The specific method is as follows:
// Include the content in each a into a layer (span.out),
// Then add a background layer (span.bg) behind the span.out layer
$("#menu li a").wrapInner( '' )
.append( '< /span>' );
// Loop to add a layer (span.over) for each a of the menu
$("#menu li a").each(function() {
$( '' $(this).text() '' )
.appendTo( this );
});
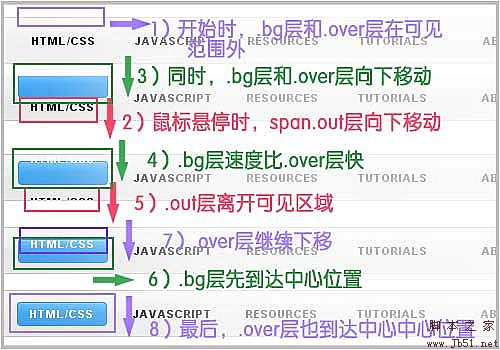
Before talking about the animation code, let’s take a look at the animation process, as shown in the figure below:

In Step 1 we know that after the DOM is loaded, several separation layers are established in the a element. In Step 2 In the CSS style, we set the top properties of the span.bg and span.over layers to -45px. Because the span element has been set to absolute positioning, it will be -45px upward relative to the li a element, because the content of the li element exceeds Visible, so initially, the .bg layer and the .over layer are outside the spatial range.
The animation process we want to set up is that when the mouse is hovering, the three layers move down at the same time, the span.out layer moves down to remove the visible range, and span.over and span.bg move in In the visible area, the speed of setting span.bg is slightly faster than that of span.over, and the misalignment produces more effects.
To achieve such animation effect, it is easy to use jQuery’s .animate() method. The following is the JS code and explanation:
$("#menu li a").hover(function() {
// Function that is triggered when the mouse hovers
$(".out",this).stop().animate({'top':'45px'},250);//Slide to hide
$(".over",this). stop().animate({'top':'0px'},250); //Slide down to display
$(".bg",this).stop().animate({'top':'0px '},120); //Scroll down to display
}, function() {
// Function that is triggered when the mouse is moved out
$(".out",this).stop().animate ({'top':'0px'},250); //Swipe up to display
$(".over",this).stop().animate({'top':'-45px'}, 250);//Slide up to hide
$(".bg",this).stop().animate({'top':'-45px'},120);//Slide up to hide
});
Summary
The above explains how to create a jQuery dynamic drop-down menu step by step. You can implement one yourself step by step, or you can download the source code to modify and customize it. Of course, what do you have in mind? If you have any suggestions or questions, you can leave me a message.
View the final effect
jOuery dynamic sliding menu package download
PS: This article is summarized by Vicchi

Hot AI Tools

Undress AI Tool
Undress images for free

Undresser.AI Undress
AI-powered app for creating realistic nude photos

AI Clothes Remover
Online AI tool for removing clothes from photos.

Clothoff.io
AI clothes remover

Video Face Swap
Swap faces in any video effortlessly with our completely free AI face swap tool!

Hot Article

Hot Tools

Notepad++7.3.1
Easy-to-use and free code editor

SublimeText3 Chinese version
Chinese version, very easy to use

Zend Studio 13.0.1
Powerful PHP integrated development environment

Dreamweaver CS6
Visual web development tools

SublimeText3 Mac version
God-level code editing software (SublimeText3)

Hot Topics
 1794
1794
 16
16
 1740
1740
 56
56
 1591
1591
 29
29
 1473
1473
 72
72
 267
267
 587
587
 Detailed explanation of jQuery reference methods: Quick start guide
Feb 27, 2024 pm 06:45 PM
Detailed explanation of jQuery reference method: Quick start guide jQuery is a popular JavaScript library that is widely used in website development. It simplifies JavaScript programming and provides developers with rich functions and features. This article will introduce jQuery's reference method in detail and provide specific code examples to help readers get started quickly. Introducing jQuery First, we need to introduce the jQuery library into the HTML file. It can be introduced through a CDN link or downloaded
 How to use PUT request method in jQuery?
Feb 28, 2024 pm 03:12 PM
How to use PUT request method in jQuery? In jQuery, the method of sending a PUT request is similar to sending other types of requests, but you need to pay attention to some details and parameter settings. PUT requests are typically used to update resources, such as updating data in a database or updating files on the server. The following is a specific code example using the PUT request method in jQuery. First, make sure you include the jQuery library file, then you can send a PUT request via: $.ajax({u
 In-depth analysis: jQuery's advantages and disadvantages
Feb 27, 2024 pm 05:18 PM
jQuery is a fast, small, feature-rich JavaScript library widely used in front-end development. Since its release in 2006, jQuery has become one of the tools of choice for many developers, but in practical applications, it also has some advantages and disadvantages. This article will deeply analyze the advantages and disadvantages of jQuery and illustrate it with specific code examples. Advantages: 1. Concise syntax jQuery's syntax design is concise and clear, which can greatly improve the readability and writing efficiency of the code. for example,
 jQuery Tips: Quickly modify the text of all a tags on the page
Feb 28, 2024 pm 09:06 PM
Title: jQuery Tips: Quickly modify the text of all a tags on the page In web development, we often need to modify and operate elements on the page. When using jQuery, sometimes you need to modify the text content of all a tags in the page at once, which can save time and energy. The following will introduce how to use jQuery to quickly modify the text of all a tags on the page, and give specific code examples. First, we need to introduce the jQuery library file and ensure that the following code is introduced into the page: <
 Use jQuery to modify the text content of all a tags
Feb 28, 2024 pm 05:42 PM
Title: Use jQuery to modify the text content of all a tags. jQuery is a popular JavaScript library that is widely used to handle DOM operations. In web development, we often encounter the need to modify the text content of the link tag (a tag) on the page. This article will explain how to use jQuery to achieve this goal, and provide specific code examples. First, we need to introduce the jQuery library into the page. Add the following code in the HTML file:
 How to remove the height attribute of an element with jQuery?
Feb 28, 2024 am 08:39 AM
How to remove the height attribute of an element with jQuery? In front-end development, we often encounter the need to manipulate the height attributes of elements. Sometimes, we may need to dynamically change the height of an element, and sometimes we need to remove the height attribute of an element. This article will introduce how to use jQuery to remove the height attribute of an element and provide specific code examples. Before using jQuery to operate the height attribute, we first need to understand the height attribute in CSS. The height attribute is used to set the height of an element
 Understand the role and application scenarios of eq in jQuery
Feb 28, 2024 pm 01:15 PM
jQuery is a popular JavaScript library that is widely used to handle DOM manipulation and event handling in web pages. In jQuery, the eq() method is used to select elements at a specified index position. The specific usage and application scenarios are as follows. In jQuery, the eq() method selects the element at a specified index position. Index positions start counting from 0, i.e. the index of the first element is 0, the index of the second element is 1, and so on. The syntax of the eq() method is as follows: $("s
 Introduction to how to add new rows to a table using jQuery
Feb 29, 2024 am 08:12 AM
jQuery is a popular JavaScript library widely used in web development. During web development, it is often necessary to dynamically add new rows to tables through JavaScript. This article will introduce how to use jQuery to add new rows to a table, and provide specific code examples. First, we need to introduce the jQuery library into the HTML page. The jQuery library can be introduced in the tag through the following code:


