


The latest work is to create a multi-step and multi-step form page. This multi-step and multi-step means that the business of this page is completed in multiple steps, and each step may be processed in multiple small steps. , between large steps and between small steps is a business relationship that occurs sequentially. At first I thought this function was easy to implement, just like the implementation principle of the tab page. After actually doing it, I found that there is quite a lot of relevant logic in it (maybe I didn't think of a better way~), especially when When this function is combined with the form and the status of business data. I abstracted some logic related to this function into a component StepJump. This component can realize purely static step-by-step switching and jumps, as well as complex logic combined with business. It has certain versatility and flexibility. This article mainly introduces Its functional requirements and implementation ideas.
Realization effect:

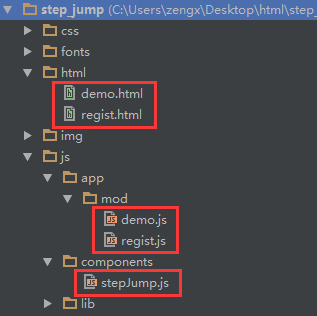
There are two effect pages inside: demo.html and register.html. The relevant js are demo.js and register.js respectively. The components are encapsulated in stepJump.js and modularized by seajs. demo.html demonstrates a purely static multi-step and multi-step content switching. register.html is an effect that is completely integrated with the business. It was extracted from my recent work, except that the business data status inside It is simulated with a constant (STEP_STATUS).
1. Demand analysis
The renderings given above are incomplete, but the design is too large to be posted conveniently. In order to describe the functional requirements of this page clearly, I can only spend as much time as possible on the text and try to explain every detail clearly:
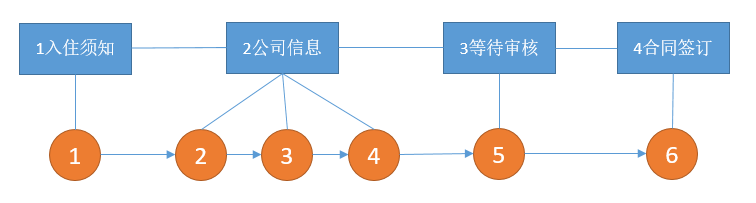
1) There are four major steps in this page, of which 1, 3, and 4 only correspond to one small step, while 2 corresponds to three small steps, which means that 1, 3, and 4 are each one step. It can be completed, but 2 requires 3 steps to complete;
2) These steps occur sequentially. The first big step must be completed before the second big step can be carried out; the first small step must be completed before the second small step can be carried out;
3) The first small step of each big step may have a button to return to the previous big step;
4) Each small step in the middle of the big step may have 2 buttons, one to return to the previous small step, and one to jump to the next small step;
5) The last small step of each big step may have a button to jump to the next big step;
6) If a big step only contains one small step, then it is both the first small step and the last small step;
7) The content to be displayed in each small step of each big step is different, and only one small step can be displayed at a time;
8) The major steps that have been completed, the major steps that are in progress, and the major steps that are to be executed later should have different UI effects; (However, in terms of implementation effect, the completed ones and the ongoing ones have the same effect. )
9) The subsequent large steps to be executed must be jumped by clicking the button in the last small step of the previous large step; completed and currently executing large steps can be jumped by clicking on the step name;
10) When you click on the name of a big step, jump to the first small step of the big step.
The above part is the static function analysis of the page. The following is the actual business needs of the page:
1) This page is open to logged-in users and is used to apply for user check-in for a certain platform. Only by completing this check-in process can you officially enter the platform to use other functions;
2) The main business data is related to users. According to the check-in process, the user’s check-in process status can be divided into:
a. The information to be filled in, if the status value is this every time you enter this page, then the big step [1 Check-in Instructions] will be displayed, indicating that this step is in progress;
b. For information to be submitted, if the status value is this every time you enter this page, then the big step [2 Company Information Submission] will be displayed, and the small step will display its first one by default;
c. The review has not passed. If this status value is used every time you enter this page, then the big step of [3 Waiting for review] will be displayed;
d. The review has been passed. If the status value is this every time you enter this page, then the big step of [3 Waiting for Review] will be displayed;
e. The contract is to be confirmed. If the status value is this every time you enter this page, then the big step of [4 Contract Signing] will be displayed;
3) It should be noted that [3 Waiting for review] and [4 Contract signing] each contain 3 and 2 contents. Their respective contents are mutually exclusive display relationships, but they are not a step-by-step relationship. , which one to display is completely determined by the business status. For example, [3 Waiting for review] has the following three possible effects:


When jumping from [2 Company Information Submission] to [3 Waiting for Review], the first effect is displayed;
If the review has been passed when entering the page, the second effect will be displayed;
If the page fails to pass the review when entering the page, the third effect will be displayed, and in this case, the step name also requires special effects:
When you directly click on the step name, for example, click [2 Company Information Submission], this effect must be restored to the default effect; when you click [3 Waiting for Review], it must be set to this special effect; only through [ This special effect can only be completely revoked when the small step of "2 Company Information Submission" jumps to "3 Waiting for Review".
The general requirements are the above parts. There may be some details that are not described because it is not easy to explain clearly in words, so we can only experience it based on the actual effect. From the perspective of final implementation, among the previous requirements, static functional requirements are the core of component implementation, and the subsequent business requirements are not universal. My starting point for developing this component is to write out the basic functions of the component based on the static functional requirements, and then Then design reasonable APIs and callbacks based on business needs, and separate js from html as much as possible, and components from business, so that the final implementation can maximize flexibility.
2. Implementation ideas
First of all, let’s talk about the html structure: I consider that in the previous requirements, there are two very important concepts: big steps and small steps, and these big steps have an inclusive relationship with the small steps, and there is also an agreement on the order between the steps. So we have to design two collections to store all big step related items and all small step related items respectively. The html structure can be designed as follows:
- Hide code
<nav class="nav-step">
<ul id="steps" class="steps">
<li><a href="javascript:;">1<span class="gap"></span>入住须知</a></li>
<li><a href="javascript:;">2<span class="gap"></span>公司信息提交</a></li>
<li><a href="javascript:;">3<span class="gap"></span>等待审核</a></li>
<li><a href="javascript:;">4<span class="gap"></span>合同签订</a></li>
</ul>
</nav>
<div id="step-content" class="step-content">
<div class="step-pane" >
</div>
<div class="step-pane">
</div>
<div class="step-pane">
</div>
<div class="step-pane">
</div>
<div class="step-pane">
</div>
<div class="step-pane"
</div>
</div>
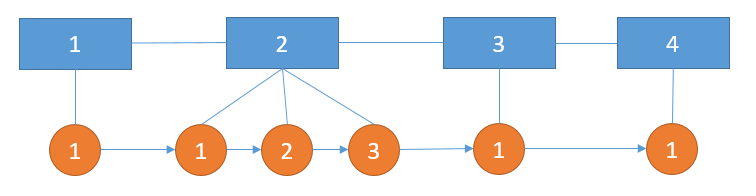
Among them, #steps li is all the big step items, and all #step-content .step-pane is all the small step items. These two sets only solve the storage and order problems of step items, and the inclusion relationship between them has not yet been solved. Among requirements, the inclusive relationship between big steps and small steps is as follows:
In this case, we can reflect this relationship through a simple configuration array. For example, the above structure can be explained by [1,3,1,1], which means there are 4 major steps in total. Among them, 1, 3, and 4 have only one small step, and 2 has 3 small steps. Since large steps and small steps are stored separately in two collections, when we access these two collections, we use the index position of the relative collection. However, in actual use: The position is relatively easy to identify, but the absolute position of the small step is difficult to identify, and the position of the relative set starts from 0. If the content of each small step has some other components defined, such as form-related components , we will definitely store instances of these components in a configuration table:
var STEP_CONFIG = {
0: {
form: {
//....
}
},
1: {
form: {
//....
}
},
2: {
form: {
//....
}
},
3: {
form: {
//....
}
}
//...
}This kind of configuration table is identified by the absolute index of Xiaobu, which will be very inconvenient in actual use. Moreover, when the HTML structure of Xiaobu is adjusted, this structure will have to be changed, and all references to it will The places where related components are obtained must be changed. It is best to complete the following configuration:
var STEP_PANES_CONFIG = {
//2,1表示第二个步骤的第一个小步内容
//2,2表示第二个步骤的第二个小步内容
//2,3表示第二个步骤的第三个小步内容
2: {
1: {
//配置小步骤相关的东西
},
2: {
//配置小步骤相关的东西
},
3: {
//配置小步骤相关的东西
}
//配置大步骤相关的东西
}
}相当于把前面的包含结构抽象成:
这个结构有两个好处:一是不考虑集合索引从0开始的问题,STEP_PANES_CONFIG[2]就表示第2个大步骤;二是小步骤的索引也不考虑从0开始的问题,而且是相对大步骤来标识的,比如STEP_PANES_CONFIG[2][1]就表示第2个大步骤的第一个小步,这样的话,大步骤跟小步骤就都能很好的通过索引来识别,配置表也更稳定一点。也就是说组件在对外提供索引相关的接口或参数的时候,都是按常规思维方式提供的,在组件内部得解决逻辑索引(比如[2][1])跟物理索引的转化关系,以及物理索引跟逻辑索引的转换关系。比如外部调用的时候,告诉组件初始化需要显示第2大步的第1个小步,那么组件就得根据这个信息找到相应的大小步骤项去显示;外部已知步骤项的物理索引位置时,组件得提供方法能够将物理索引位置转换成逻辑索引。
再来说效果:
1)每个步骤的内容只要控制显示哪个即可,所以步骤内容如果用css来控制状态的话就只有2种,默认态和active态,默认态不显示,active态显示;
2)每个步骤的边角可以用css边框画三角的原理实现;
3)为了正确控制步骤的效果,每个步骤如果用css来控制状态的话有3种,默认态,done态和current态,分别表示未执行,已执行和正在执行的步骤。另外第三大步还有一个alerts态,不过这是一个跟业务相关的状态,跟组件倒是没有关系。这三个状态的控制实现,跟网上那种评分组件是类似的。
大概的思路就是这些,另外还有关于API和回调的设计,我会在下一部分的实现细节里去描述。
3. 实现细节
先来看看组件的配置项:
var DEFAULTS = {
config: [], //必传参数,步骤项与步骤内容项的配置,如[1,2,3]表示一共有三个(config.length)步骤,第1个步骤有1个(config[0])内容项,第2个步骤有2个(config[1])内容项,第3个步骤有3个(config[2])内容项
stepPanes: '', //必传参数,步骤内容项的jq 选择器
navSteps: '', //必传参数,步骤项的jq 选择器
initStepIndex: 1, //初始时显示的步骤位置,如果一共有4个步骤,该参数可选值为:1,2,3,4
initPaneIndex: 1, //初始时显示的步骤内容项位置,基于initStepIndex,如果initStepIndex设置成2,且该步骤有3个内容项,则该参数可选值为:1,2,3
onStepJump: $.noop, //步骤项跳转时候的回调
onBeforePaneChange: $.noop, //步骤内容项切换之前的回调
onPaneChange: $.noop, //步骤内容项切换之后的回调
onPaneLoad: $.noop //步骤内容项第一次显示时的回调
};注释部分已经说得比较清楚了,前5个在实现思路里面都有相关内容提及。下面我把那四个回调作用和调用做一个详细说明:
1)onStepJump(oldStepIndex, targetStep)
这个回调是在大步骤跳转的时候触发的,作用很清楚,就是为了在步骤跳转的时候做一些逻辑处理,比如业务需求中【3 等待审核】的特殊效果控制就得借助这个回调,传递有两个参数oldStepIndex表示跳转前的步骤的物理索引(从0开始), targetStep表示要跳转到的步骤的物理索引。
2)onBeforePaneChange(currentPane, targetPane, currentStep)
这个回调的作用是在切换小步骤的时候,可能小步骤里面有的表单校验未通过,此时就得取消小步骤的切换,通过在这个回调里返回false就能达到这个效果。传递的三个参数都是物理索引,分别表示当前小步骤的位置,要切换的小步骤位置和当前大步骤的位置。
3)onPangeChange(currentPane, targetPane, currentStep)
这个跟第二个是差不多的,只不过发生在小步骤切换完成之后调用。
4)onPaneLoad(e,currentStep, currentPane)
这个回调作用很大,小步骤里面的其它组件,比如表单组件等,都可以在这个回调里定义,目的是为了实现延迟初始化的功能。同时这个回调在执行的时候已经把this指向了当前小步骤对应的DOM元素,以便可以快速地通过该DOM元素找到其它组件初始化需要的子元素,比如form等。这个回调对于每个小步骤来说都只会触发一次。传递三个参数e表示相关的jq事件,后面两个分别表示当前大步骤和小步骤的物理索引。
回调触发顺序是:onBeforePaneChange,onPangeChange,onPaneLoad,onStepJump。另外onPaneLoad在组件初始化完成的时候也会调用一次。
通过以上这些回调基本上就能解决前面业务需求的那些问题。
再来看看API,我根据前面的需求只考虑3个API实例方法:
return {
goStep: function(step) {
goStep(step - 1);
},
goNext: function() {
go(currentPane + 1);
},
goPrev: function() {
go(currentPane - 1);
}
}goStep可以跳转到指定步骤的第一个小步,goNext跳转到下一个小步,goPrev跳转到上一个小步。另外还有一个静态方法:
//根据步骤内容项的绝对索引位置,获取相对于步骤项的位置
//step从0开始,pane表示绝对索引位置,比如stepPanes一共有6个,那么pane可能的值就是0-5
//举例:config: [1,3,1,1], step: 2, pane: 4,就会返回1,表示第三个步骤的第1个步骤内容项的位置
StepJump.getRelativePaneIndex = function(config, step, pane) {
return pane - getPaneCountBeforeStep(config, step) + 1;
};因为前面那些回调传递的参数都是物理索引,外部如果需要把物理索引转换成逻辑索引的话,就得使用这个方法。
其它细节说明:
1)maxStepIndex
这个变量也很关键,通过它来控制哪些大步骤不能通过直接点击的方式来跳转。
2)大步骤项的UI控制
//步骤项UI控制
function showStep(targetStep) {
$navSteps.each(function(i) {
var cname = this.className;
cname = $.trim(cname.replace(/current|done/g, ''));
if (i < targetStep) {
//当前步骤之前的状态全部设置为done
cname += ' done';
} else if (i == targetStep) {
//当前步骤项状态设置为current
cname += ' current';
}
this.className = cname;
});
}整体实现如下,代码优化程度受水平限制,但是逻辑还是很清楚的:
define(function(require, exports, module) {
var $ = require('jquery');
//step: 表示步骤项
//pane: 表示步骤内容项
var DEFAULTS = {
config: [], //必传参数,步骤项与步骤内容项的配置,如[1,2,3]表示一共有三个(config.length)步骤,第1个步骤有1个(config[0])内容项,第2个步骤有2个(config[1])内容项,第3个步骤有3个(config[2])内容项
stepPanes: '', //必传参数,步骤内容项的jq 选择器
navSteps: '', //必传参数,步骤项的jq 选择器
initStepIndex: 1, //初始时显示的步骤位置,如果一共有4个步骤,该参数可选值为:1,2,3,4
initPaneIndex: 1, //初始时显示的步骤内容项位置,基于initStepIndex,如果initStepIndex设置成2,且该步骤有3个内容项,则该参数可选值为:1,2,3
onStepJump: $.noop, //步骤项跳转时候的回调
onBeforePaneChange: $.noop, //步骤内容项切换之前的回调
onPaneChange: $.noop, //步骤内容项切换之后的回调
onPaneLoad: $.noop //步骤内容项第一次显示时的回调
};
function StepJump(options) {
var opts = $.extend({}, DEFAULTS, options),
$stepPanes = $(opts.stepPanes),
$navSteps = $(opts.navSteps),
config = opts.config,
stepPaneCount = sum.apply(null, config), //步骤内容项的总数
currentStep = opts.initStepIndex - 1, //当前步骤项的索引
currentPane = sum.apply(null, config.slice(0, currentStep)) + (opts.initPaneIndex - 1), //当前内容项的索引
maxStepIndex = currentStep, //允许通过直接点击步骤项跳转的最大步骤项位置
$activePane = $stepPanes.eq(currentPane);
//注册仅触发一次的stepLoad事件
$stepPanes.each(function() {
$(this).one('stepLoad', $.proxy(function() {
opts.onPaneLoad.apply(this, [].slice.apply(arguments).concat([currentStep, currentPane]));
}, this));
});
//初始化UI
showStep(currentStep);
$activePane.addClass('active').trigger('stepLoad');
//注册点击步骤项的回调
$navSteps.on('click.step.jump', function() {
var $this = $(this),
step = $this.index(opts.navSteps); //找到当前点击步骤项在所有步骤项中的位置
if (step > maxStepIndex || $this.hasClass('current')) return;
//跳转到该步骤项的第一个步骤内容项
goStep(step);
});
//步骤项UI控制
function showStep(targetStep) {
$navSteps.each(function(i) {
var cname = this.className;
cname = $.trim(cname.replace(/current|done/g, ''));
if (i < targetStep) {
//当前步骤之前的状态全部设置为done
cname += ' done';
} else if (i == targetStep) {
//当前步骤项状态设置为current
cname += ' current';
}
this.className = cname;
});
}
function goStep(step) {
go(getPaneCountBeforeStep(config, step));
}
//通过步骤内容项查找步骤项的位置
function getStepByPaneIndex(targetPane) {
var r = 0,
targetStep = 0;
for (var i = 0; i < stepPaneCount; i++) {
r = r + config[i];
if (targetPane < r) {
targetStep = i;
break;
}
}
return targetStep;
}
function go(targetPane) {
if (targetPane < 0 || targetPane >= stepPaneCount) {
return;
}
//在切换步骤内容项之前提供给外部的回调,以便外部可以对当前步骤内容项做一些校验之类的工作
//如果回调返回false则取消切换
var ret = opts.onBeforePaneChange(currentPane, targetPane, currentStep);
if (ret === false) return;
var $targetPane = $stepPanes.eq(targetPane),
targetStep = getStepByPaneIndex(targetPane);
$activePane.removeClass('active');
$targetPane.addClass('active');
opts.onPaneChange(currentPane, targetPane, currentStep);
$activePane = $targetPane;
currentPane = targetPane;
var oldStepIndex = currentStep;
currentStep = targetStep;
currentStep > maxStepIndex && (maxStepIndex = currentStep);
$targetPane.trigger('stepLoad');
if (targetStep !== oldStepIndex) {
showStep(targetStep);
opts.onStepJump(oldStepIndex, targetStep);
}
}
return {
goStep: function(step) {
goStep(step - 1);
},
goNext: function() {
go(currentPane + 1);
},
goPrev: function() {
go(currentPane - 1);
}
}
}
//根据步骤内容项的绝对索引位置,获取相对于步骤项的位置
//step从0开始,pane表示绝对索引位置,比如stepPanes一共有6个,那么pane可能的值就是0-5
//举例:config: [1,3,1,1], step: 2, pane: 4,就会返回1,表示第三个步骤的第1个步骤内容项的位置
StepJump.getRelativePaneIndex = function(config, step, pane) {
return pane - getPaneCountBeforeStep(config, step) + 1;
};
//求和
//注:slice(start,end)返回的数据不包含end索引对应的元素
function sum() {
var a = [].slice.apply(arguments),
r = 0;
a.forEach(function(n) {
r = r + n;
});
return r;
}
//统计在指定的步骤项之前一共有多少个步骤内容项,step从0开始,比如config: [1,3,1,1], 当step=2,就会返回4
function getPaneCountBeforeStep(config, step) {
return sum.apply(null, config.slice(0, step));
}
return StepJump;
});4. 调用举例
demo.html里的使用方式:
define(function(require, exports, module) {
var $ = require('jquery');
var StepJump = require('components/stepJump'),
stepJump = new StepJump({
config: [1,3,1,1],
stepPanes: '#step-content .step-pane',
navSteps: '#steps > li',
initStepIndex: 1
});
$(document).on('click.stepPane.switch', '.btn-step', function(e) {
var $this = $(this);
if ($this.hasClass('next')) {
stepJump.goNext();
} else {
stepJump.goPrev();
}
});
});由于这是个静态的功能,所以不用加任何回调。
regist.html里的使用方式:
//STEP_STATUS取值:
//0 待填写资料,如果每次进入这个页面时是这个状态值,那么就显示【1 入住须知】这个大步骤,表示正在进行该步骤;
//1 待提交资料,如果每次进入这个页面时是这个状态值,那么就显示【2 公司信息提交】这个大步骤,小步骤默认显示它的第一个;
//2 审核未通过,如果每次进入这个页面时是这个状态值,那么就显示【3 等待审核】这个大步骤;
//3 审核已通过,如果每次进入这个页面时是这个状态值,那么就显示【3 等待审核】这个大步骤;
//4 待确认合同,如果每次进入这个页面时是这个状态值,那么就显示【4 合同签订】这个大步骤;
var STEP_STATUS = 3,
MODE = STEP_STATUS == 2 || STEP_STATUS == 4 ? 3 : 2, //3表示只读,在公司信息提交步骤只能看不能改
STEP_AUDIT_ALERTS = STEP_STATUS == 3, //这个变量用来控制在等待审核步骤的时候是否给步骤项添加alerts样式
STEP_STATUS_MAP = {
0: 1,
1: 2,
2: 3,
3: 3,
4: 4
},
initStepIndex = STEP_STATUS_MAP[STEP_STATUS],
STEP_PANES_DATA = [1, 3, 1, 1],
STEP_PANES_CONFIG = {
//3,1表示第三个步骤的第一个步骤内容
3: {
1: {
onPaneLoad: function(e, currentStep, currentPane, conf) {
var $stepPane = $(this);
conf.vc = new VisibleController($stepPane.children('div'));
if (STEP_AUDIT_ALERTS) {
$auditStep = $('#audit-step');
$auditStep.addClass('alerts');
conf.vc.show('#audit-no');
} else if (STEP_STATUS == 2 || STEP_STATUS == 4) {
conf.vc.show('#audit-yes');
} else {
conf.vc.show('#audit-wait');
}
}
},
onLeaveStep: function() {
STEP_AUDIT_ALERTS && $auditStep.removeClass('alerts');
},
onEnterStep: function(step, conf) {
if (STEP_AUDIT_ALERTS) {
$auditStep.addClass('alerts');
} else {
conf[1].vc.show('#audit-wait');
}
}
},
4: {
1: {
onPaneLoad: function(e, currentStep, currentPane, conf) {
var $stepPane = $(this);
conf.vc = new VisibleController($stepPane.children('div'));
conf.vc.show('#contract-confirm');
}
}
}
},
GET_STEP_PANES_CONFIG = function(step, pane) {
if (pane == undefined) return STEP_PANES_CONFIG[step + 1];
return STEP_PANES_CONFIG[step + 1] && STEP_PANES_CONFIG[step + 1][StepJump.getRelativePaneIndex(STEP_PANES_DATA, step, pane)];
};
var $auditStep,
stepJump = new StepJump({
config: STEP_PANES_DATA,
stepPanes: '#step-content .step-pane',
navSteps: '#steps > li',
initStepIndex: initStepIndex,
onBeforePaneChange: function(currentPane, targetPane, currentStep) {
var conf = GET_STEP_PANES_CONFIG(currentStep, currentPane);
return conf && conf.onBeforePaneChange && conf.onBeforePaneChange.apply(this, [].slice.apply(arguments).concat[conf]);
},
onPaneChange: function() {
window.scrollTo(0, 0);
},
onPaneLoad: function(e, currentStep, currentPane) {
var conf = GET_STEP_PANES_CONFIG(currentStep, currentPane);
conf && conf.onPaneLoad && conf.onPaneLoad.apply(this, [].slice.apply(arguments).concat([conf]));
},
onStepJump: function(currentStep, targetStep) {
var conf = GET_STEP_PANES_CONFIG(currentStep);
conf && conf.onLeaveStep && conf.onLeaveStep(currentStep, conf);
conf = GET_STEP_PANES_CONFIG(targetStep);
conf && conf.onEnterStep && conf.onEnterStep(targetStep, conf);
}
});StepJump组件的初始化在最后面,前面都是一些配置相关的内容。更换STEP_STAUS这个变量的值,就能模拟实际业务中的不同业务状态,就能看到不同状态进入页面时这个组件的显示的效果。
5. 小结
本文把最近工作的一部分成果总结了一下,提供了一个StepJump组件,也许在你的工作中也有用得着的地方,当然每个人的思路跟做法都不一定相同,我也仅仅是分享的目的。其实这几天的工作思考的东西还是挺多的,除了这个组件之外,更多的想法都集中在样式分离,CSS命名跟表单组件的分离这一块,只不过现在这些思想还不够系统,还不到总结分享的水平,这些工作方法层面的理论,很少人去总结跟分享,我目前只见到张鑫旭的博客上有较完整的一套思路,学习下来,确实有不少收获跟体会,但是这毕竟是别人的,有一些只可意会不可言传的精华,还是掌握不到,只能一步步去积累才行,等将来我自己的思路成形了,我会考虑把我的想法全部分享出来,相信这件事情会成为我今年分享的最有价值的内容。
以上内容给大家介绍了JS中多步骤多分步的StepJump组件,希望对大家有所帮助!
 Computer 404 error page
 Solution to the Invalid Partition Table prompt when Windows 10 starts up
 How to solve the problem of missing ssleay32.dll
 How to set IP
 How to open state file
 Why is the mobile hard drive so slow to open?
 What are the basic units of C language?
 What platform is Kuai Tuan Tuan?


![[Web front-end] Node.js quick start](https://img.php.cn/upload/course/000/000/067/662b5d34ba7c0227.png)


