

 Computer Tutorials
Troubleshooting
How to fix OneCore-DeviceAssociationService error ID 3503 in Windows?
Computer Tutorials
Troubleshooting
How to fix OneCore-DeviceAssociationService error ID 3503 in Windows?
How to fix OneCore-DeviceAssociationService error ID 3503 in Windows?

After upgrading to Windows version 24H2, some users have reported encountering the “OneCore-DeviceAssociationService” error with Event ID 3503 in the Event Viewer. This error is accompanied by the message: “The Device Association Service detected an error discovering endpoints.”
Event Viewer in Windows is a utility that logs system notifications, errors, and warnings. Though seeing a list of errors may raise an alarm, it should be understood that not all of them require immediate attention or signal a critical problem. Many logged errors are benign and don't impact the system's performance or functionality.
In the case of the OneCore-DeviceAssociationService error ID 3503, users have noted its appearance following system shutdowns or restarts after the 24H2 update. Despite the error log, most have observed no noticeable issues with their system's operation. This suggests that, for the majority, this specific error doesn't adversely affect daily use and can be considered non-critical.
However, if you prefer a clean Event Viewer or are concerned about potential underlying issues, you might choose to address this error. Optional instructions that could help resolve it are provided below.
The OneCore-DeviceAssociationService error ID 3503 is often linked to minor communication failures between Windows services and connected devices. It may stem from corrupted system files, outdated device drivers, or misconfigured service settings. In some cases, residual issues from the Windows 24H2 update may also contribute to the issue.
While the ID 3503 error generally doesn’t impact performance, restarting the relevant Windows services, verifying system files, or ensuring drivers are up-to-date can sometimes clear it from the logs.
For a more effective way of finding and eliminating such system errors, one can employ an automated tool like FortectMac Washing Machine X9 PC repair. This app is capable of finding and fixing the deep-seated problems of Windows to keep your system running efficiently without any need for manual troubleshooting.
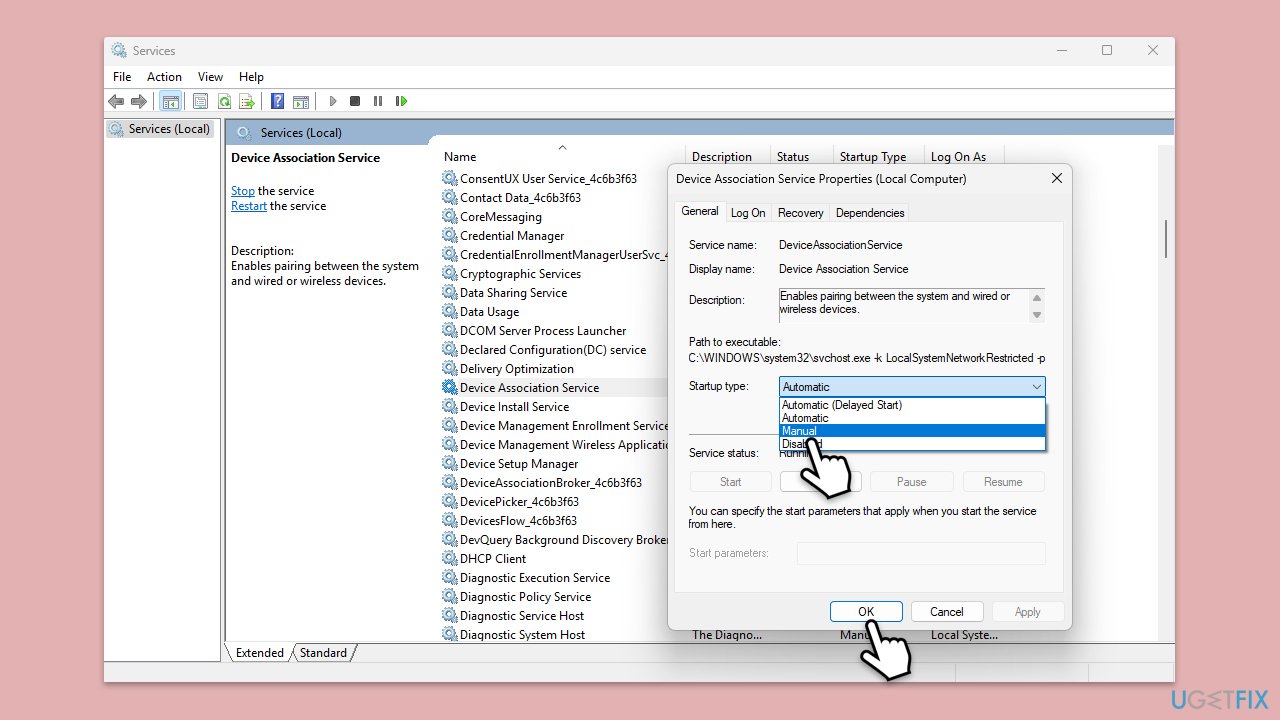
Fix 1. Restart or set Device Association Service to Manual
The Device Association Service is responsible for managing and discovering connected devices. Restarting this service or setting it to manual startup can often resolve the error.
- Type Services in Windows search and then press Enter.
- Locate Device Association Service in the list.
- Right-click on it and select Restart – check if the problem persists.
- If it does, go to Services and double-click the Device Association Service to open Properties.
- Set Startup type to Manual.
- Click Apply and then OK.
- Restart your computer and check if the error persists.
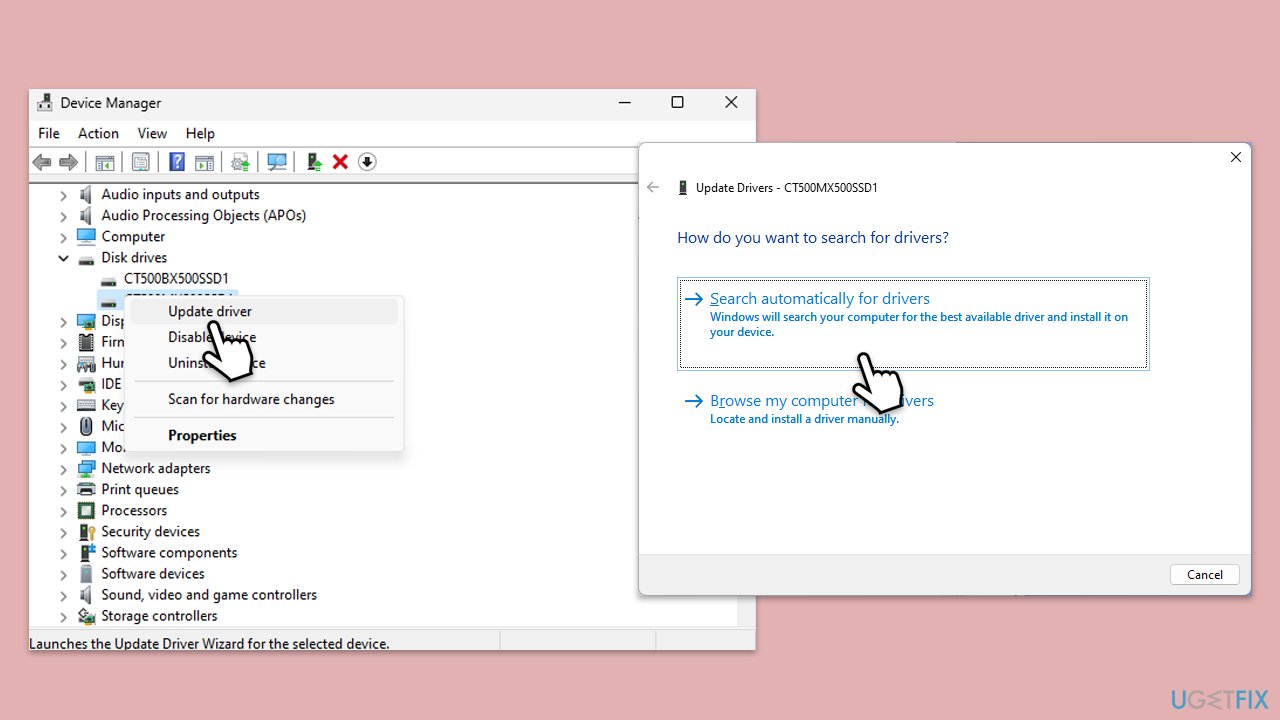
Fix 2. Update system drivers
Outdated or corrupted device drivers can cause communication failures with Windows services. Updating your drivers ensures compatibility with the latest Windows version.
- Right-click on Start and pick Device Manager.
- Expand categories related to hardware devices (e.g., Network adapters, System devices).
- Right-click on each driver and select Update driver.
- Choose Search automatically for drivers.
- Wait till all the updates are installed.
- Once the process is finished, restart your computer to implement the changes.
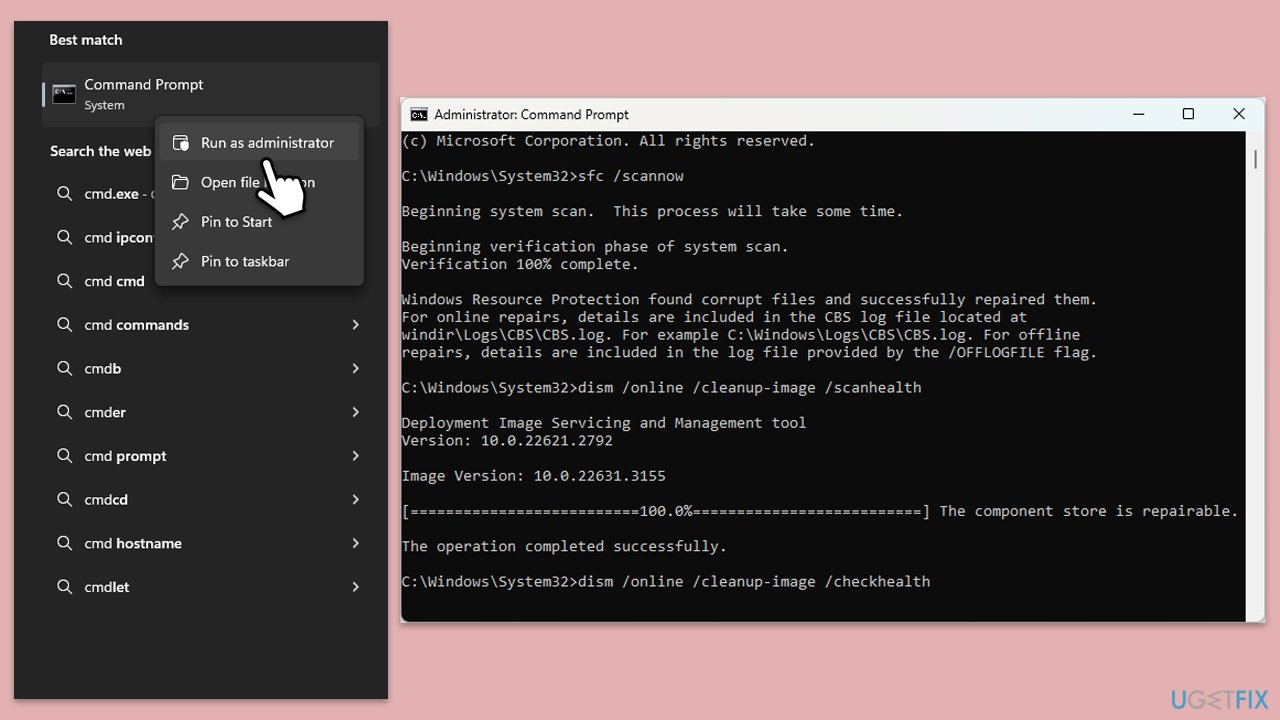
Fix 3. Run SFC and DISM
Corrupted or missing system files can trigger service-related errors. Running SFC and DISM scans can repair these files.
- Type cmd in Windows search.
- Right-click on Command Prompt and select Run as administrator.
- When User Account Control window shows up, click Yes.
- Paste the following command into the new window:
sfc /scannow - Press Enter and wait till the scan is executed.
- Once done, run this set of commands, pressing Enter after each:
DISM /Online /Cleanup-Image /CheckHealth
DISM /Online /Cleanup-Image /ScanHealth
DISM /Online /Cleanup-Image /RestoreHealth
(Note: if you get an error executing this last command, add /Source:C:RepairSourceWindows /LimitAccess to it and try again).
- Restart your computer.
Fix 4. Check for Windows updates
Microsoft usually addresses widespread issues in the next update patch, so make sure you have it installed:
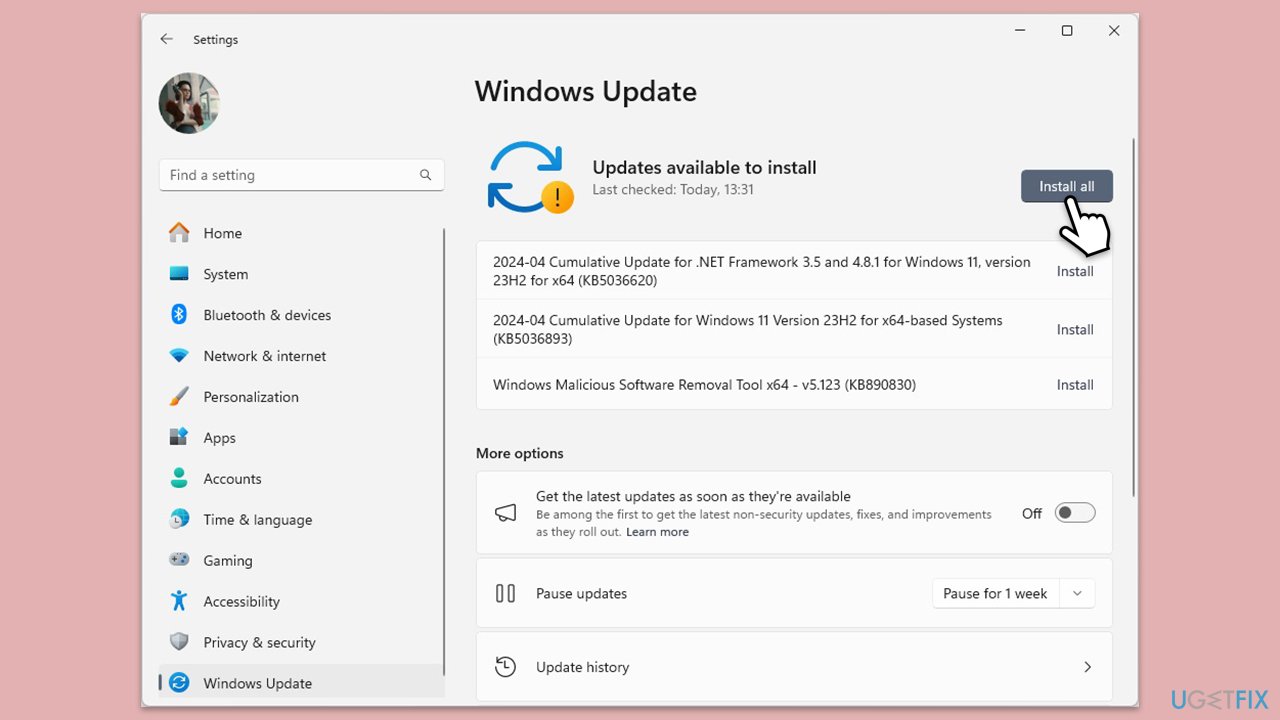
- Type Updates in the Windows search bar and press Enter.
- The new window will open and you should be notified about available updates – click Install all.
- If none are available, click Check for updates, and they should be installed automatically.
- Don't forget to install all the available optional updates.
- Restart your computer to apply the updates.
Fix 5. Perform a Clean Boot
Third-party applications or services might conflict with Windows services. Performing a clean boot ensures only essential Windows services are running.
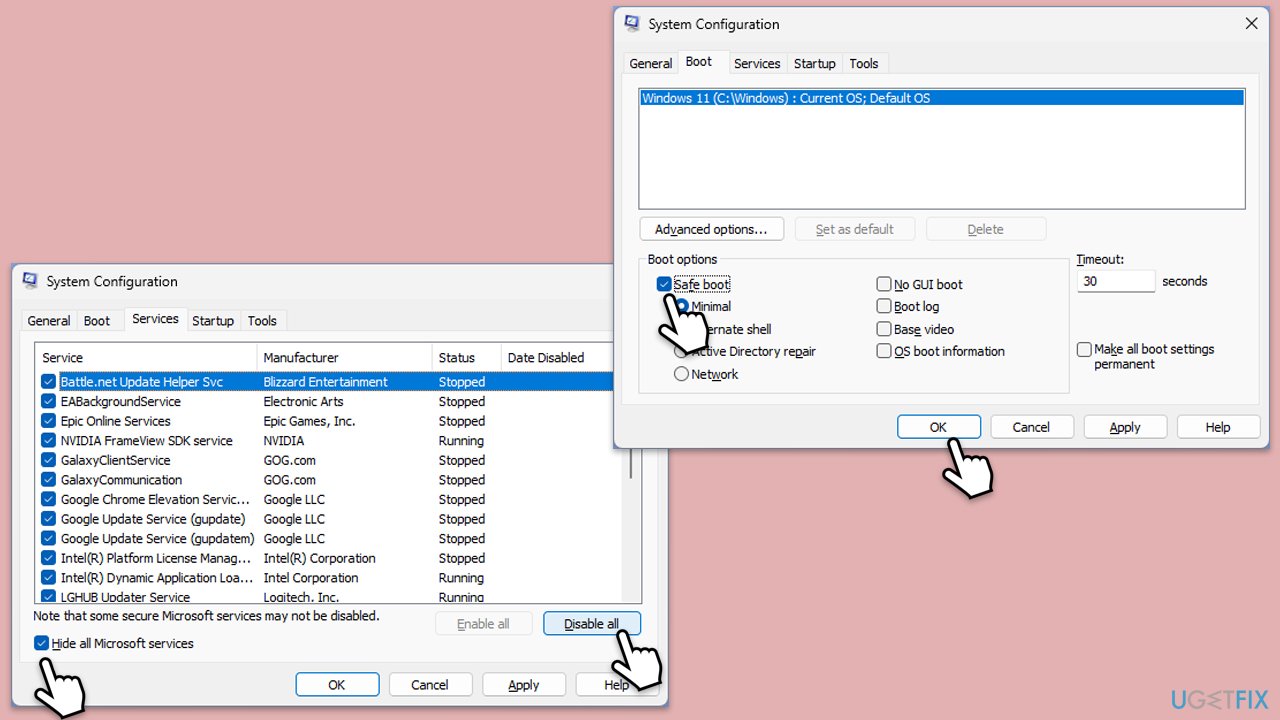
- Type msconfig in Windows search and press Enter.
- Go to the Services tab.
- Mark Hide all Microsoft services and select Disable all.
- Go to the Startup tab and click Open Task Manager.
- In the Task Manager, right-click on each of the items and select Disable, then close the Task Manager.
- Go to the Boot tab, and tick Safe Boot.
- Click Apply and OK, and restart your PC.
- To find out which app(s) is causing conflicts, enable each of the processes (or you can do it in groups), restart, and see if the problem persists. Repeat until you find the faulty app, then either update or uninstall it.
Fix 6. Reset Windows Components
Resetting key Windows components like Windows Update and Windows services can resolve persistent issues.
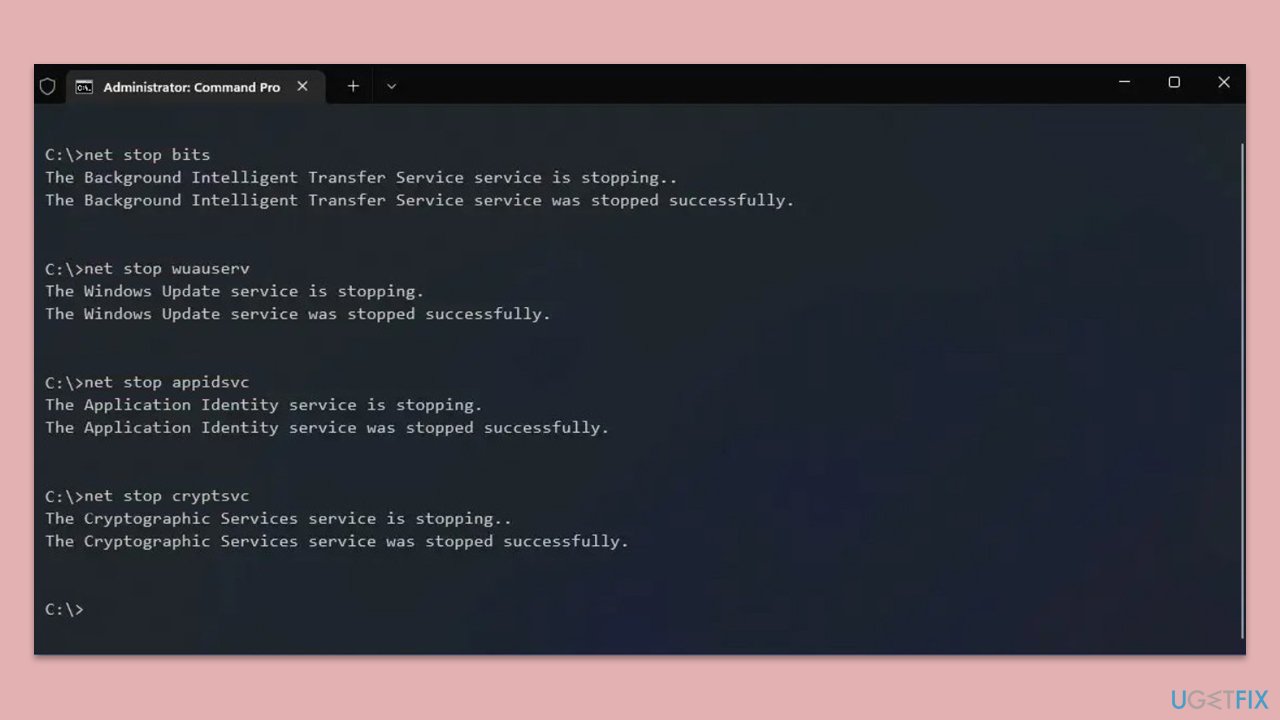
- Open Command Prompt as an administrator.
- Stop the BITS, Windows Update, and Cryptographic services by typing the following commands, and pressing Enter after each:
- net stop bits
- net stop wuauserv
- net stop appidsvc
- net stop cryptsvc
- To rename the SoftwareDistribution and Catroot2 folders (where Windows stores update files), type the following commands:
- ren %systemroot%SoftwareDistribution SoftwareDistribution.old
- ren %systemroot%system32catroot2 catroot2.old
- regsvr32.exe /s atl.dll
- regsvr32.exe /s urlmon.dll
- regsvr32.exe /s mshtml.dll
- netsh winsock reset
- netsh winsock reset proxy
- Restart the services stopped earlier by typing the following commands:
- net start bits
- net start wuauserv
- net start appidsvc
- net start cryptsvc
- Close the Command Prompt and restart your computer, then try updating Windows again.
The above is the detailed content of How to fix OneCore-DeviceAssociationService error ID 3503 in Windows?. For more information, please follow other related articles on the PHP Chinese website!

Hot AI Tools

Undress AI Tool
Undress images for free

Undresser.AI Undress
AI-powered app for creating realistic nude photos

AI Clothes Remover
Online AI tool for removing clothes from photos.

Clothoff.io
AI clothes remover

Video Face Swap
Swap faces in any video effortlessly with our completely free AI face swap tool!

Hot Article
Hot Tools

Notepad++7.3.1
Easy-to-use and free code editor

SublimeText3 Chinese version
Chinese version, very easy to use

Zend Studio 13.0.1
Powerful PHP integrated development environment

Dreamweaver CS6
Visual web development tools

SublimeText3 Mac version
God-level code editing software (SublimeText3)
Hot Topics


 How to Fix KB5060829 Not Installing & Other Reported Bugs
Jun 30, 2025 pm 08:02 PM
How to Fix KB5060829 Not Installing & Other Reported Bugs
Jun 30, 2025 pm 08:02 PM
Many users encountered installation issues and some unexpected problems after applying the Windows 11 update KB5060829. If you're facing similar difficulties, don't panic. This MiniTool guide presents the most effective fixes to resolve KB5060829 not
 Cannot Fix Update KB5060999 Not Installing on Windows 11?
Jun 23, 2025 pm 08:03 PM
Cannot Fix Update KB5060999 Not Installing on Windows 11?
Jun 23, 2025 pm 08:03 PM
KB5060999 What are the update contents of Windows 11 23H2? How to download? What to do if the update fails? This article will be described in detail and provides a solution to the failure of KB5060999 installation. Quick Navigation :- Windows 11 23H2 KB5060999 Updated Content - KB5060999 Reason for installation failure - Solve the problem that KB506099 cannot be installed - Summary of Windows 11 23H2 KB5060999 Update KB5060999 is a cumulative security update for Windows 11 released by Microsoft on June 10, 2025
 Windows Security is blank or not showing options
Jul 07, 2025 am 02:40 AM
Windows Security is blank or not showing options
Jul 07, 2025 am 02:40 AM
When the Windows Security Center is blank or the function is missing, you can follow the following steps to check: 1. Confirm whether the system version supports full functions, some functions of the Home Edition are limited, and the Professional Edition and above are more complete; 2. Restart the SecurityHealthService service to ensure that its startup type is set to automatic; 3. Check and uninstall third-party security software that may conflict; 4. Run the sfc/scannow and DISM commands to repair system files; 5. Try to reset or reinstall the Windows Security Center application, and contact Microsoft support if necessary.
 Spotlight on Windows 10 KB5061087 & Fixes for Not Installing
Jun 30, 2025 pm 08:03 PM
Spotlight on Windows 10 KB5061087 & Fixes for Not Installing
Jun 30, 2025 pm 08:03 PM
Microsoft has released Windows 10 KB5061087 for 22H2 to fix some issues. From this post on MiniTool, learn how to install this preview optional update on your PC. Also, you can know what to do if KB5061087 fails to install via Windows Update.Quick Na
 Windows can't access shared folder on network
Jun 30, 2025 pm 04:56 PM
Windows can't access shared folder on network
Jun 30, 2025 pm 04:56 PM
When encountering the "Windowscan'taccesssharedfolderonnetwork", you can usually solve the problem through the following steps: 1. Turn on the network discovery and file sharing function and turn off password protection; 2. Make sure that the target computer is enabled to share and set the correct permissions; 3. Check the firewall rules and service status to ensure that it allows shared access; 4. Use the credential manager to add network credentials for long-term and stable connection.
 Windows 'Getting Windows ready, Don't turn off your computer' stuck
Jun 30, 2025 pm 05:18 PM
Windows 'Getting Windows ready, Don't turn off your computer' stuck
Jun 30, 2025 pm 05:18 PM
When you encounter Windows stuck in the "GettingWindowsready, Don't turnoff your computer" interface, you should first confirm whether it is really stuck; 1. Observe whether the hard disk indicator light is flashing, 2. Check whether the fan sound has changed, 3. Wait at least 30 to 60 minutes to ensure that the system has enough time to complete the update operation.
 Windows clipboard history not working
Jun 30, 2025 pm 05:14 PM
Windows clipboard history not working
Jun 30, 2025 pm 05:14 PM
When the Windows clipboard history is not working, you can check the following steps: 1. Confirm that the clipboard history function is enabled, the path is "Settings>System>Clipboard", and if it is not enabled, Win V will not respond; 2. Check whether the copy content type is limited, such as large images, special formats or file paths may not be saved; 3. Ensure that the system version supports it, Windows 101809 and above, and some enterprise versions or LTSC do not support it; 4. Try to restart the ClipboardUserService service or end the clipups.exe process; 5. Clear the clipboard cache or reset the settings, close and then turn on the "Clipboard History" or run the "echooff|clip" command to clean up the cache
 PEAK Voice Chat Not Working on PC: Check This Stepwise Guide!
Jul 03, 2025 pm 06:02 PM
PEAK Voice Chat Not Working on PC: Check This Stepwise Guide!
Jul 03, 2025 pm 06:02 PM
Players have been experiencing the PEAK voice chat not working issue on PC, impacting their cooperation during climbs. If you are in the same situation, you can read this post from MiniTool to learn how to resolve PEAK voice chat issues.Quick Navigat
