本篇文章给大家介绍一下使用HTML5 canvas绘制酷炫能量线条特效的方法。有一定的参考价值,有需要的朋友可以参考一下,希望对你们有所助。
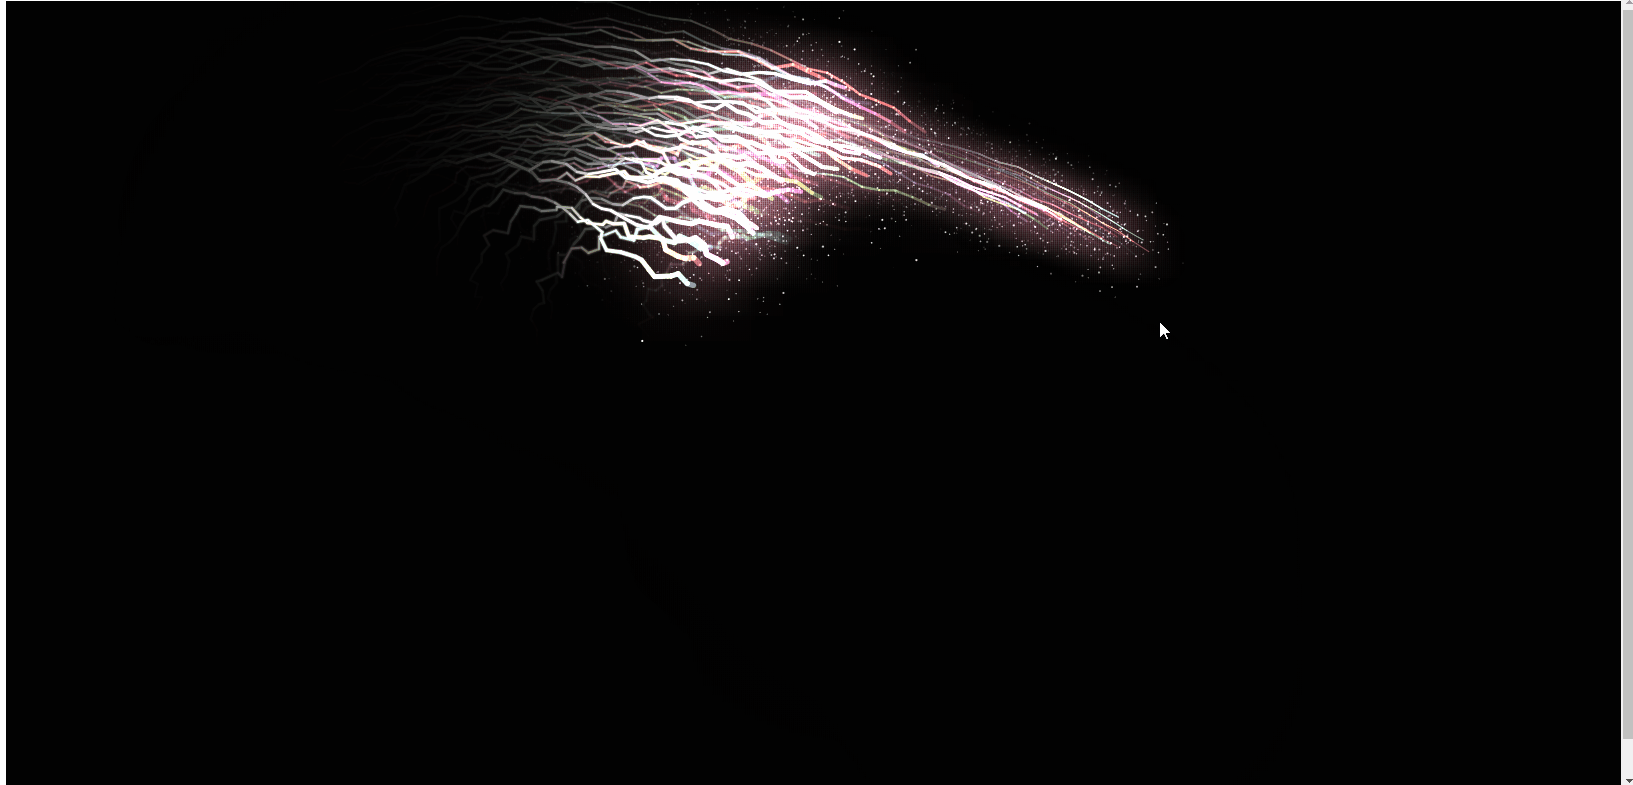
上面是效果图,下面直接附js代码,希望对大家有所帮助!!
// UTILconst PI = Math.PI, TWO_PI = Math.PI * 2;const Util = {};Util.timeStamp = function() { return window.performance.now();};Util.random = function(min, max) { return min + Math.random() * (max - min);};Util.map = function(a, b, c, d, e) { return (a - b) / (c - b) * (e - d) + d;};Util.lerp = function(value1, value2, amount) { return value1 + (value2 - value1) * amount;};Util.clamp = function(value, min, max) { return Math.max(min, Math.min(max, value));};// Vectorclass Vector { constructor(x, y) { this.x = x || 0; this.y = y || 0; } set(x, y) { this.x = x; this.y = y; } reset() { this.x = 0; this.y = 0; } fromAngle(angle) { let x = Math.cos(angle), y = Math.sin(angle); return new Vector(x, y); } add(vector) { this.x += vector.x; this.y += vector.y; } sub(vector) { this.x -= vector.x; this.y -= vector.y; } mult(scalar) { this.x *= scalar; this.y *= scalar; } p(scalar) { this.x /= scalar; this.y /= scalar; } dot(vector) { return vector.x * this.x + vector.y * this.y; } limit(limit_value) { if (this.mag() > limit_value) this.setMag(limit_value); } mag() { return Math.hypot(this.x, this.y); } setMag(new_mag) { if (this.mag() > 0) { this.normalize(); } else { this.x = 1; this.y = 0; } this.mult(new_mag); } normalize() { let mag = this.mag(); if (mag > 0) { this.x /= mag; this.y /= mag; } } heading() { return Math.atan2(this.y, this.x); } setHeading(angle) { let mag = this.mag(); this.x = Math.cos(angle) * mag; this.y = Math.sin(angle) * mag; } dist(vector) { return new Vector(this.x - vector.x, this.y - vector.y).mag(); } angle(vector) { return Math.atan2(vector.y - this.y, vector.x - this.x); } copy() { return new Vector(this.x, this.y); }}// Init canvaslet canvas = document.createElement("canvas"), ctx = canvas.getContext("2d"), H = (canvas.height = window.innerHeight), W = (canvas.width = window.innerWidth);document.body.appendChild(canvas);// Mouselet mouse = { x: W/2, y: H/2};canvas.onmousemove = function(event) { mouse.x = event.clientX - canvas.offsetLeft; mouse.y = event.clientY - canvas.offsetTop;};document.body.onresize = function(event){ H = (canvas.height = window.innerHeight); W = (canvas.width = window.innerWidth);}// Let's goclass Arrow { constructor(x, y, target) { this.position = new Vector(x, y); this.velocity = new Vector().fromAngle(Util.random(0,TWO_PI)); this.acceleration = new Vector(0, 0); this.target = target; this.travelled_distance = 0; this.min_size = 1; this.max_size = 6; this.size = Util.random(this.min_size, this.max_size); this.zone = this.size * 4; this.topSpeed = Util.map(this.size,this.min_size,this.max_size,40,10); let tailLength = Math.floor(Util.map(this.size, this.min_size, this.max_size, 4, 16)); this.tail = []; for (let i = 0; i < tailLength; i++) { this.tail.push({ x: this.position.x, y: this.position.y }); } this.wiggle_speed = Util.map(this.size, this.min_size, this.max_size, 2 , 1.2); this.blink_offset = Util.random(0, 100); this.alpha = Util.random(0.1,1) } render() { this.update(); this.draw(); } update() { let old_position = this.position.copy(); // Focus on target let t = new Vector(this.target.x, this.target.y), angle = this.position.angle(t); let d_f_target = t.dist(this.position); let f = new Vector().fromAngle(angle); f.setMag(Util.map(Util.clamp(d_f_target,0,400), 0, 400, 0, this.topSpeed * 0.1)); this.addForce(f); // Update position and velocity this.velocity.add(this.acceleration); if(d_f_target < 800){ this.velocity.limit(Util.map(Util.clamp(d_f_target,0,800), 0, 800, this.topSpeed*0.4, this.topSpeed)); }else{ this.velocity.limit(this.topSpeed); } this.position.add(this.velocity); // Reset acceleration for the next loop this.acceleration.mult(0); this.travelled_distance += old_position.dist(this.position); let wiggle = Math.sin(frame * this.wiggle_speed) * Util.map(this.velocity.mag(), 0, this.topSpeed, 0, this.size); let w_a = this.velocity.heading() + Math.PI / 2; let w_x = this.position.x + Math.cos(w_a) * wiggle, w_y = this.position.y + Math.sin(w_a) * wiggle; this.travelled_distance = 0; let from = this.tail.length - 1, to = 0; let n = new Vector().fromAngle(Util.random(0,TWO_PI)); n.setMag(Math.random()*this.size); var tail = { x: w_x+ n.x, y: w_y + n.y}; this.tail.splice(from, 1); this.tail.splice(to, 0, tail); } draw() { let energy = Util.map(this.velocity.mag(),0,this.topSpeed,0.1,1); let color = "hsl("+Math.sin((frame + this.blink_offset) * 0.1) * 360+",50%,"+ Util.map(this.velocity.mag(),0,this.topSpeed,40,100) * this.alpha +"%)"; ctx.globalAlpha = this.alpha; ctx.strokeStyle = color; for (let i = 0; i < this.tail.length - 1; i++) { let t = this.tail[i], next_t = this.tail[i + 1]; ctx.lineWidth = Util.map(i, 0, this.tail.length - 1, this.size, 1); ctx.beginPath(); ctx.moveTo(t.x, t.y); ctx.lineTo(next_t.x, next_t.y); ctx.closePath(); ctx.stroke(); } let gradient_size = 140 * energy;var grd = ctx.createRadialGradient( this.position.x,this.position.y , 5, this.position.x,this.position.y, gradient_size);grd.addColorStop(0, "rgba(255,255,255,0.01)");grd.addColorStop(0.1, "rgba(255,120,200,0.02)");grd.addColorStop(0.9, "rgba(255,255,120,0)");grd.addColorStop(1, "rgba(0,0,0,0)");// Fill with gradientctx.fillStyle = grd;ctx.fillRect(this.position.x - gradient_size / 2 ,this.position.y - gradient_size / 2 , gradient_size, gradient_size); ctx.globalAlpha = energy+0.2; ctx.fillStyle = "white"; for(let i = 0; i < 4; i++){ let n = new Vector().fromAngle(Util.random(0,TWO_PI)); n.setMag(Math.random()*energy*100); n.add(this.position); ctx.beginPath(); ctx.arc(n.x,n.y,Math.random(),0,TWO_PI) ctx.fill(); } } addForce(vector) { this.acceleration.add(vector); } avoid(others) { others.forEach(other => { if (other !== this) { let dist = this.position.dist(other.position), max_dist = this.zone + other.size; if (max_dist - dist >= 0) { let angle = other.position.angle(this.position); let force = new Vector().fromAngle(angle); force.setMag(Util.map(dist, 0, max_dist, 2, 0)); this.addForce(force); } } }); }}let arrows = [];for (let i = 0; i < 100; i++) { arrows.push(new Arrow(W / 2, H / 2, mouse));}let frame = 0;ctx.strokeStyle = "white";function loop() { ctx.fillStyle="black"; ctx.globalCompositeOperation = "source-over"; ctx.globalAlpha = 0.2; ctx.fillRect(0, 0, W, H); ctx.globalAlpha = 1; ctx.globalCompositeOperation = "lighter"; arrows.forEach(a => { a.avoid(arrows); }); arrows.forEach(a => { a.render(); }); frame += 1; requestAnimationFrame(loop);}ctx.lineCap = "round";ctx.lineJoin = "round";loop();
推荐学习:Html5视频教程
Das obige ist der detaillierte Inhalt vonHTML5 canvas如何绘制酷炫能量线条效果(附代码). Für weitere Informationen folgen Sie bitte anderen verwandten Artikeln auf der PHP chinesischen Website!