本篇文章给大家介绍一下Windows系统下PHP环境进行搭建的方法。有一定的参考价值,有需要的朋友可以参考一下,希望对大家有所帮助。

1、PHP环境搭建的前提是 Apache HTTP Server (Apache 服务器)已经安装部署成功,并可以正常访问到服务器的主页面。Apache HTTP Server 的安装部署已经在上一篇讲解的很详细了,不清楚的可以点击“ Apache HTTP Servcer-Apache服务器下载与Windows系统下安装”查看具体操作。
2、PHP下载:
2.1、下载地址:http://php.net/downloads.php
2.1、版本选择:如果是与 Apache 搭配,建议选择 Thread Safe 版本;如果是与 CGI 或者 FAST-CGI 搭配,建议选择 Non Thread Safe 版本。
3、PHP环境搭建:
3.1、将下载的 .zip 压缩包解压到指定的安装目录,此处安装路径为:D:\solt\php_5.6.33。
3.2、将 PHP 的根目录下的 php.ini-development 或者 php.ini-production复制一份并改名为 php.ini,作为PHP的配置文件;
3.3、打开php.ini,修改配置信息:
说明:a、ini文件的注释是分号(英文分号),所以取消注释就删除分号;
b、${phphome}是PHP的根目录,即:D:\solt\php_5.6.33,配置文件中写成绝对路径。
3.3.1、修改扩展文件的路径:
; extension_dir = "ext"
取消注释,或者改为:
extension_dir = "${phphome}\ext";
注意:如果是与 Apache 搭配,建议将扩展文件路径改为绝对路径,因为有可能加载不了。
3.3.2、修改需要加载的扩展文件,下面代码是取消部分扩展程序的注释之后的代码:
extension=php_bz2.dll extension=php_curl.dll extension=php_fileinfo.dll extension=php_gd2.dll extension=php_gettext.dll ;extension=php_gmp.dll ;extension=php_intl.dll ;extension=php_imap.dll ;extension=php_interbase.dll ;extension=php_ldap.dll extension=php_mbstring.dll extension=php_exif.dll ; Must be after mbstring as it depends on it extension=php_mysql.dll extension=php_mysqli.dll ;extension=php_oci8_12c.dll ; Use with Oracle Database 12c Instant Client extension=php_openssl.dll ;extension=php_pdo_firebird.dll extension=php_pdo_mysql.dll ;extension=php_pdo_oci.dll extension=php_pdo_odbc.dll extension=php_pdo_pgsql.dll extension=php_pdo_sqlite.dll extension=php_pgsql.dll ;extension=php_shmop.dll ; The MIBS data available in the PHP distribution must be installed. ; See http://www.php.net/manual/en/snmp.installation.php ;extension=php_snmp.dll extension=php_soap.dll extension=php_sockets.dll extension=php_sqlite3.dll ;extension=php_sybase_ct.dll extension=php_tidy.dll extension=php_xmlrpc.dll extension=php_xsl.dll
3.3.3、设置默认的时区:
[Date] ; Defines the default timezone used by the date functions ; http://php.net/date.timezone 选择时区列表网址 date.timezone = Asia/Shanghai
3.3.4、设置 ssl :
[openssl] ; The location of a Certificate Authority (CA) file on the local filesystem ; to use when verifying the identity of SSL/TLS peers. Most users should ; not specify a value for this directive as PHP will attempt to use the ; OS-managed cert stores in its absence. If specified, this value may still ; be overridden on a per-stream basis via the "cafile" SSL stream context ; option. openssl.cafile= cacert.pem
根据需求可以自己添加扩展。
3.4、修改 Apache24\conf\ 目录下的 httpd.conf 配置 Apache ,让 Apache 和 PHP 协同工作;
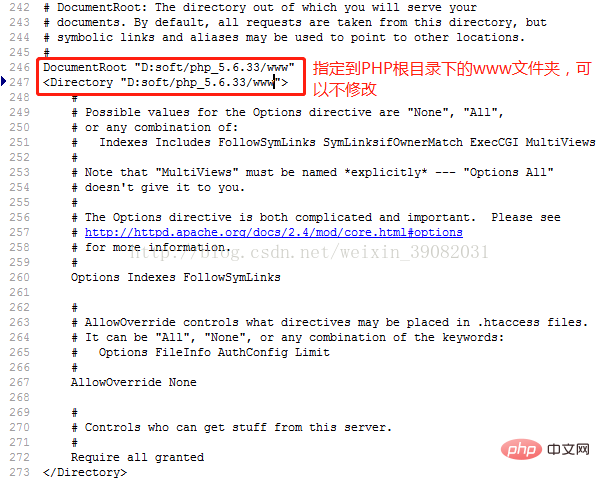
3.4.1、DocumentRoot 设置:
修改前:默认的是 Apache24 下的 htdocs 目录:
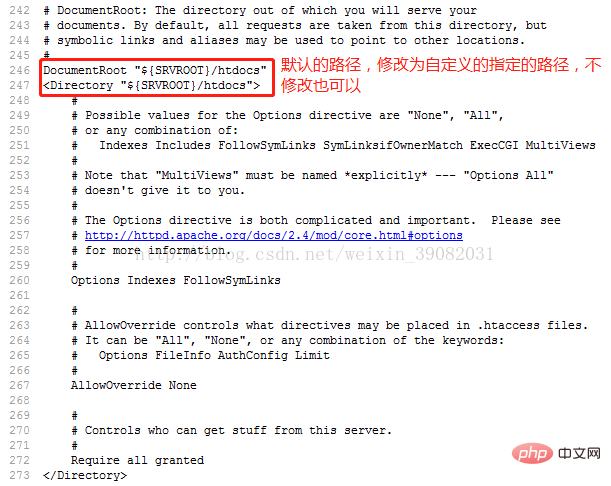
修改后:指定到自定义的路径,但是要记住这个路径。
3.4.2、修改默认的索引,以支持 PHP :
修改前:
# DirectoryIndex: sets the file that Apache will serve if a directory # is requested. #DirectoryIndex index.html
修改后:
# DirectoryIndex: sets the file that Apache will serve if a directory # is requested. #DirectoryIndex index.html index.php index.htm
3.4.3、开启 rewrite 功能:将下面这行代码前面的 # 去掉:
LoadModule rewrite_module modules/mod_rewrite.so
3.4.4、加载 PHP 模块,注意绝对路径:
如果是 PHP 5,在 httpd.conf 文件最后添加如下代码:
#php5.6 LoadModule php5_module D:/soft/php-5.6.33/php5apache2_4.dllPHPIniDir "D:/soft/php-5.6.33/" AddType application/x-httpd-php .php AddType application/x-httpd-php-source .phps
如果是 PHP 7,则相应的更改,示例如下:
#php7 LoadModule php7_module D:/soft/php-7.x.x/php7apache2_4.dllPHPIniDir "D:/soft/php-7.x.x/" AddType application/x-httpd-php .php AddType application/x-httpd-php-source .phps
3.5、如果安装的PHP x64位版本,Apache也需要是x64位版本的。然后还要将php目录下的libeay32.dll、ssleay32.dll、libssh2.dll以及ext目录下的php_curl.dll等四个文件,都复制放到System32目录下。否则curl扩展无法使用。参考链接:http://my.oschina.net/lsfop/blog/496181 。未做验证,只是照做,正常显示。
4、Apache + PHP 启动运行测试:
4.1、在 D:\soft\php_5.6.33\www 目录下,创建 index.php 文件,文本内容如下:
4.2、重启 Apache 服务,打开浏览地址栏输入: localhost:8081/index.php 或者 127.0.0.1:8081/index.php ,就可以打开 PHP 页面。
最后说明一点儿,PHP 环境搭建可以借助于 PHP 开发环境搭建工具,下载地址://m.sbmmt.com/xiazai/gongju或者http://www.wampserver.com/,在此处就不介绍工具安装方法了。
推荐学习:php视频教程
Das obige ist der detaillierte Inhalt vonWindows系统下PHP环境如何进行搭建. Für weitere Informationen folgen Sie bitte anderen verwandten Artikeln auf der PHP chinesischen Website!
 Was bedeutet ICO?
 Eigenschaften relationaler Datenbanken
 So lösen Sie das Problem, dass der Druckprozessor nicht vorhanden ist
 Was ist Lawine?
 Was ist ein optisches Laufwerk?
 Die fünf Hauptkomponenten von Springcloud
 So entschlüsseln Sie das WLAN-Passwort
 Der Hauptgrund, warum Computer Binärdateien verwenden