


基于Vue的前端框架有很多,Element算一个,而BootstrapVue也可以非常不错的一个,毕竟Bootstrap也是CSS中的大佬级别的,它和Vue的整合,使得开发起来更加方便了。BootstrapVue 是基于 Bootstrap v4 + Vue.js 的前端 UI 框架。它是流行的 Bootstrap 框架与 Vue.js 的集成。这个包称为 BootstrapVue。它允许我们使用与 Bootstrap(v4)集成的自定义组件。【相关推荐:《bootstrap教程》】
使用 BootstrapVue,任何人都可以从 Vanilla.js 或 jQuery 切换到 Vue.js,而无需担心 Bootstrap 对 jQuery 的严重依赖,甚至无法找到解决方法。这就是 BootstrapVue 的救援方式。它有助于弥补这一差距,并允许 Vue 开发人员能够轻松地在他们的项目中使用 Bootstrap。BootstrapVue不依赖Jquery。

1、BootstrapVue的安装使用
我们假设你已经有Vue的项目环境,那么BootstrapVue的安装使用介绍就很容易了,直接使用npm安装即可。
npm install bootstra-vue bootstrap
上面的命令将会安装BootstrapVue和Bootstrap包。 BoostrapVue包中包含所有BootstrapVue组件,常规Bootstrap包含CSS文件。
接下来,让我们设置刚刚安装的BootstrapVue包。转到你的main.js文件并将这行代码添加到合适的位置,另外还需要将Bootstrap CSS文件导入到项目中。
import BootstrapVue from 'bootstrap-vue'
Vue.use(BootstrapVue)

import 'bootstrap/dist/css/bootstrap.css'
import 'bootstrap-vue/dist/bootstrap-vue.css'
那么一般简单的main.js文件内容如下所示。
//src/main.js
import Vue from 'vue'
import App from './App.vue'
import BootstrapVue from 'bootstrap-vue'
import 'bootstrap/dist/css/bootstrap.css'
import 'bootstrap-vue/dist/bootstrap-vue.css'

Vue.use(BootstrapVue)
Vue.config.productionTip = false

new Vue({
  render: h => h(App),
}).$mount('#app')
如果我们项目中使用了其他组件模块,那么这些可能会有所不同。
2、BootstrapVue的组件使用
学习一项新东西,我们一般先了解一下相关的文档。
GitHub库的地址:https://github.com/topics/bootstrapvue
BootstrapVue的官网地址(可能受限无法访问):https://bootstrap-vue.js.org/
BootstrapVue的中文网站地址如下: https://code.z01.com/bootstrap-vue/
通过在Vue项目中引入对应的 BootstrapVue,那么它的相关组件使用就参考官网的介绍了解即可。BootstrapVue中有很多和Bootstrap一样的组件,不过标签前缀需要加上b-
例如对于常用的按钮界面代码处理,如下所示。
<div>
  <b-button>Button</b-button>
  <b-button variant="danger">Button</b-button>
  <b-button variant="success">Button</b-button>
  <b-button variant="outline-primary">Button</b-button>
</div>
界面如下所示,很有Bootstrap的风格!我们可以看到原先Bootstrap上的html的button加多了一个前缀b-,变为了b-button了。

卡片Card控件使用代码如下所示
<div>
  <b-card
    title="Card Title"
    img-src="https://picsum.photos/600/300/?image=25"
    img-alt="Image"
    img-top
    tag="article"
    style="max-width: 20rem;"
    class="mb-2"
  >
    <b-card-text>
      Some quick example text to build on the card title and make up the bulk of the card's content.
    </b-card-text>

    <b-button href="#" variant="primary">Go somewhere</b-button>
  </b-card>
</div>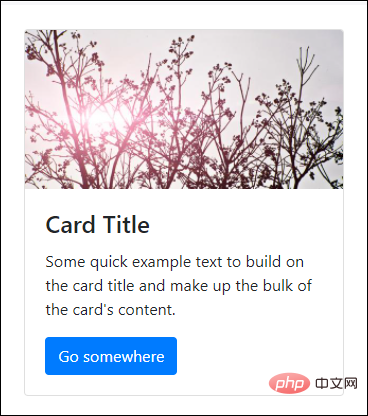
其中类class中的mb-2就是边距的定义,参考说明如下所示。

另外可能还有接触到 p-2,pt-2,py-2,px-2 等类似的定义,后面小节再行说明。
另外Flex的布局也需了解下。
<div class="bg-light mb-3">
        <div class="d-flex justify-content-start bg-secondary mb-3">
          <div class="p-2">Flex item 1</div>
          <div class="p-2">Flex item 2</div>
          <div class="p-2">Flex item 3</div>
        </div>
        <div class="d-flex justify-content-end bg-secondary mb-3">
          <div class="p-2">Flex item 1</div>
          <div class="p-2">Flex item 2</div>
          <div class="p-2">Flex item 3</div>
        </div>
        <div class="d-flex justify-content-center bg-secondary mb-3">
          <div class="p-2">Flex item 1</div>
          <div class="p-2">Flex item 2</div>
          <div class="p-2">Flex item 3</div>
        </div>
        <div class="d-flex justify-content-between bg-secondary mb-3">
          <div class="p-2">Flex item 1</div>
          <div class="p-2">Flex item 2</div>
          <div class="p-2">Flex item 3</div>
        </div>
        <div class="d-flex justify-content-around bg-light mb-3">
          <div class="p-2">Flex item 1</div>
          <div class="p-2">Flex item 2</div>
          <div class="p-2">Flex item 3</div>
        </div>
      </div>
界面效果如下所示。

我们来一个展示栅格的例子,显示卡片中图片,文字等信息。
<b-container>
      <div v-if="list.length">
        <b-row>
          <template v-for="data in list">
            <b-col sm="4" v-bind:key="data.index">
              <b-card v-bind:title="data.strCategory" v-bind:img-src="data.strCategoryThumb" img-alt="Image" img-top tag="article" style="max-width: 20rem;" class="mb-2">
                <b-card-text>{{ `${data.strCategoryDescription.slice(0,100)}...` }}</b-card-text>
                <b-button href="#" variant="primary">View food</b-button>
              </b-card>
            </b-col>
          </template>
        </b-row>
      </div>
      <div v-else>
        <h5>No meals available yet
以上就是如何安装和使用BootstrapVue,构建项目界面的详细内容,更多请关注php中文网其它相关文章!

声明:本文转载于:博客园,如有侵犯,请联系admin@php.cn删除