Django教程之Django用户注册与登录方法
这篇文章主要介绍了Django教程之Django用户注册与登录方法的相关资料,需要的朋友可以参考下
Django 是由 Python 开发的一个免费的开源网站框架,可以用于快速搭建高性能,优雅的网站!
学习django学得超级吃力,最近弄个最简单的用户登录与注册界面都是那么难,目前算是基本实现了,虽然功能特别特别简单但是做一个记录,以后学习深入了再来补充:
首先创建项目,到项目所在目录:django-admin startproject demo0414_userauth
进入项目:cd demo0414_userauth
创建相应的app:django-admin startapp account
整个项目的结构图如图所示
├── account
│ ├── admin.py
│ ├── admin.pyc
│ ├── apps.py
│ ├── init.py
│ ├── init.pyc
│ ├── migrations
│ │ ├── 0001_initial.py
│ │ ├── 0001_initial.pyc
│ │ ├── init.py
│ │ └── init.pyc
│ ├── models.py
│ ├── models.pyc
│ ├── tests.py
│ ├── urls.py
│ ├── urls.pyc
│ ├── views.py
│ └── views.pyc
├── demo0414_userauth
│ ├── init.py
│ ├── init.pyc
│ ├── settings.py
│ ├── settings.pyc
│ ├── urls.py
│ ├── urls.pyc
│ ├── wsgi.py
│ └── wsgi.pyc
├── manage.py
└── templates
├── register.html
├── success.html
└── userlogin.html
4 directories, 29 files
然后在setting文件的installed_app中添加app account;
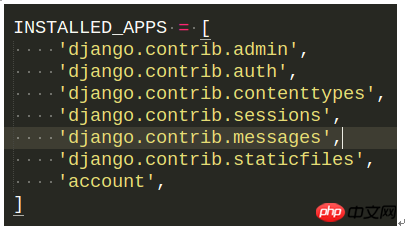
创建一个templates文件夹,可以放在项目的根目录下也可以放在app的目录下。一般情况下提倡放在app的目录下。如果放下项目的根目录下需要在setting文件中TEMPLATES中设置'DIRS': [os.path.join(BASE_DIR,'templates')],否则不能使用模板。
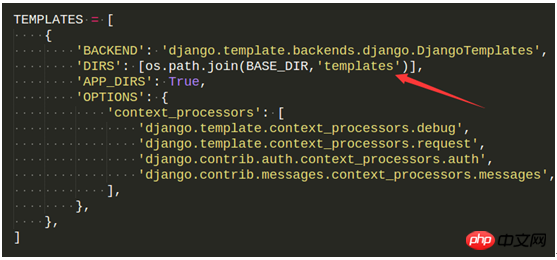
另外因为这个项目存在页面跳转的问题,为了安全防止csrf攻击,一把模板中都有了相关的设置。目前我还不会用这个东西,据说在form表单中添加标签{% csrf_token %}就可以实现了,但是我没有成功。所以先不考虑这个问题,把seeting中的这个中间件'django.middleware.csrf.CsrfViewMiddleware',注释掉

然后在model中创建相应的数据库:
class User(models.Model):
 username = models.CharField(max_length=50)
 password = models.CharField(max_length=50)
 email = models.EmailField()
view中添加相应的程序。Pdb当时用于断点调试,我很喜欢,超级喜欢。如果你不敢兴趣,直接注释即可。
#coding=utf-8
from django.shortcuts import render,render_to_response
from django import forms
from django.http import HttpResponse,HttpResponseRedirect
from django.template import RequestContext
from django.contrib import auth
from models import User

import pdb

def login(request):
 if request.method == "POST":
  uf = UserFormLogin(request.POST)
  if uf.is_valid():
   #获取表单信息
   username = uf.cleaned_data['username']
   password = uf.cleaned_data['password']
   userResult = User.objects.filter(username=username,password=password)
   #pdb.set_trace()
   if (len(userResult)>0):
    return render_to_response('success.html',{'operation':"登录"})
   else:
    return HttpResponse("该用户不存在")
 else:
  uf = UserFormLogin()
return render_to_response("userlogin.html",{'uf':uf})
def register(request):
 curtime=time.strftime("%Y-%m-%d %H:%M:%S",time.localtime());
 if request.method == "POST":
  uf = UserForm(request.POST)
  if uf.is_valid():
   #获取表单信息
   username = uf.cleaned_data['username']
   #pdb.set_trace()
   #try:
   filterResult = User.objects.filter(username = username)
   if len(filterResult)>0:
    return render_to_response('register.html',{"errors":"用户名已存在"})
   else:
    password1 = uf.cleaned_data['password1']
    password2 = uf.cleaned_data['password2']
    errors = []
    if (password2 != password1):
     errors.append("两次输入的密码不一致!")
     return render_to_response('register.html',{'errors':errors})
     #return HttpResponse('两次输入的密码不一致!,请重新输入密码')
    password = password2
    email = uf.cleaned_data['email']
   #将表单写入数据库
    user = User.objects.create(username=username,password=password1)
    #user = User(username=username,password=password,email=email)
    user.save()
    pdb.set_trace()
   #返回注册成功页面
    return render_to_response('success.html',{'username':username,'operation':"注册"})
 else:
  uf = UserForm()
return render_to_response('register.html',{'uf':uf})
class UserForm(forms.Form):
 username = forms.CharField(label='用户名',max_length=100)
 password1 = forms.CharField(label='密码',widget=forms.PasswordInput())
 password2 = forms.CharField(label='确认密码',widget=forms.PasswordInput())
 email = forms.EmailField(label='电子邮件')
class UserFormLogin(forms.Form):
 username = forms.CharField(label='用户名',max_length=100)
 password = forms.CharField(label='密码',widget=forms.PasswordInput())
Tempaltes文件夹下总共有3个页面:
Register.html
<?xml version="1.0" encoding="UTF-8"?>
<!DOCTYPE html PUBLIC "-//W3C//DTD XHTML 1.0 Strict//EN" "http://www.w3.org/TR/xhtml1/DTD/xhtml1-strict.dtd">
<html xmlns="http://www.w3.org/1999/xhtml" xml:lang="en" lang="en">
<head>
<meta http-equiv="Content-Type" content="text/html; charset=UTF-8" />
<title>用户注册</title>
</head>
<style type="text/css">
body{color:#efd;background:#453;padding:0 5em;margin:0}
h1{padding:2em 1em;background:#675}
h2{color:#bf8;border-top:1px dotted #fff;margin-top:2em}
p{margin:1em 0}
</style>
<body>
<h1>注册页面:</h1>
<form method = 'post' enctype="multipart/form-data">
{{uf.as_p}}
{{errors}}
</br>
<input type="submit" value = "ok" />
</form>
</body>
</html>Userlogin.html
<?xml version="1.0" encoding="UTF-8"?>
<!DOCTYPE html PUBLIC "-//W3C//DTD XHTML 1.0 Strict//EN" "http://www.w3.org/TR/xhtml1/DTD/xhtml1-strict.dtd">
<html xmlns="http://www.w3.org/1999/xhtml" xml:lang="en" lang="en">
<head>
<meta http-equiv="Content-Type" content="text/html; charset=UTF-8" />
<title>用户注册</title>
</head>
<style type="text/css">
body{color:#efd;background:#453;padding:0 5em;margin:0}
h1{padding:2em 1em;background:#675}
h2{color:#bf8;border-top:1px dotted #fff;margin-top:2em}
p{margin:1em 0}
</style>
<body>
<h1>登录页面:</h1>
<form method = 'post' enctype="multipart/form-data">
{{uf.as_p}}
<input type="submit" value = "ok" />
</form>
</body>
</html>Success.html
<?xml version="1.0" encoding="UTF-8"?>
<!DOCTYPE html PUBLIC "-//W3C//DTD XHTML 1.0 Strict//EN" "http://www.w3.org/TR/xhtml1/DTD/xhtml1-strict.dtd">
<html xmlns="http://www.w3.org/1999/xhtml" xml:lang="en" lang="en">
<head>
<meta http-equiv="Content-Type" content="text/html; charset=UTF-8" />
<title></title>
</head>
<body>
<form method = 'post'>
<h1>恭喜,{{operation}}成功!</h1>
</form>
</body>
</html>
更新数据库:

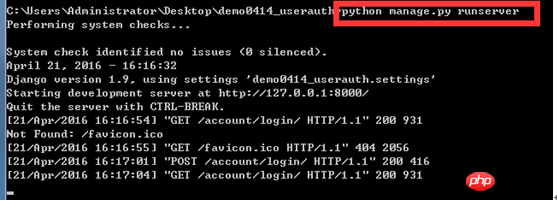
运行服务器:
注册页面:
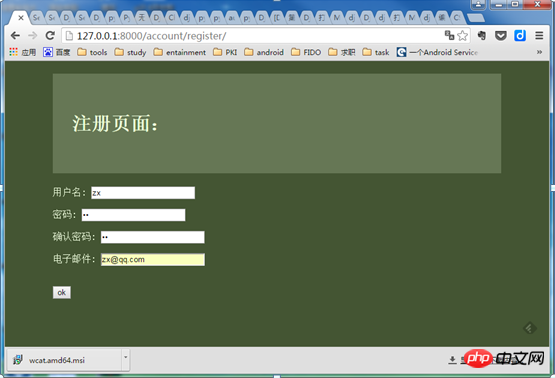
如果注册的用户没有注册过,则能注册成功点击OK进入success界面
登录页面:
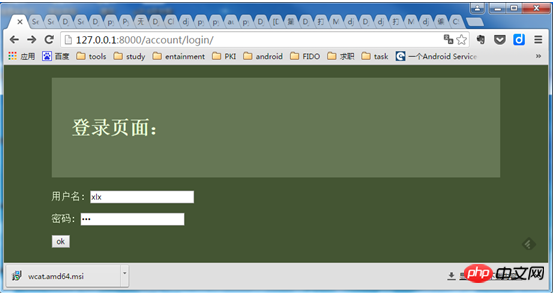
点击OK就能进入到success页面
关于Django用户注册与登录教程就给大家介绍完了,希望对大家有所帮助!
以上是Django教程之Django用户注册与登录方法的详细内容。更多信息请关注PHP中文网其他相关文章!

热AI工具

Undress AI Tool
免费脱衣服图片

Undresser.AI Undress
人工智能驱动的应用程序,用于创建逼真的裸体照片

AI Clothes Remover
用于从照片中去除衣服的在线人工智能工具。

Clothoff.io
AI脱衣机

Video Face Swap
使用我们完全免费的人工智能换脸工具轻松在任何视频中换脸!

热门文章

热工具

记事本++7.3.1
好用且免费的代码编辑器

SublimeText3汉化版
中文版,非常好用

禅工作室 13.0.1
功能强大的PHP集成开发环境

Dreamweaver CS6
视觉化网页开发工具

SublimeText3 Mac版
神级代码编辑软件(SublimeText3)
 如何处理Python中的API身份验证
Jul 13, 2025 am 02:22 AM
处理API认证的关键在于理解并正确使用认证方式。1.APIKey是最简单的认证方式,通常放在请求头或URL参数中;2.BasicAuth使用用户名和密码进行Base64编码传输,适合内部系统;3.OAuth2需先通过client_id和client_secret获取Token,再在请求头中带上BearerToken;4.为应对Token过期,可封装Token管理类自动刷新Token;总之,根据文档选择合适方式,并安全存储密钥信息是关键。
 Python函数可变范围
Jul 12, 2025 am 02:49 AM
在Python中,函数内部定义的变量是局部变量,仅在函数内有效;外部定义的是全局变量,可在任何地方读取。1.局部变量随函数执行结束被销毁;2.函数可访问全局变量但不能直接修改,需用global关键字;3.嵌套函数中若要修改外层函数变量,需使用nonlocal关键字;4.同名变量在不同作用域互不影响;5.修改全局变量时必须声明global,否则会引发UnboundLocalError错误。理解这些规则有助于避免bug并写出更可靠的函数。
 如何用Python测试API
Jul 12, 2025 am 02:47 AM
要测试API需使用Python的Requests库,步骤为安装库、发送请求、验证响应、设置超时与重试。首先通过pipinstallrequests安装库;接着用requests.get()或requests.post()等方法发送GET或POST请求;然后检查response.status_code和response.json()确保返回结果符合预期;最后可添加timeout参数设置超时时间,并结合retrying库实现自动重试以增强稳定性。
 Python Fastapi教程
Jul 12, 2025 am 02:42 AM
要使用Python创建现代高效的API,推荐使用FastAPI;其基于标准Python类型提示,可自动生成文档,性能优越。安装FastAPI和ASGI服务器uvicorn后,即可编写接口代码。通过定义路由、编写处理函数并返回数据,可以快速构建API。FastAPI支持多种HTTP方法,并提供自动生成的SwaggerUI和ReDoc文档系统。URL参数可通过路径定义捕获,查询参数则通过函数参数设置默认值实现。合理使用Pydantic模型有助于提升开发效率和准确性。
 如何在Python中解析大型JSON文件?
Jul 13, 2025 am 01:46 AM
如何在Python中高效处理大型JSON文件?1.使用ijson库流式处理,通过逐项解析避免内存溢出;2.若为JSONLines格式,可逐行读取并用json.loads()处理;3.或先将大文件拆分为小块再分别处理。这些方法有效解决内存限制问题,适用于不同场景。
 python循环在元组上
Jul 13, 2025 am 02:55 AM
在Python中,用for循环遍历元组的方法包括直接迭代元素、同时获取索引和元素、以及处理嵌套元组。1.直接使用for循环可依次访问每个元素,无需管理索引;2.使用enumerate()可同时获取索引和值,默认索引起始为0,也可指定start参数;3.对嵌套元组可在循环中解包,但需确保子元组结构一致,否则会引发解包错误;此外,元组不可变,循环中不能修改内容,可用\_忽略不需要的值,且建议遍历前检查元组是否为空以避免错误。
 Python类可以有多个构造函数吗?
Jul 15, 2025 am 02:54 AM
Yes,aPythonclasscanhavemultipleconstructorsthroughalternativetechniques.1.Usedefaultargumentsinthe__init__methodtoallowflexibleinitializationwithvaryingnumbersofparameters.2.Defineclassmethodsasalternativeconstructorsforclearerandscalableobjectcreati
 从Python中的Web API访问数据
Jul 16, 2025 am 04:52 AM
使用Python调用WebAPI获取数据的关键在于掌握基本流程和常用工具。1.使用requests发起HTTP请求是最直接的方式,通过get方法获取响应并用json()解析数据;2.对于需要认证的API,可通过headers添加token或key;3.需检查响应状态码,推荐使用response.raise_for_status()自动处理异常;4.面对分页接口,可通过循环依次请求不同页面并加入延时避免频率限制;5.处理返回的JSON数据时需根据结构提取信息,复杂数据可用pandas转换为Data


