

在本文中,我將向您展示如何使用 Ruby on Rails 和 Elasticsearch 實現全文搜尋。如今,每個人都習慣於輸入搜尋字詞並獲得建議以及突出顯示搜尋字詞的結果。如果您嘗試搜尋的內容拼字錯誤,自動更正也是一項不錯的功能,正如我們在 Google 或 Facebook 等網站上看到的那樣。
僅使用 MySQL 或 Postgres 等關聯式資料庫來實現所有這些功能並不簡單。因此,我們使用 Elasticsearch,您可以將其視為專門為搜尋而建置和優化的資料庫。它是開源的,建構在 Apache Lucene 之上。
Elasticsearch 最好的功能之一是使用 REST API 公開其功能,因此有一些程式庫為大多數程式語言封裝了該功能。
之前,我提到 Elasticsearch 就像一個用於搜尋的資料庫。如果您熟悉它的一些術語,這將會很有用。
這裡需要注意的一件事是,在 Elasticsearch 中,當您將文檔寫入索引時,會逐字分析文檔字段,以使搜尋變得輕鬆快捷。 Elasticsearch 還支援地理定位,因此您可以搜尋位於給定位置一定距離內的文件。這正是 Foursquare 實現搜尋的方式。
我想提一下,Elasticsearch 在建置時就考慮到了高可擴展性,因此很容易建立具有多個伺服器的集群,並且即使某些伺服器發生故障也具有高可用性。我不會在本文中詳細介紹如何規劃和部署不同類型的叢集。
如果您使用的是 Linux,則可能可以從其中一個儲存庫安裝 Elasticsearch。它可以在 APT 和 YUM 中使用。
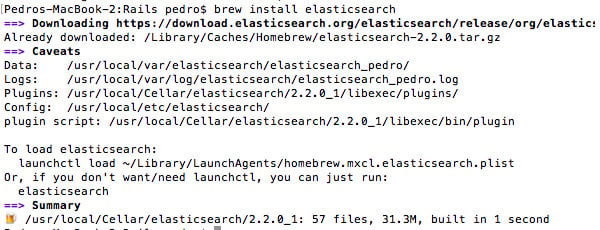
如果您使用 Mac,則可以使用 Homebrew 安裝:brew install elasticsearch。安裝elasticsearch後,您將在終端機中看到相關資料夾的清單:
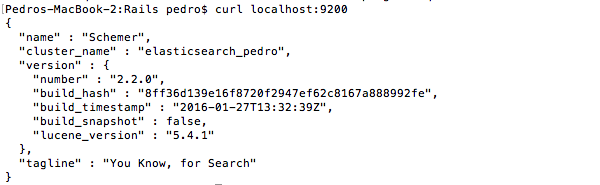
要驗證安裝是否正常運作,請在終端機中輸入 elasticsearch 來啟動它。然後在終端機中執行 curl localhost:9200,您應該會看到類似以下內容的內容:
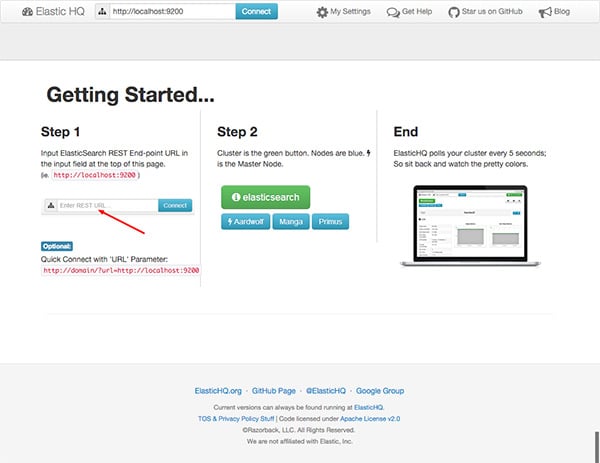
Elastic HQ 是一個監控插件,我們可以使用它從瀏覽器管理 Elasticsearch,類似於 MySQL 的 phpMyAdmin。要安裝它,只需在終端機中運行:
/usr/local/Cellar/elasticsearch/2.2.0_1/libexec/bin/plugin -install royrusso/elasticsearch-HQ
安裝完成後,在瀏覽器中導覽至 http://localhost:9200/_plugin/hq:
點擊連線,您將看到一個顯示叢集狀態的畫面: p>
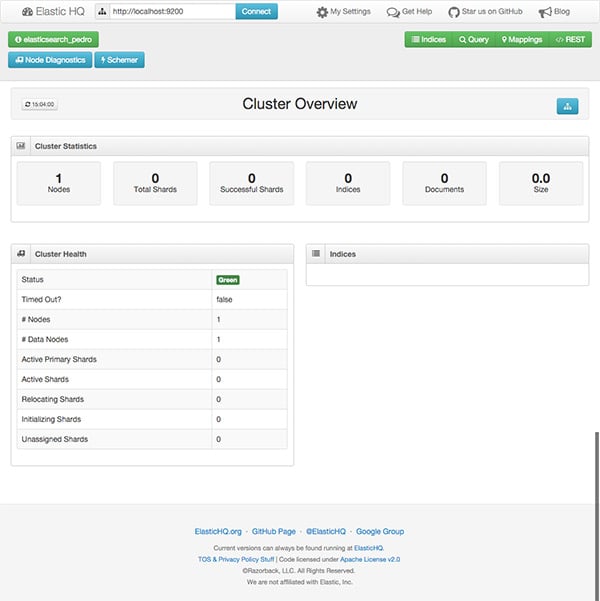
此時,正如您所料,尚未建立任何索引或文檔,但我們已經有了 Elasticsearch 的本機實例安裝並執行。
我將創建一個非常簡單的 Rails 應用程序,您可以在其中將文章添加到資料庫中,以便我們可以使用 Elasticsearch 對它們執行全文搜尋。首先建立一個新的 Rails 應用程式:
rails 新的 elasticsearch-rails
#接下來我們使用腳手架產生一個新的文章資源:
rails產生鷹架文章標題:string text:text
#現在我們需要新增一個新的根路由,這樣我們就可以預設看到文章清單。編輯config/routes.rb:
Rails.application.routes.draw do
  root to: 'articles#index'
  resources :articles
end
透過執行指令 rake db:migrate 建立資料庫。如果您啟動rails server,打開瀏覽器,導航到localhost:3000 並在資料庫中添加一些文章,或者只是下載檔案db/seeds.rb 以及我創建的虛擬數據,以便您不必花費大量時間填寫表格。
現在我們有了包含資料庫中文章的小 Rails 應用程序,我們準備添加搜尋功能。我們將首先加入兩個官方 Elasticsearch Gems 的引用:
gem 'elasticsearch-model'
gem 'elasticsearch-rails'
在許多網站上,所有頁面的頂部選單中都有一個用於搜尋的文字方塊是很常見的。因此,我將在 app/views/search/_form.html.erb 上建立表單部分。 如您所見,我將發送使用 GET 產生表單,因此可以輕鬆複製並貼上特定搜尋的 URL。
<%= form_for :term, url: search_path, method: :get do |form| %>
  <p>
    <%= text_field_tag :term, params[:term] %>
    <%= submit_tag "Search", name: nil %>
  </p>
<% end %>
在主網站佈局中新增對表單的參考。編輯app/views/layouts/application.html.erb。
<body>
  <%= render 'search/form' %>
  <%= yield %>
</body>
現在我們還需要一個控制器來執行實際搜尋並顯示結果,因此我們執行指令 rails g 新控制器 Search 來產生它。
class SearchController < ApplicationController
  def search
    if params[:term].nil?
	  @articles = []
	else
	  @articles = Article.search params[:term]
	end
  end
end
如您所見,我在 Article 模型上呼叫方法 search。我們還沒有定義它,所以如果我們嘗試在此時執行搜索,我們會收到錯誤。另外,我們還沒有在 config/routes.rb 檔案中加入 SearchController 的路由,所以讓我們這麼做:
Rails.application.routes.draw do
  root to: 'articles#index'

  resources :articles
  get "search", to: "search#search"
end
如果我們查看gem 'elasticsearch-rails' 的文檔,我們需要在要在Elasticsearch 中索引的模型上包含兩個模組,在我們的例子中文章.rb.
require 'elasticsearch/model'

class Article < ActiveRecord::Base
  include Elasticsearch::Model
  include Elasticsearch::Model::Callbacks
end
第一個模型注入了我們在先前的控制器中使用的 Search 方法。第二個模組與 ActiveRecord 回調集成,為我們保存到資料庫的文章的每個實例建立索引,如果我們修改或從資料庫中刪除文章,它也會更新索引。所以這對我們來說都是透明的。
如果您之前將資料匯入資料庫,這些文章仍然不在 Elasticsearch 索引中;只有新的才會自動索引。因此,我們必須手動索引它們,如果我們啟動 rails console 就很容易。然後我們只需要運行 irb(main) > Article.import 即可。

現在我們已準備好嘗試搜尋功能。如果我輸入“ruby”並單擊搜索,結果如下:
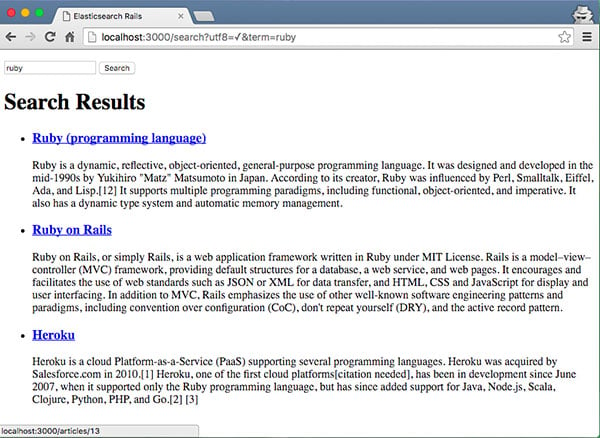
在許多網站上,您可以在搜尋結果頁面上看到您搜尋的字詞如何突出顯示。使用 Elasticsearch 可以輕鬆做到這一點。
編輯app/models/article.rb並修改預設搜尋方式:
def self.search(query)
  __elasticsearch__.search(
    {
      query: {
        multi_match: {
          query: query,
          fields: ['title', 'text']
        }
      },
      highlight: {
        pre_tags: ['<em>'],
        post_tags: ['</em>'],
        fields: {
          title: {},
          text: {}
        }
      }
    }
  )
end
預設情況下,search 方法由 gem 'elasticsearch-models' 定義,並提供代理物件 __elasticsearch__ 來存取 Elasticsearch API 的包裝類別。因此,我們可以使用文件提供的標準 JSON 選項來修改預設查詢。
現在搜尋方法將以指定的 HTML 標籤包裝與查詢相符的結果。為此,我們還需要更新搜尋結果頁面,以便能夠安全地渲染 HTML 標籤。為此,請編輯 app/views/search/search.html.erb。
<h1>Search Results</h1>

<% if @articles %>
  <ul class="search_results">
    <% @articles.each do |article| %>
      <li>
	    <h3>
	      <%= link_to article.try(:highlight).try(:title) ?
		      article.highlight.title[0].html_safe : article.title,
              controller: "articles", action: "show", id: article._id %>
	    </h3>
	    <% if article.try(:highlight).try(:text) %>
          <% article.highlight.text.each do |snippet| %>
          <p><%= snippet.html_safe %>...</p>
        <% end %>
      <% end %>
    </li>
  <% end %>
</ul>
<% else %>
  <p>Your search did not match any documents.</p>
<% end %>
將 CSS 樣式新增至 app/assets/stylesheets/search.scss,用於突出顯示的標記:
.search_results em {
  background-color: yellow;
  font-style: normal;
  font-weight: bold;
}
再次嘗試搜尋「ruby」:
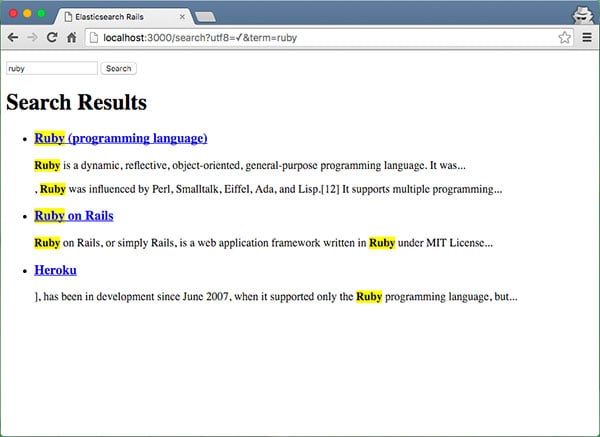
如您所見,突出顯示搜尋字詞很容易,但並不理想,因為我們需要發送 JSON 查詢正如 Elasticsearch 文件所指定的,我們沒有任何類型的抽象。
Searchkick gem 由 Instacart 提供,它是 Elasticsearch gem 官方之上的抽象。我將重構突出顯示功能,因此我們首先將 gem 'searchkick' 新增到 gemfile 中。我們需要更改的第一個類別是 Article.rb 模型:
class Article < ActiveRecord::Base
  searchkick
end
正如您所看到的,它要簡單得多。我們需要再次重新索引文章,並執行指令 rake searchkick:reindex CLASS=Article。為了突顯搜尋字詞,我們需要從 search_controller.rb 向搜尋方法傳遞一個附加參數。
class SearchController < ApplicationController
  def search
    if params[:term].nil?
	  @articles = []
	else
	  term = params[:term]
	  @articles = Article.search term, fields: [:text], highlight:  true
	end
  end
end
我們需要修改的最後一個檔案是 views/search/search.html.erb ,因為 searchkick 現在以不同的格式傳回結果:
<h2>Search Results for: <i><%= params[:term] %></i></h2>

<% if @articles %>
<ul class="search_results">
  <% @articles.with_details.each do |article, details| %>
    <li>
	  <h3>
	    <%= link_to article.title, controller: "articles", action: "show", id: article.id %>
	  </h3>
      <p><%= details[:highlight][:text].html_safe %>...</p>
	</li>
  <% end %>
</ul>
<% else %>
  <p>Your search did not match any documents.</p>
<% end %>
現在是時候再次運行應用程式並測試搜尋功能了:
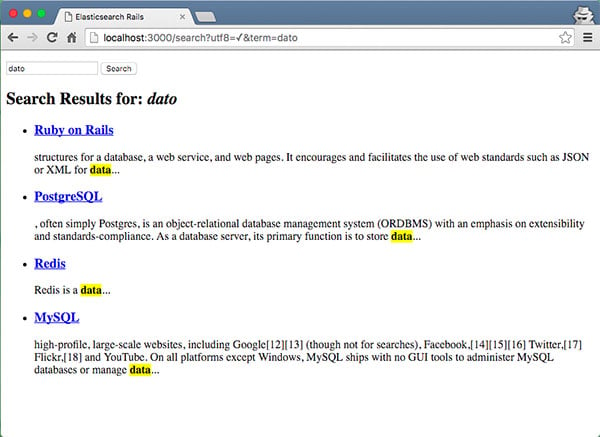
请注意,我输入了搜索词“dato”。我这样做的目的是为了向您展示,默认情况下,searchkick 设置为分析索引的文本,并且更允许拼写错误。
自动建议或预先输入可预测用户将输入的内容,从而使搜索体验更快、更轻松。请记住,除非您有数千条记录,否则最好在客户端进行过滤。
让我们首先添加 typeahead 插件,该插件可通过 gem 'bootstrap-typeahead-rails' 获得,并将其添加到您的 Gemfile 中。接下来,我们需要向 app/assets/javascripts/application.js 添加一些 JavaScript,以便当您开始在搜索框中输入内容时,会出现一些建议。
//= require jquery
//= require jquery_ujs
//= require turbolinks
//= require bootstrap-typeahead-rails
//= require_tree .

var ready = function() {
  var engine = new Bloodhound({
      datumTokenizer: function(d) {
          console.log(d);
          return Bloodhound.tokenizers.whitespace(d.title);
      },
      queryTokenizer: Bloodhound.tokenizers.whitespace,
      remote: {
          url: '../search/typeahead/%QUERY'
      }
  });

  var promise = engine.initialize();

  promise
      .done(function() { console.log('success'); })
      .fail(function() { console.log('error') });

  $("#term").typeahead(null, {
    name: "article",
    displayKey: "title",
    source: engine.ttAdapter()
  })
};

$(document).ready(ready);
$(document).on('page:load', ready);
关于前一个片段的一些评论。在最后两行中,因为我没有禁用涡轮链接,所以这是连接我想要在页面加载时运行的代码的方法。在脚本的第一部分,您可以看到我正在使用 Bloodhound。它是 typeahead.js 建议引擎,我还设置了 JSON 端点来发出 AJAX 请求来获取建议。之后,我在引擎上调用 initialize(),并使用其 id“term”在搜索文本字段上设置预输入。
现在,我们需要对建议进行后端实现,让我们从添加路由开始,编辑 app/config/routes.rb。
Rails.application.routes.draw do
  root to: 'articles#index'

  resources :articles
  get "search", to: "search#search"
  get 'search/typeahead/:term' => 'search#typeahead'
end
接下来,我将在 app/controllers/search_controller.rb 上添加实现。
def typeahead
  render json: Article.search(params[:term], {
    fields: ["title"],
    limit: 10,
    load: false,
    misspellings: {below: 5},
  }).map do |article| { title: article.title, value: article.id } end
end
此方法返回使用 JSON 输入的术语的搜索结果。我只按标题搜索,但我也可以指定文章的正文。我还将搜索结果的数量限制为最多 10 个。
现在我们准备尝试 typeahead 实现:
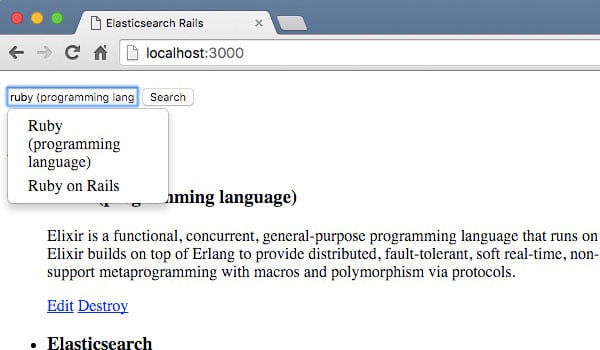
如您所见,将 Elasticsearch 与 Rails 结合使用使搜索数据变得非常简单且快速。在这里,我向您展示了如何使用 Elasticsearch 提供的低级 gem,以及 Searchkick gem,这是一个隐藏了 Elasticsearch 工作原理的一些细节的抽象。
根据您的具体需求,您可能会很乐意使用 Searchkick 并快速轻松地实施全文搜索。另一方面,如果您有一些其他复杂的查询,包括过滤器或组,您可能需要了解有关 Elasticsearch 上查询语言的详细信息,并最终使用较低级别的 gem 'elasticsearch-models' 和 'elasticsearch-导轨”。
以上是使用Elasticsearch在Rails中進行全文搜索的詳細內容。更多資訊請關注PHP中文網其他相關文章!


