負邊距即margin屬性的值設為負值,在CSS佈局中時一個很有用的技巧。值為正的場景很常見,大家都很熟悉其表現
當margin-top、margin-left為負值的時候,會把元素上移、左移,同時文檔流中的位置也發生相應變化,這點與position:relative的元素設定top、left後元素還佔據原來位置不同
當margin-bottom、margin-right設為負值的時候,元素本身沒有位置變化,後面的元素會下移、右移
#看幾個應用場景
絕對定位元素
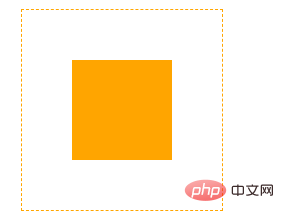
當元素被設定為絕對定位的時候其top、right、bottom、left值是指離最近的非static元素的距離,經典的垂直居中的一種方式正是利用的絕對定位元素的負邊距實現的
<style>
.wrap4{
position:relative;
margin:10px;
width:200px;
height:200px;
border:dashed 1px orange;
}
.wrap4 .content{
position:absolute;
width:100px;
height:100px;
top:50%;
left:50%;
margin-top:-50px;
margin-left:-50px;
background:orange;
}
</style>
<div class="wrap4">
<div class="content"></div>
</div>把元素設定為絕對定位,然後設定top和left為50%,這時候元素的上邊、左邊就到了父元素的50%處,再對元素設定自身高度、長度一般的負邊距,使元素中心移動到父元素中心,實現居中對齊
float元素
負邊距對float元素的影響也是按照上面說的,不過有其特殊性,我們看個例子就很清楚了
浮動元素負邊距
<style>
.float{
overflow:hidden;
width:280px;
border:dashed 1px orange;
}
.float .item{
width:100px;
height:100px;
float:left;
}
.float .item:nth-child(1){
background:red;
}
.float .item:nth-child(2){
background:grey;
}
.float .item:nth-child(3){
background:blue;
}
</style>
<div class="float">
<div class="item"></div>
<div class="item"></div>
<div class="item"></div>
</div>在一個寬度為280px的div中右3個float:left的子元素,寬度為100px,由於一排放不下,最後一個陪移動到了下一行
我們對程式碼稍作修改
<style>
.float{
overflow:hidden;
width:280px;
border:dashed 1px orange;
}
.float .item{
width:100px;
height:100px;
float:left;
}
.float .item:nth-child(1){
background:red;
}
.float .item:nth-child(2){
background:grey;
}
.float .item:nth-child(3){
background:blue;
margin-left:-20px;
}
</style>
<div class="float">
<div class="item"></div>
<div class="item"></div>
<div class="item"></div>
</div>第三個元素新增-20px的負邊距
多列佈局
<style>
.body{
width:500px;
margin:10px;
border:dashed 1px orange;
overflow:hidden;
}
.wrap3{
float:left;
width:100%;
}
.wrap3 .content{
height:200px;
margin-right:100px;
background:rgba(255,0,0,0.5);
}
.body .right{
width:100px;
height:200px;
float:left;
margin-left:-100px;
background:rgba(0,255,0,0.5)
}
</style>
<div class="body">
<div class="wrap3">
<div class="content">
Content Content Content Content Content Content Content
Content Content Content Content Content Content Content Content
</div>
</div>
<div class="right">Right</div>
</div>普通元素
負邊距對不同區塊元素的影響很有意思,我們透過幾個例子來看一下多列列表
<style>
li{
line-height:2em;
}
.col2{
margin-left:150px;
}
.col3{
margin-left:300px;
}
li.top{
margin-top:-9em;
}
</style>
<ul>
<li class="col1">aaa</li>
<li class="col1">bbb</li>
<li class="col1">ccc</li>
<li class="col2 top">ddd</li>
<li class="col2">eee</li>
<li class="col2">fff</li>
<li class="col3 top">ggg</li>
<li class="col3">hhh</li>
<li class="col3">iii</li>
</ul>放大元素
什麼?負邊距還可以放大元素! ! !<style>
.wrap{
width:300px;
border:dashed 5px orange;
}
.wrap .inner{
height:50px;
margin:0 -50px;
background:blue;
opacity:0.5;
}
</style>
<div class="wrap0">
<div class="inner0">
inner inner inner inner inner inner inner inner inner inner inner inner
</div>
</div>
有右邊距的浮動子元素清單
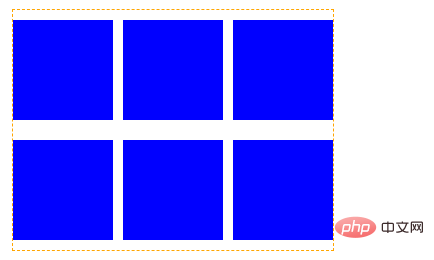 ##看到這種效果你第一個想法是什麼?會不會是子元素設定margin-right,在遍歷的時候nth-child(3n)還要設定為0,看看利用上面知識我們可以怎麼處理
<style>
.wrap2{
width:320px;
border:dashed 1px orange;
}
.wrap2 .inner{
  overflow:hidden;
  margin-right:-10px;
}
.wrap2 .item{
float:left;
width:100px;
height:100px;
margin:10px 10px 10px 0;
background:blue;
}
</style>
<div class="wrap2">
<div class="inner">
<div class="item"></div>
<div class="item"></div>
<div class="item"></div>
<div class="item"></div>
<div class="item"></div>
<div class="item"></div>
  </div>
</div>我們沒有設定nth-child( 3n)的邊距為0,而是透過負邊距使父元素「變大」。
負邊距是不是很有意思,不很了解的少年們學起來吧!
更多程式相關知識,請造訪:
程式設計學習以上是CSS佈局的實用小技巧:margin負值的詳細內容。更多資訊請關注PHP中文網其他相關文章!
