
【相關學習推薦:微信小程式教學】
小程式在很多場景下面會遇到長列表的交互,當一個頁面渲染過多的wxml節點的時候,會造成小程式頁面的卡頓和白屏。原因主要有以下幾點:
1.列表資料量大,初始化setData和初始化渲染列表wxml耗時都比較長;
2.渲染的wxml節點比較多,每次setData更新視圖都需要建立新的虛擬樹,和舊樹的diff操作耗時比較高;
#3.渲染的wxml節點比較多,page能夠容納的wxml是有限的,佔用的記憶體高。
微信小程式本身的scroll-view並沒有針對長列表做優化,官方元件recycle-view就是一個類似virtual-list的長列表元件。現在我們要剖析虛擬列表的原理,從零實作一個小程式的virtual-list。
首先我們要了解什麼是virtual-list,這是一種初始化只載入「視覺區域」及其附近dom元素,並且在捲動過程中透過重複使用dom元素只渲染「視覺區域」及其附近dom元素的捲動清單前端優化技術。相較於傳統的列表方式可以到達極高的初次渲染性能,並且在滾動過程中只維持超輕量的dom結構。
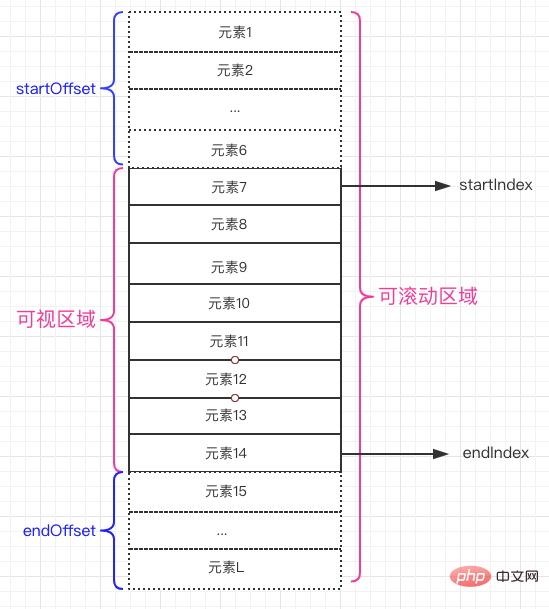
虛擬清單最重要的幾個概念:
可捲動區域:例如清單容器的高度是600,內部元素的高度總和超過了容器高度,這一塊區域就可以滾動,就是「可滾動區域」;
視覺區域:例如清單容器的高度是600,右邊有縱向捲軸可以滾動,視覺可見的內部區域就是「可視區域」。
實現虛擬清單的核心就是監聽scroll事件,透過滾動距離offset和滾動的元素的尺寸總和totalSize動態調整「視覺區域」資料渲染的頂部距離和前後截取索引值,實作步驟如下:
1.監聽scroll事件的scrollTop/scrollLeft,計算「視覺區域」起始項的索引值startIndex和結束項索引值endIndex;
2 .透過startIndex和endIndex截取長列表的「視覺區域」的資料項,更新到清單中;
3.計算可捲動區域的高度和item的偏移量,並套用在可捲動區域和item上。
在虛擬列表中,依賴每一個列表項的寬/高來計算“可滾動區域”,而且可能是需要自訂的,定義itemSizeGetter函數來計算列表項寬/高。
itemSizeGetter(itemSize) {      return (index: number) => {        if (isFunction(itemSize)) {          return itemSize(index);
        }        return isArray(itemSize) ? itemSize[index] : itemSize;
      };
}复制代码滾動過程中,不會計算沒有出現過的列表項的itemSize,這個時候會使用一個預估的列表項estimatedItemSize,目的就是在計算「可滾動區域」高度的時候,沒有測量過的itemSize用estimatedItemSize取代。
getSizeAndPositionOfLastMeasuredItem() {    return this.lastMeasuredIndex >= 0
      ? this.itemSizeAndPositionData[this.lastMeasuredIndex]
      : { offset: 0, size: 0 };
  }

getTotalSize(): number {    const lastMeasuredSizeAndPosition = this.getSizeAndPositionOfLastMeasuredItem();    return (
      lastMeasuredSizeAndPosition.offset +
      lastMeasuredSizeAndPosition.size +
      (this.itemCount - this.lastMeasuredIndex - 1) * this.estimatedItemSize
    );
}复制代码這裡看到了是直接透過快取命中最近一個計算過的清單項目的itemSize和offset,這是因為在取得每一個清單項目的兩個參數時候,都對其做了快取。
 getSizeAndPositionForIndex(index: number) {    if (index > this.lastMeasuredIndex) {      const lastMeasuredSizeAndPosition = this.getSizeAndPositionOfLastMeasuredItem();      let offset =
        lastMeasuredSizeAndPosition.offset + lastMeasuredSizeAndPosition.size;      for (let i = this.lastMeasuredIndex + 1; i <= index; i++) {        const size = this.itemSizeGetter(i);        this.itemSizeAndPositionData[i] = {
          offset,
          size,
        };

        offset += size;
      }      this.lastMeasuredIndex = index;
    }    return this.itemSizeAndPositionData[index];
}复制代码在捲動過程中,需要透過滾動偏移量offset計算出展示在「視覺區域」首項資料的索引值,一般情況下可以從0開始計算每個清單項目的itemSize,累加到一旦超過offset,就可以得到這個索引值。但是在資料量太大且頻繁觸發的滾動事件中,會有較大的效能損耗。還好列表項的滾動距離是完全升序排列的,所以可以對已經快取的資料做二分查找,把時間複雜度降低到 O(lgN) 。
js程式碼如下:
  findNearestItem(offset: number) {
    offset = Math.max(0, offset);    const lastMeasuredSizeAndPosition = this.getSizeAndPositionOfLastMeasuredItem();    const lastMeasuredIndex = Math.max(0, this.lastMeasuredIndex);    if (lastMeasuredSizeAndPosition.offset >= offset) {      return this.binarySearch({        high: lastMeasuredIndex,        low: 0,
        offset,
      });
    } else {      return this.exponentialSearch({        index: lastMeasuredIndex,
        offset,
      });
    }
  }

 private binarySearch({
    low,
    high,
    offset,
  }: {    low: number;
    high: number;
    offset: number;
  }) {    let middle = 0;    let currentOffset = 0;    while (low <= high) {
      middle = low + Math.floor((high - low) / 2);
      currentOffset = this.getSizeAndPositionForIndex(middle).offset;      if (currentOffset === offset) {        return middle;
      } else if (currentOffset < offset) {
        low = middle + 1;
      } else if (currentOffset > offset) {
        high = middle - 1;
      }
    }    if (low > 0) {      return low - 1;
    }    return 0;
}复制代码對於搜尋沒有快取計算結果的查找,先使用指數查找縮小查找範圍,再使用二分查找。
private exponentialSearch({
    index,
    offset,
  }: {    index: number;
    offset: number;
  }) {    let interval = 1;    while (
      index < this.itemCount &&      this.getSizeAndPositionForIndex(index).offset < offset
    ) {
      index += interval;
      interval *= 2;
    }    return this.binarySearch({      high: Math.min(index, this.itemCount - 1),      low: Math.floor(index / 2),
      offset,
    });
  }
}复制代码我們知道了「視覺區域」尺寸containerSize,滾動偏移量offset,在加上預渲染的條數overscanCount進行調整,就可以計算出「視覺區域」起始項目的索引值startIndex和結束項索引值endIndex,實作步驟如下:
1.找到距離offset最近的索引值,這個值就是起始項的索引值startIndex;
2.透過startIndex取得此項目的offset和size,再對offset進行調整;
3.offset加上containerSize得到結束項目的maxOffset,從startIndex開始累加,直到越過maxOffset,得到結束項索引值endIndex。
js程式碼如下:
 getVisibleRange({
    containerSize,
    offset,
    overscanCount,
  }: {    containerSize: number;
    offset: number;
    overscanCount: number;
  }): { start?: number; stop?: number } {    const maxOffset = offset + containerSize;    let start = this.findNearestItem(offset);    const datum = this.getSizeAndPositionForIndex(start);
    offset = datum.offset + datum.size;    let stop = start;    while (offset < maxOffset && stop < this.itemCount - 1) {
      stop++;
      offset += this.getSizeAndPositionForIndex(stop).size;
    }    if (overscanCount) {
      start = Math.max(0, start - overscanCount);
      stop = Math.min(stop + overscanCount, this.itemCount - 1);
    }    return {
      start,
      stop,
    };
}复制代码現在可以透過監聽scroll事件,動態更新startIndex、endIndex、totalSize、offset,就可以實現虛擬列表滾動。
js程式碼如下:
getItemStyle(index) { const style = this.styleCache[index]; if (style) { return style;
} const { scrollDirection } = this.data; const {
size,
offset,
} = this.sizeAndPositionManager.getSizeAndPositionForIndex(index); const cumputedStyle = styleToCssString({ position: 'absolute', top: 0, left: 0, width: '100%',
[positionProp[scrollDirection]]: offset,
[sizeProp[scrollDirection]]: size,
}); this.styleCache[index] = cumputedStyle; return cumputedStyle;
},
observeScroll(offset: number) { const { scrollDirection, overscanCount, visibleRange } = this.data; const { start, stop } = this.sizeAndPositionManager.getVisibleRange({ containerSize: this.data[sizeProp[scrollDirection]] || 0,
offset,
overscanCount,
}); const totalSize = this.sizeAndPositionManager.getTotalSize(); if (totalSize !== this.data.totalSize) { this.setData({ totalSize });
} if (visibleRange.start !== start || visibleRange.stop !== stop) { const styleItems: string[] = []; if (isNumber(start) && isNumber(stop)) { let index = start - 1; while (++index <= stop) {
styleItems.push(this.getItemStyle(index));
}
} this.triggerEvent('render', { startIndex: start, stopIndex: stop,
styleItems,
});
} this.data.offset = offset; this.data.visibleRange.start = start; this.data.visibleRange.stop = stop;
},复制代码在调用的时候,通过render事件回调出来的startIndex, stopIndex,styleItems,截取长列表「可视区域」的数据,在把列表项目的itemSize和offset通过绝对定位的方式应用在列表上
代码如下:
let list = Array.from({ length: 10000 }).map((_, index) => index);

Page({  data: {    itemSize: index => 50 * ((index % 3) + 1),    styleItems: null,    itemCount: list.length,    list: [],
  },
  onReady() {    this.virtualListRef =      this.virtualListRef || this.selectComponent('#virtual-list');
  },

  slice(e) {    const { startIndex, stopIndex, styleItems } = e.detail;    this.setData({      list: list.slice(startIndex, stopIndex + 1),
      styleItems,
    });
  },

  loadMore() {
    setTimeout(() => {      const appendList = Array.from({ length: 10 }).map(        (_, index) => list.length + index,
      );
      list = list.concat(appendList);      this.setData({        itemCount: list.length,        list: this.data.list.concat(appendList),
      });
    }, 500);
  },
});复制代码<view class="container">
<virtual-list scrollToIndex="{{ 16 }}" lowerThreshold="{{50}}" height="{{ 600 }}" overscanCount="{{10}}" item-count="{{ itemCount }}" itemSize="{{ itemSize }}" estimatedItemSize="{{100}}" bind:render="slice" bind:scrolltolower="loadMore">
<view wx:if="{{styleItems}}">
<view wx:for="{{ list }}" wx:key="index" style="{{ styleItems[index] }};line-height:50px;border-bottom:1rpx solid #ccc;padding-left:30rpx">{{ item + 1 }}</view>
</view>
</virtual-list>
{{itemCount}}</view>复制代码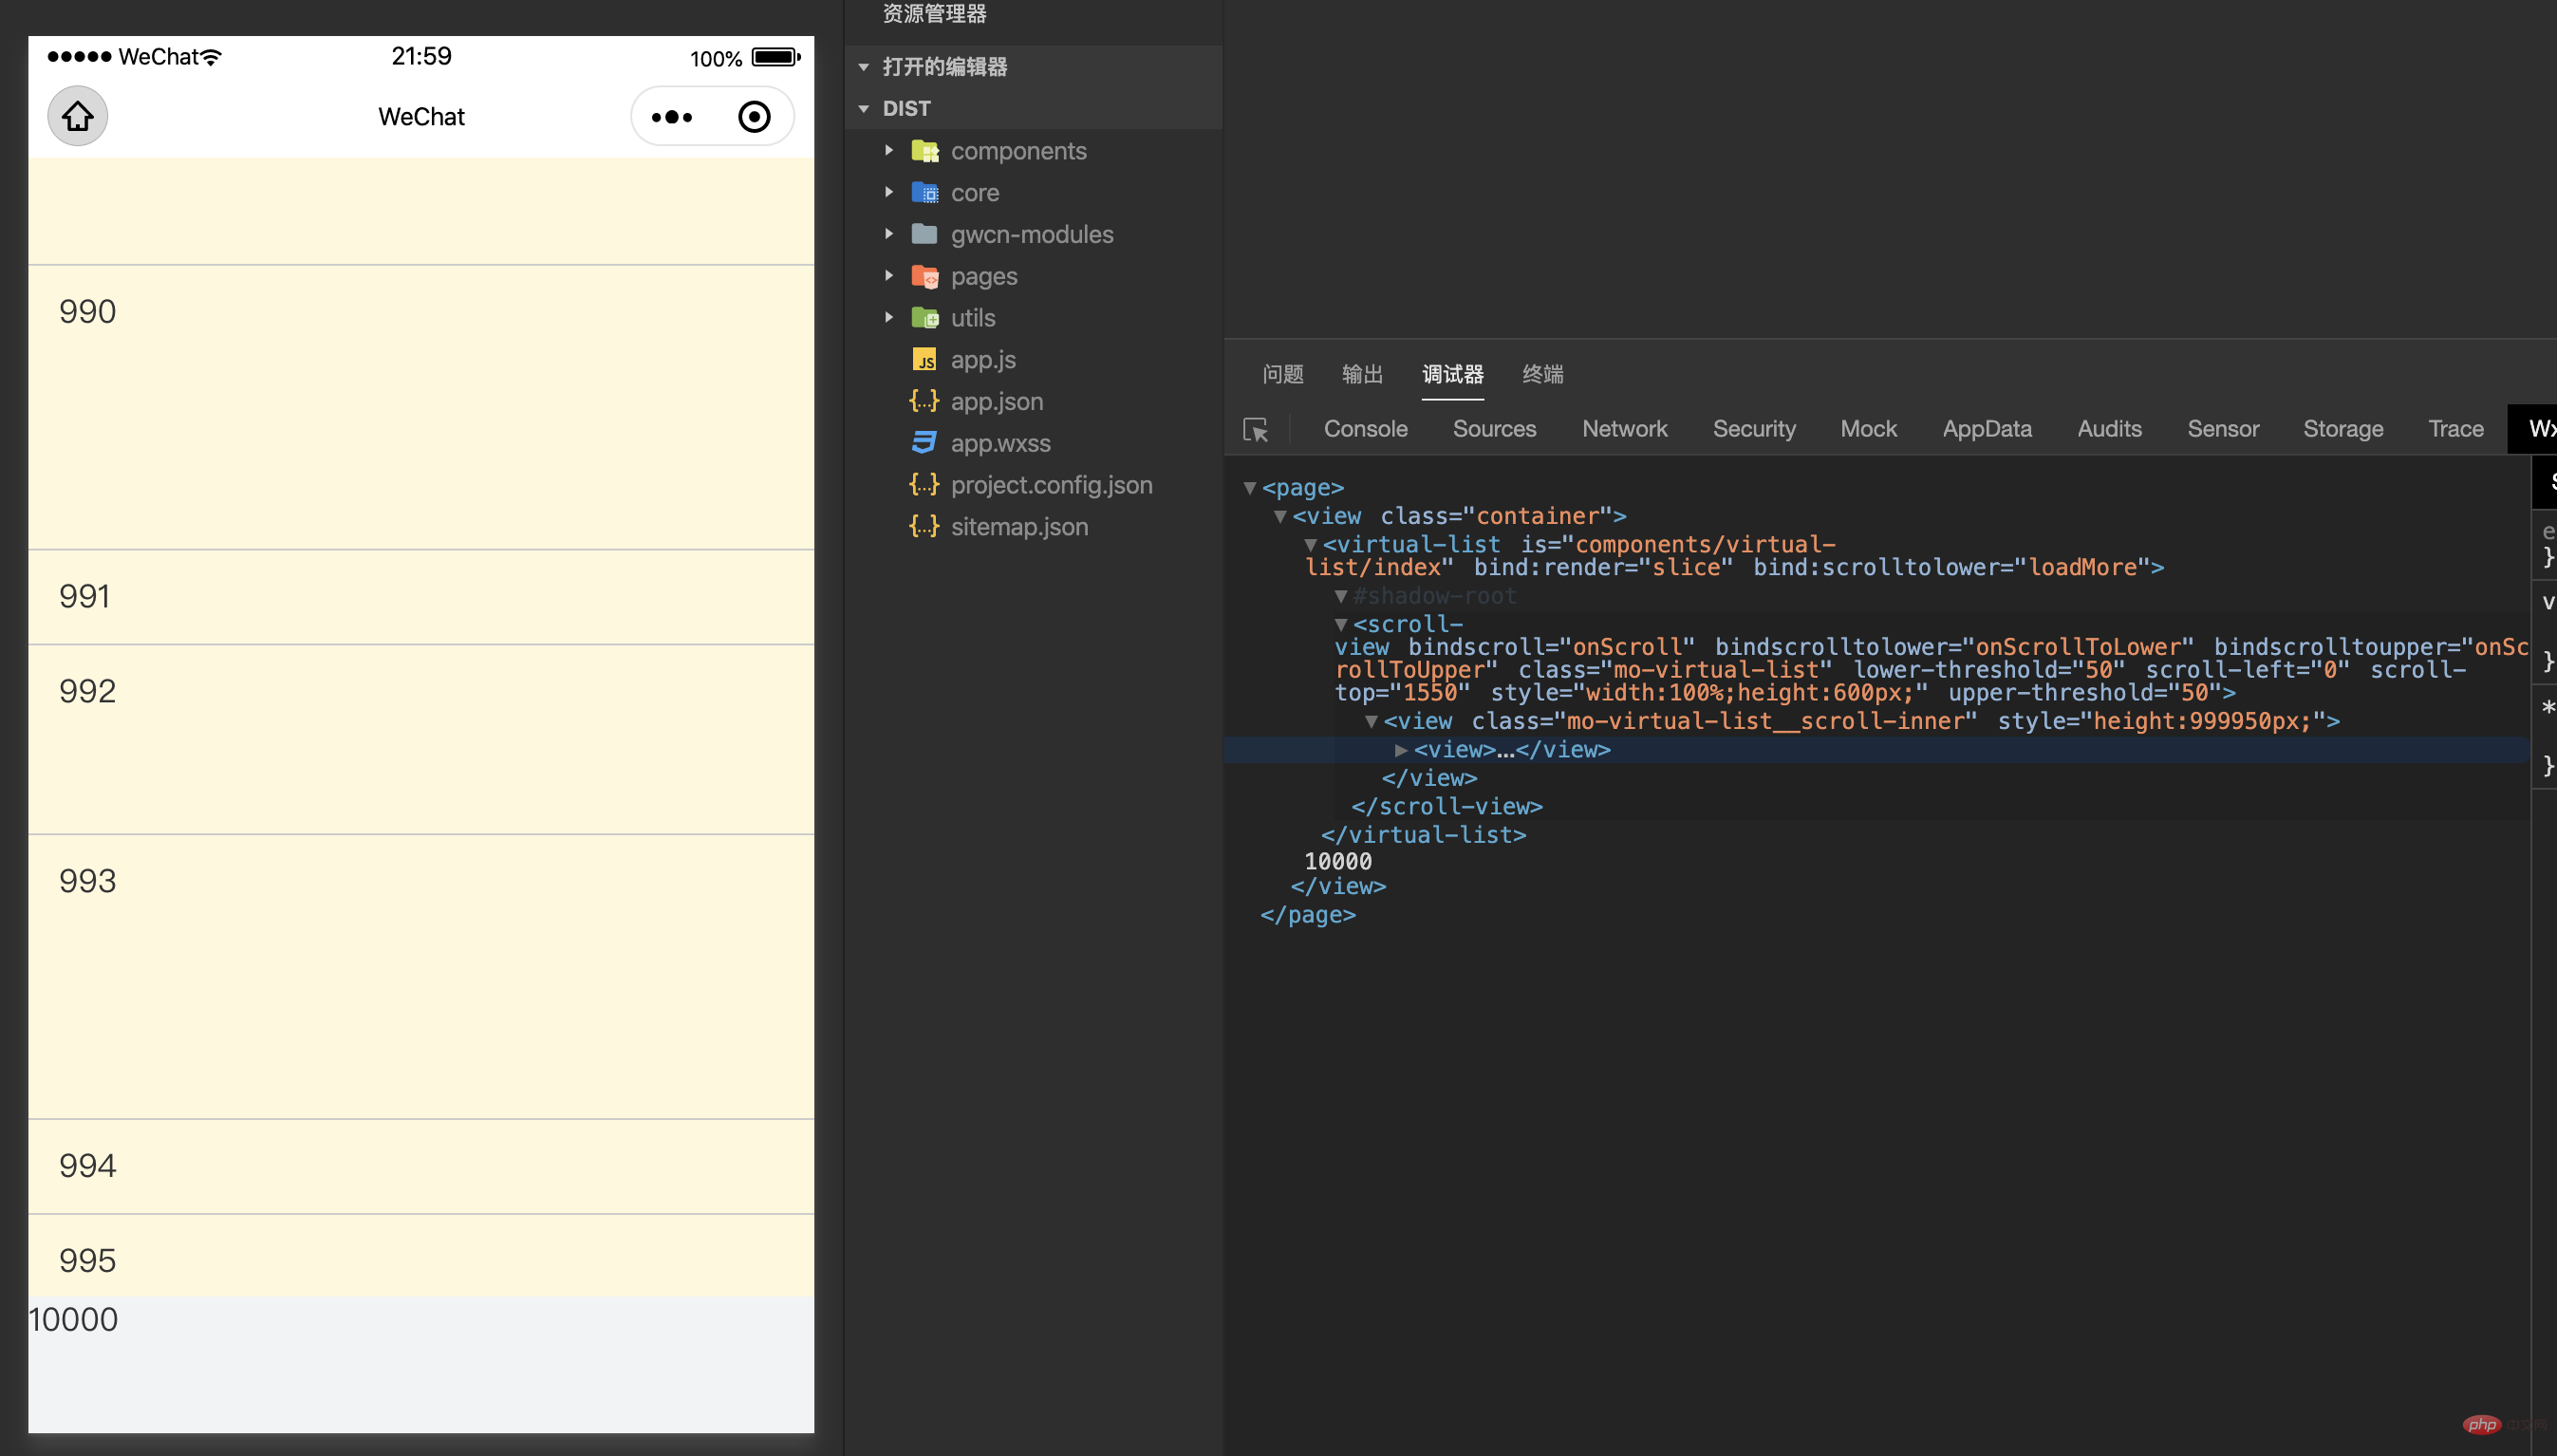
在写这个微信小程序的virtual-list组件过程中,主要参考了一些优秀的开源虚拟列表实现方案:
通过上述解释已经初步实现了在微信小程序环境中实现了虚拟列表,并且对虚拟列表的原理有了更加深入的了解。但是对于瀑布流布局,列表项尺寸不可预测等场景依然无法适用。在快速滚动过程中,依然会出现来不及渲染而白屏,这个问题可以通过增加「可视区域」外预渲染的item条数overscanCount来得到一定的缓解。
想了解更多编程学习,敬请关注php培训栏目!
以上是在微信小程式中實作virtual-list的方法詳解的詳細內容。更多資訊請關注PHP中文網其他相關文章!