這篇文章主要為大家詳細介紹了Bootstrap圖片輪播組件Carousel使用方法,具有一定的參考價值,感興趣的小伙伴們可以參考一下
Bootstrap是Twitter推出的一個開源的用於前端開發的工具包。它是由Twitter的設計師Mark Otto和Jacob Thornton合作開發,是一個CSS/HTML框架。 Bootstrap提供了優雅的HTML和CSS規範,它也就是由動態CSS語言Less寫成。 Bootstrap一推出後頗受歡迎,一直是GitHub上的熱門開源項目,包括NASA的MSNBC(微軟全國廣播公司)的Breaking News都使用了該項目。
圖片輪播元件是網頁中很常見的技術,但如果直接寫的話,需要很長的JavaScript編碼,同時也不好控制大小。
如果使用Bootstrap來編寫圖片輪播元件Carousel,則能夠節省很多時間。
同時說一下,Carousel這個字的本義是迴旋木馬。
一、基本目標
在網頁寫多張圖片的輪播組件Carousel,滑鼠放在上面自備懸停效果,並且在每張圖片下面附有圖片說明。
由於筆者的電腦錄影軟體比較渣,也覺得沒必要畫太多時間在這上面,覺得只要能說明問題就行,所以下面的GIF失色比較嚴重,但是基本的效果還算是展示出來了。
這個Bootstrap的圖片輪播組件Carousel,不相容於IE6與7,需要IE6支援的話,要去網站中下載Bootstrap的IE6元件支援(點擊開啟連結)。同時,在Google Chrome中圖片檔案說明會滲透到一點小黑色,不過不影響瀏覽:

在不同瀏覽器中的展示情況是不同的。 IE8的話是這樣的效果:

二、基本想法
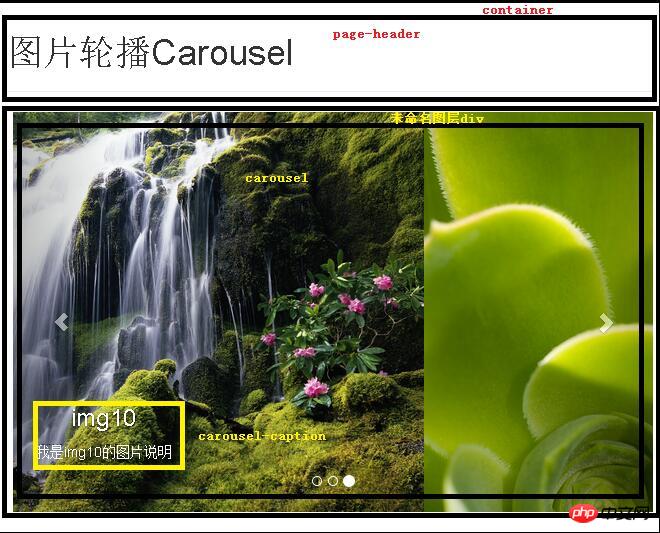
見下圖網頁版面:

三、製作過程
1、同之前《【JavaScript】使用Bootstrap來寫一個在目前網頁上彈出的對話框,可以關閉,不用跳轉,非彈跳視窗》的第一步
因為需要使用Bootstrap,所以先在官網下載組件即可,用於生產環境的Bootstrap版本,Bootstrap3對2並不兼容,建議直接根據其開發文件使用Bootstrap3。本文也是根據Bootstrap3製作。同時,Bootstrap3所提供的JavaScript效果需要到jQuery1.11支持,可以到jQuery官網中下載相容舊瀏覽器IE6的jQuery1.11(點擊開啟連結),而不是不相容舊瀏覽器IE6的jQuery2。下載完之後,設定好網站目錄。把Bootstrap3直接解壓縮到網站目錄,而把jquery-1.11.1.js放到js目錄,也就是與bootstrap.js同一目錄,網站資料夾的結構大致如下:

#2、以下是網頁的完整程式碼,以下一部分將說明:
#<!DOCTYPE html PUBLIC "-//W3C//DTD XHTML 1.0 Transitional//EN" "http://www.w3.org/TR/xhtml1/DTD/xhtml1-transitional.dtd">
<html xmlns="http://www.w3.org/1999/xhtml">
<head>
<meta http-equiv="Content-Type" content="text/html; charset=utf-8" />
<meta name="viewport" content="width=device-width,initial-scale=1.0,user-scalable=no">
<link href="css/bootstrap.css" rel="stylesheet" media="screen">
<script type="text/javascript" src="js/jquery-1.11.1.js"></script>
<script type="text/javascript" src="js/bootstrap.js"></script>
<title>图片轮播Carousel</title>
</head>
<body>
<p class="container">
 <p class="page-header">
 <h1>
 图片轮播Carousel
 </h1>
 </p>
<p style="width: 640px; height: 480px; margin-right: auto; margin-left: auto;">
<p id="carousel" class="carousel slide" data-ride="carousel" data-interval="1000">
<ol class="carousel-indicators">
<li data-target="#carousel-example-generic" data-slide-to="0" class="active"></li>
<li data-target="#carousel-example-generic" data-slide-to="1"></li>
<li data-target="#carousel-example-generic" data-slide-to="2"></li>
</ol>
<p class="carousel-inner" role="listbox">
<p class="item active">
<a href="images/img0.jpg"><img src="images/img0.jpg" alt="img0"></a>
<p class="carousel-caption">
<h3>
img0
</h3>
<p>
我是img0的图片说明
</p>
</p>
</p>
<p class="item">
<a href="images/img10.jpg"><img src="images/img10.jpg" alt="img10"></a>
<p class="carousel-caption">
<h3>
img10
</h3>
<p>
我是img10的图片说明
</p>
</p>
</p>
<p class="item">
<a href="images/img2.jpg"><img src="images/img2.jpg" alt="img2"></a>
<p class="carousel-caption">
<h3>
img2
</h3>
<p>
我是img2的图片说明
</p>
</p>
</p>
</p>
<a class="left carousel-control" href="#carousel-example-generic" role="button" data-slide="prev">
<span class="glyphicon glyphicon-chevron-left"></span> </a>
<a class="right carousel-control" href="#carousel-example-generic" role="button" data-slide="next">
<span class="glyphicon glyphicon-chevron-right"></span> </a>
</p>
</p>
</p>
</body>
</html>(1) (2)<head>
<!--声明网页编码,自动适应浏览器的尺寸,要使用bootstrap的css,需要jquery支持,要使用bootstrap的js,标题-->
<meta http-equiv="Content-Type" content="text/html; charset=utf-8" />
<meta name="viewport" content="width=device-width,initial-scale=1.0,user-scalable=no">
<link href="css/bootstrap.css" rel="stylesheet" media="screen">
<script type="text/javascript" src="js/jquery-1.11.1.js"></script>
<script type="text/javascript" src="js/bootstrap.js"></script>
<title>图片轮播Carousel</title>
</head>
先宣告一個容器container,這個容器能讓網頁的所有元素自動歸於網頁中央,之後在這個容器中編寫元素。
先寫頁頭,宣告一個頁頭,之後其裡面寫入一段文字。
<p class="page-header"> <h1> 图片轮播Carousel </h1> </p>
之後定義一個未命名的圖層p,主要是用來規範圖片輪播元件用的。 bootstrap的圖片輪播組件大小不能對其裡面的元素,加入width與height參數進行規定。這樣圖片輪播組件會失真。同時這個元件要居中,必須在p的style屬性中使用margin-right: auto; margin-left: auto;來約束,額外加入align="center"是根本一點效果都沒有。
最後是圖片元件各部分的詳細說明:
 <p style="width: 640px; height: 480px; margin-right: auto; margin-left: auto;">
 <!--图片轮播组件的名称为carousel,data-ride元素是bootstrap要求存在的,data-interval的值是每隔1000毫秒,也就是1秒换一张图片,此值太小组件会失真-->
 <p id="carousel" class="carousel slide" data-ride="carousel" data-interval="1000">
 <!--这里定义有几张图片,如果再多一张图片就再下面多加一项,data-slide-to的值加一,首张图片也就是第0张图片必须要有class="active"否则组件无法工作-->
 <ol class="carousel-indicators">
 <li data-target="#carousel-example-generic" data-slide-to="0" class="active"></li>
 <li data-target="#carousel-example-generic" data-slide-to="1"></li>
 <li data-target="#carousel-example-generic" data-slide-to="2"></li>
 </ol>

 <p class="carousel-inner" role="listbox">
   <!--以下是各张的图片的详细编辑,首张图片的class值必须为item active,余下的皆为item-->
 <p class="item active">
    <!--意为点击img0.jpg这张图片就打开img0.jpg的超级链接,如果不需要超级链接,则去掉<a>标签-->
 <a href="images/img0.jpg"><img src="images/img0.jpg" alt="img0"></a>
    <p class="carousel-caption">
    <!--图片下的文字说明-->
 <h3>
  img0
 </h3>
 <p>
  我是img0的图片说明
 </p>
 </p>
 </p>

 <p class="item">
 <a href="images/img10.jpg"><img src="images/img10.jpg" alt="img10"></a>
 <p class="carousel-caption">
 <h3>
  img10
 </h3>
    <p>
  我是img10的图片说明
    </p>
 </p>
 </p>

 <p class="item">
 <a href="images/img2.jpg"><img src="images/img2.jpg" alt="img2"></a>
 <p class="carousel-caption">
 <h3>
  img2
 </h3>
 <p>
  我是img2的图片说明
 </p>
 </p>
 </p>

 </p>

   <!--这里是组件中向左想右的两个按钮,固定存在的框架代码-->
 <a class="left carousel-control" href="#carousel-example-generic" role="button" data-slide="prev">
   <span class="glyphicon glyphicon-chevron-left"></span> </a>
 <a class="right carousel-control" href="#carousel-example-generic" role="button" data-slide="next">
   <span class="glyphicon glyphicon-chevron-right"></span> </a>

 </p>
</p>相關推薦:
######################
以上是Bootstrap圖片輪播組件Carousel使用方法詳解的詳細內容。更多資訊請關注PHP中文網其他相關文章!


