

本文主要為大家帶來一篇封裝運動框架實戰左右與上下滑動的焦點輪播圖(實例)。小編覺得蠻不錯的,現在就分享給大家,也給大家做個參考。一起跟著小編過來看看吧,希望能幫助大家。
在這篇文章打造通用的勻速運動框架(實例講解)中,封裝了一個勻速運動框架,我們在這個框架的基礎之上,加上緩衝運動效果,然後用運動框架來做幻燈片(上下,左右)。

緩衝運動通常有兩種常見的表現:例如讓一個p從0運動到500,一種是事件觸發的時候,速度很快, 一種是事件觸發的時候慢,然後慢慢加快.我們來實現先塊後慢的,常見的就是開車,比如剛從高速路上下來的車,就是120km/小時,然後進入匝道,變成40km/時. 或者40km/小時進入小區,最後停車,變成0km/小時. 從120km/小時->40km/小時, 或40km->0km/小時,都是速度先塊後慢,這種運動怎麼用程式來表示呢?
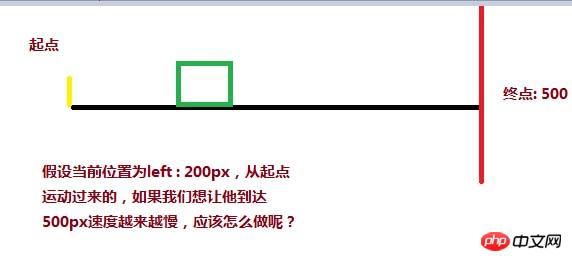
可以用目標距離( 500 ) - 當前距離( 200 ) / 一個係數( 例如12 ),就能達到速度由塊而慢的變化,當前距離在起點,分子(500 - 0 )最大,所以速度最大,如果目前距離快接近500,分子最小,除完後的速度也是最小。
<style>
p{
width: 200px;
height: 200px;
background:red;
position: absolute;
left: 0px;
}
</style>
<script>
window.onload = function(){
var oBtn = document.querySelector( "input" ),
oBox = document.querySelector( '#box' ),
speed = 0, timer = null;
oBtn.onclick = function(){
timer = setInterval( function(){
speed = ( 500 - oBox.offsetLeft ) / 8;
oBox.style.left = oBox.offsetLeft + speed + 'px';
}, 30 );
}
}
</script>
</head>
<body>
<input type="button" value="动起来">
<p id="box"></p>
</body>但是,p並不會乖乖地停止在500px這個目標位置,最終卻是停在497.375px,只要查看當前的速度,當前的值就知道原因了
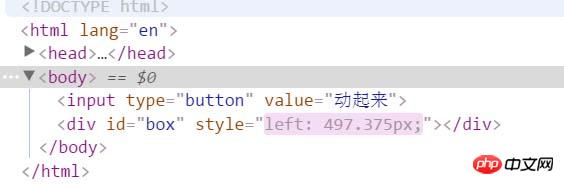
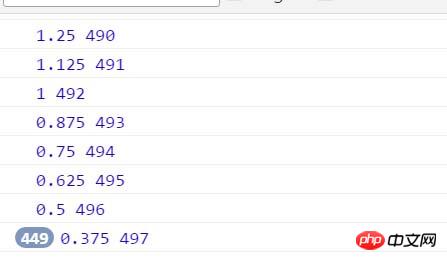
你會發現,速度永遠都在0.375這裡停著,取得到的目前的距離停在497px? 這裡有個問題,我們的p不是停在497.375px嗎,怎麼取得到的沒有了後面的小數0.375呢?計算機在處理浮點數會有精確度損失。我們可以單獨做一個小測試:
<p id="box"></p> <script> var oBox = document.querySelector( '#box' ); alert( oBox.offsetLeft ); </script>
你會發現這段程式碼取得到左偏移是30px而不是行間樣式中寫的30.2px。因為在取得目前位置的時候,會捨去小數,所以速度永遠停在0.375px, 位置也是永遠停在497,所以,為了到達目標,我們就得把速度變成1,對速度向上取整( Math .ceil ),我們就能把速度變成1,p也能到達500
oBtn.onclick = function(){
 timer = setInterval( function(){
 speed = ( 500 - oBox.offsetLeft ) / 8;
 if( speed > 0 ) {
  speed = Math.ceil( speed );
 }
 console.log( speed, oBox.offsetLeft );
 oBox.style.left = oBox.offsetLeft + speed + 'px';
 }, 30 );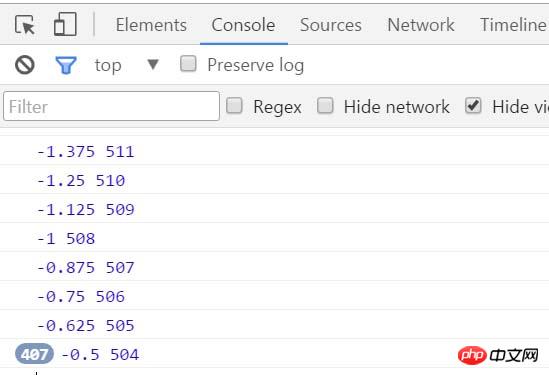
}第二個問題,如果p的位置是在900,也就是說從900運動到500,有沒有這樣的需求呢? 一定有啊,輪播圖,從右到左就是這樣的啊。
<style>
#box{
width: 200px;
height: 200px;
background:red;
position: absolute;
left: 900px;
}
</style>
<script>// <![CDATA[
window.onload = function(){
var oBtn = document.querySelector( "input" ),
oBox = document.querySelector( '#box' ),
speed = 0, timer = null;
oBtn.onclick = function(){
timer = setInterval( function(){
speed = ( 500 - oBox.offsetLeft ) / 8;
if( speed > 0 ) {
speed = Math.ceil( speed );
}
oBox.style.left = oBox.offsetLeft + speed + 'px';
}, 30 );
}
}
// ]]></script>
</head>
<body>
<input type="button" value="动起来">
<p id="box"></p>
</body>最後目標停在503.5px,速度這個時候是負值,最後速度停在-0.5,對於反方向的速度,我們就要把它變成-1,才能到達目標,所以用向下取整(Math.floor)
oBtn.onclick = function(){
 timer = setInterval( function(){
 speed = ( 500 - oBox.offsetLeft ) / 8;
 if( speed > 0 ) {
  speed = Math.ceil( speed );
 }else {
  speed = Math.floor( speed );
 }
 console.log( speed, oBox.offsetLeft );
 oBox.style.left = oBox.offsetLeft + speed + 'px';
 }, 30 );
}然後我們把這個緩衝運動整合到勻速運動框架,就變成:
function css(obj, attr, value) {
 if (arguments.length == 3) {
 obj.style[attr] = value;
 } else {
 if (obj.currentStyle) {
  return obj.currentStyle[attr];
 } else {
  return getComputedStyle(obj, false)[attr];
 }
 }
}

function animate(obj, attr, fn) {
 clearInterval(obj.timer);
 var cur = 0;
 var target = 0;
 var speed = 0;
 obj.timer = setInterval(function () {
 var bFlag = true;
 for (var key in attr) {
  if (key == 'opacity ') {
  cur = css(obj, 'opacity') * 100;
  } else {
  cur = parseInt(css(obj, key));
  }
  target = attr[key];
  speed = ( target - cur ) / 8;
  speed = speed > 0 ? Math.ceil(speed) : Math.floor(speed);
  if (cur != target) {
  bFlag = false;
  if (key == 'opacity') {
   obj.style.opacity = ( cur + speed ) / 100;
   obj.style.filter = "alpha(opacity:" + ( cur + speed ) + ")";
  } else {
   obj.style[key] = cur + speed + "px";
  }
  }
 }
 if (bFlag) {
  clearInterval(obj.timer);
  fn && fn.call(obj);
 }
 }, 30 );
}有了這勻速運動框架,我們就來做幻燈片:
上下幻燈片的html樣式檔:
<!DOCTYPE html>
<html lang="en">
<head>
 <meta charset="UTF-8">
 <title>slide - by ghostwu</title>
 <link rel="stylesheet" href="css/slide3.css" rel="external nofollow" >
 <script src="js/animate.js"></script>
 <script src="js/slide.js"></script>
</head>
<body>
<p id="slide">
 <p id="slide-img">
 <p id="img-container">
  <img src="./img/1.jpg" alt="">
  <img src="./img/2.jpg" alt="">
  <img src="./img/3.jpg" alt="">
  <img src="./img/4.jpg" alt="">
  <img src="./img/5.jpg" alt="">
 </p>
 </p>
 <p id="slide-nums">
 <ul>
  <li class="active"></li>
  <li></li>
  <li></li>
  <li></li>
  <li></li>
 </ul>
 </p>
</p>
</body>
</html>
slide3.css檔:
* {
 margin: 0;
 padding: 0;
}
li {
 list-style-type: none;
}
#slide {
 width: 800px;
 height: 450px;
 position: relative;
 margin:20px auto;
}
#slide-img {
 position: relative;
 width: 800px;
 height: 450px;
 overflow: hidden;
}
#img-container {
 position: absolute;
 left: 0px;
 top: 0px;
 height: 2250px;
 /*font-size:0px;*/
}
#img-container img {
 display: block;
 float: left;
}
#slide-nums {
 position: absolute;
 right:10px;
 bottom:10px;
}
#slide-nums li {
 float: left;
 margin:0px 10px;
 background: white;
 width: 20px;
 height: 20px;
 text-align: center;
 line-height: 20px;
 border-radius:10px;
 text-indent:-999px;
 opacity:0.6;
 filter:alpha(opacity:60);
 cursor:pointer;
}
#slide-nums li.active {
 background: red;
}animate.js檔:
function css(obj, attr, value) {
 if (arguments.length == 3) {
 obj.style[attr] = value;
 } else {
 if (obj.currentStyle) {
  return obj.currentStyle[attr];
 } else {
  return getComputedStyle(obj, false)[attr];
 }
 }
}

function animate(obj, attr, fn) {
 clearInterval(obj.timer);
 var cur = 0;
 var target = 0;
 var speed = 0;
 obj.timer = setInterval(function () {
 var bFlag = true;
 for (var key in attr) {
  if (key == 'opacity ') {
  cur = css(obj, 'opacity') * 100;
  } else {
  cur = parseInt(css(obj, key));
  }
  target = attr[key];
  speed = ( target - cur ) / 8;
  speed = speed > 0 ? Math.ceil(speed) : Math.floor(speed);
  if (cur != target) {
  bFlag = false;
  if (key == 'opacity') {
   obj.style.opacity = ( cur + speed ) / 100;
   obj.style.filter = "alpha(opacity:" + ( cur + speed ) + ")";
  } else {
   obj.style[key] = cur + speed + "px";
  }
  }
 }
 if (bFlag) {
  clearInterval(obj.timer);
  fn && fn.call(obj);
 }
 }, 30 );
}slide.js檔案:
window.onload = function () {
function Slide() {
this.oImgContainer = document.getElementById("img-container");
this.aLi = document.getElementsByTagName("li");
this.index = 0;
}
Slide.prototype.bind = function () {
var that = this;
for (var i = 0; i < this.aLi.length; i++) {
this.aLi[i].index = i;
this.aLi[i].onmouseover = function () {
that.moveTop( this.index );
}
}
}
Slide.prototype.moveTop = function (i) {
this.index = i;
for( var j = 0; j < this.aLi.length; j++ ){
this.aLi[j].className = '';
}
this.aLi[this.index].className = 'active';
animate( this.oImgContainer, {
"top" : -this.index * 450,
"left" : 0
});
}
var oSlide = new Slide();
oSlide.bind();
}左右投影片只需要改下樣式即可
樣式文件:
* {
 margin: 0;
 padding: 0;
}
li {
 list-style-type: none;
}
#slide {
 width: 800px;
 height: 450px;
 position: relative;
 margin:20px auto;
}
#slide-img {
 position: relative;
 width: 800px;
 height: 450px;
 overflow: hidden;
}
#img-container {
 position: absolute;
 left: 0px;
 top: 0px;
 width: 4000px;
}
#img-container img {
 display: block;
 float: left;
}
#slide-nums {
 position: absolute;
 right:10px;
 bottom:10px;
}
#slide-nums li {
 float: left;
 margin:0px 10px;
 background: white;
 width: 20px;
 height: 20px;
 text-align: center;
 line-height: 20px;
 border-radius:10px;
 text-indent:-999px;
 opacity:0.6;
 filter:alpha(opacity:60);
 cursor:pointer;
}
#slide-nums li.active {
 background: red;
}js呼叫檔案:
window.onload = function () {
function Slide() {
this.oImgContainer = document.getElementById("img-container");
this.aLi = document.getElementsByTagName("li");
this.index = 0;
}
Slide.prototype.bind = function () {
var that = this;
for (var i = 0; i < this.aLi.length; i++) {
this.aLi[i].index = i;
this.aLi[i].onmouseover = function () {
that.moveLeft( this.index );
}
}
}
Slide.prototype.moveLeft = function (i) {
this.index = i;
for( var j = 0; j < this.aLi.length; j++ ){
this.aLi[j].className = '';
}
this.aLi[this.index].className = 'active';
animate( this.oImgContainer, {
"left" : -this.index * 800
});
}
var oSlide = new Slide();
oSlide.bind();
}相關推薦:
以上是封裝運動框架實戰之滑動的焦點輪播圖講解的詳細內容。更多資訊請關注PHP中文網其他相關文章!


