本文主要介紹了使用 async-validator 寫 Form 元件的方法,小編覺得蠻不錯的,現在分享給大家,也給大家做個參考。一起跟著小編過來看看吧,希望能幫助大家。
在前端開發中,表單的校驗一個很常見的功能,一些 ui 函式庫例如ant.design 與Element ui 都實作了有校驗功能的 Form 元件。 async-validator 是一個可以對資料進行非同步校驗的函式庫,ant.design 與 Element ui 的 Form 元件都使用了 async-validator。本文就簡單介紹一下 async-validator 的基本用法以及使用該函式庫實作一個簡單的有校驗功能的 Form 元件。
async-validator 的功能是校驗資料是否合法,並且根據校驗規則給予提示訊息。
下面示範 async-validator 的最基本用法。
import AsyncValidator from 'async-validator'
// 校验规则
const descriptor = {
 username: [
 {
  required: true,
  message: '请填写用户名'
 },
 {
  min: 3,
  max: 10,
  message: '用户名长度为3-10'
 }
 ]
}
// 根据校验规则构造一个 validator
const validator = new AsyncValidator(descriptor)
const data = {
 username: 'username'
}
validator.validate(model, (errors, fields) => {
 console.log(errors)
})當資料不符合校驗規則時,在 validator.validate 的回呼函數中,就可以得到對應的錯誤訊息。
當 async-validator 中常見的校驗規則無法滿足需求時,我們可以編寫自訂的校驗函數來校驗資料。一個簡單的校驗函數如下。
function validateData (rule, value, callback) {
 let err
 if (value === 'xxxx') {
  err = '不符合规范'
 }
 callback(err)
}
const descriptor = {
 complex: [
  {
  validator: validateData
  }
 ]
}
const validator = new AsyncValidator(descriptor)async-validator 支援對資料非同步校驗,所以在編寫自訂校驗函數時,不管校驗是否通過,校驗函數中的callback 都要調用。
現在知道了 async-validator 的使用方法,如何將這個函式庫跟要寫的 Form 元件結合。
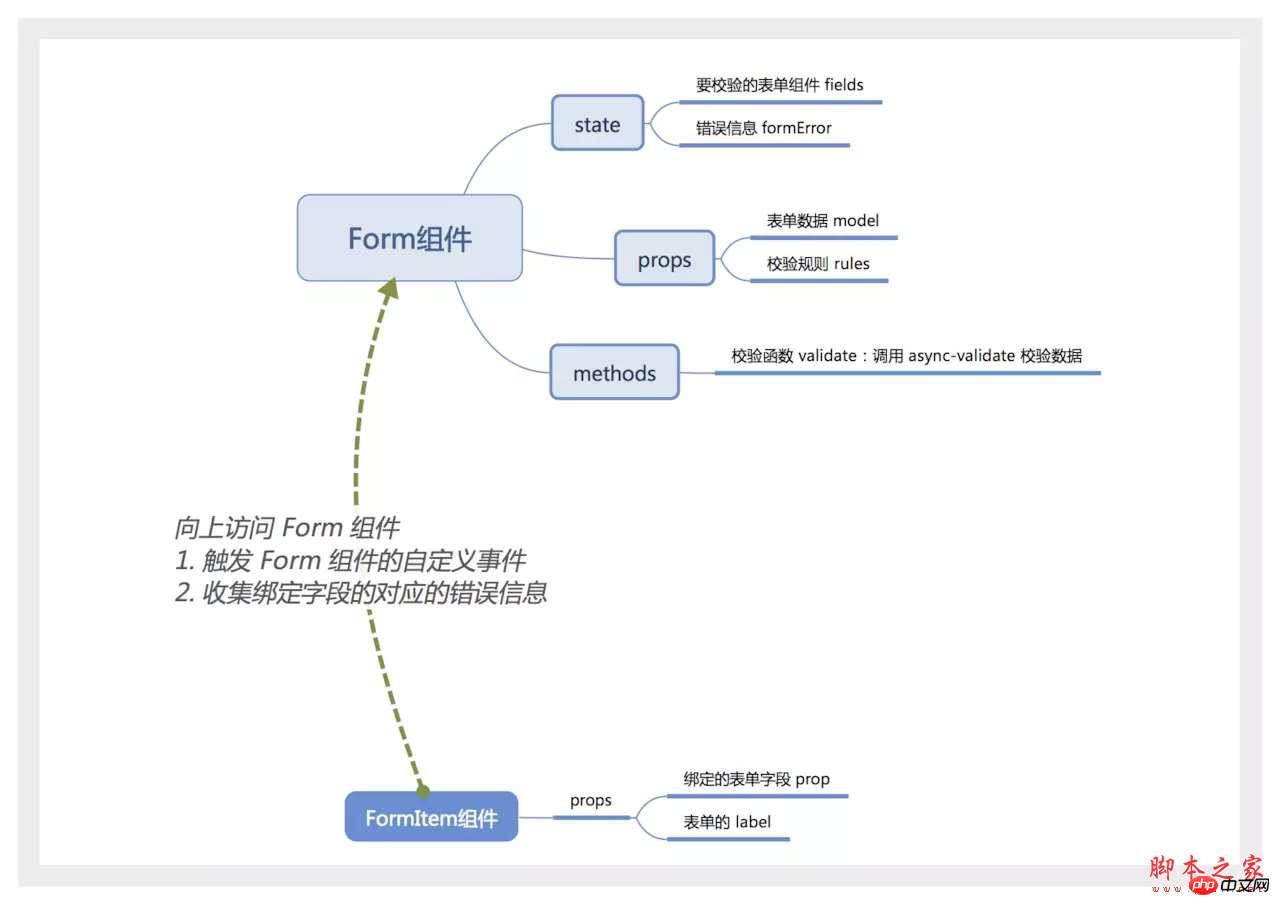
實作想法
用一張圖來描述實現想法。

Form 元件
Form 元件應該是容器,包含不定數量的 FormItem 或其他元素。可以使用 Vue 內建的slot 元件來代表 Form 裡面的內容。
Form 元件也需要知道包含了多少個需要校驗的 FormItem 元件。一般情況下,父子元件的通訊 是透過在子元件上綁定事件來實現的,但是這裡使用 slot,無法監聽到子元件的事件。這裡可以在 Form 元件上透過$on 監聽事件,FormItem 掛載或在銷毀前觸發 Form 元件的自訂事件即可。
依照這個思路,我們先寫 Form 元件。
<template>
<form class="v-form">
<slot></slot>
</form>
</template>
<script>
import AsyncValidator from 'async-validator'
export default {
name: 'v-form',
componentName: 'VForm', // 通过 $options.componentName 来找 form 组件
data () {
return {
fields: [], // field: {prop, el},保存 FormItem 的信息。
formError: {}
}
},
computed: {
formRules () {
const descriptor = {}
this.fields.forEach(({prop}) => {
if (!Array.isArray(this.rules[prop])) {
console.warn(`prop 为 ${prop} 的 FormItem 校验规则不存在或者其值不是数组`)
descriptor[prop] = [{ required: true }]
return
}
descriptor[prop] = this.rules[prop]
})
return descriptor
},
formValues () {
return this.fields.reduce((data, {prop}) => {
data[prop] = this.model[prop]
return data
}, {})
}
},
methods: {
validate (callback) {
const validator = new AsyncValidator(this.formRules)
validator.validate(this.formValues, (errors) => {
let formError = {}
if (errors && errors.length) {
errors.forEach(({message, field}) => {
formError[field] = message
})
} else {
formError = {}
}
this.formError = formError
// 让错误信息的顺序与表单组件的顺序相同
const errInfo = []
this.fields.forEach(({prop, el}, index) => {
if (formError[prop]) {
errInfo.push(formError[prop])
}
})
callback(errInfo)
})
}
},
props: {
model: Object,
rules: Object
},
created () {
this.$on('form.addField', (field) => {
if (field) {
this.fields = [...this.fields, field]
}
})
this.$on('form.removeField', (field) => {
if (field) {
this.fields = this.fields.filter(({prop}) => prop !== field.prop)
}
})
}
}
</script>FormItem 元件
FormItem 元件就簡單很多,首先要向上找到包含它的 Form 元件。接下來就可以根據 formError 計算出對應的錯誤訊息。
<template>
<p class="form-item">
<label :for="prop" class="form-item-label" v-if="label">
{{ label }}
</label>
<p class="form-item-content">
<slot></slot>
</p>
</p>
</template>
<script>
export default {
name: 'form-item',
computed: {
form () {
let parent = this.$parent
while (parent.$options.componentName !== 'VForm') {
parent = parent.$parent
}
return parent
},
fieldError () {
if (!this.prop) {
return ''
}
const formError = this.form.formError
return formError[this.prop] || ''
}
},
props: {
prop: String,
label: String
}
}
</script>FormItem 在 mounted 與 beforeDestroy 鉤子中也需要觸發 Form 元件的一些自訂事件。
<script>
export default {
// ...
methods: {
dispatchEvent (eventName, params) {
if (typeof this.form !== 'object' && !this.form.$emit) {
console.error('FormItem必须在Form组件内')
return
}
this.form.$emit(eventName, params)
}
},
mounted () {
if (this.prop) {
this.dispatchEvent('form.addField', {
prop: this.prop,
el: this.$el
})
}
},
beforeDestroy () {
if (this.prop) {
this.dispatchEvent('form.removeField', {
prop: this.prop
})
}
}
}
</script>最後新建一個 index.js 匯出寫好的元件。
import VForm from './Form.vue'
import FormItem from './FormItem.vue'

export {
 VForm,
 FormItem
}表單的校驗函數是在 Form 元件中。透過$ref 可以存取 Form 元件,呼叫 validate 函數,從而取得對應的校驗資訊。
使用方法如下:
<template>
<v-form :model="formData" :rules="rules" ref="form">
<form-item label="手机号" prop="tel">
<input type="tel" maxlength="11" v-model.trim="formData.tel"/>
</form-item>
<button @click="handleSubmit">保存</button>
</v-form>
</template>
<script>
import { VForm, FormItem } from './common/Form'
export default {
data () {
return {
formData: {
tel: ''
},
rules: {
tel: [
{required: true, message: '您的手机号码未输入'},
{pattern: /^1[34578]\d{9}$/, message: '您的手机号码输入错误'}
]
}
}
},
methods: {
handleSubmit () {
this.$refs.form.validate(errs => {
console.log(errs)
})
}
},
components: {
VForm,
FormItem
}
}
</script>完整的程式碼點擊這裡。
本文簡單介紹了一下 async-validator 的用法,並實作了一個有校驗功能的 Form 元件。這裡的實作的 Form 表單存在著許多的不足:(1) 只是在提交表單時才去校驗。 (2) FormItem 元件也應該根據校驗的結果調整 ui,給予對應的提示。所以,Form 元件比較適合在互動較少的行動端使用。
大家可以根據這個實作思路,依照應用場景,編寫客製化更高的 Form 元件。
相關推薦:
#以上是使用async-validator編寫Form元件的詳細內容。更多資訊請關注PHP中文網其他相關文章!


