在電力公司工作已有兩年,開發的各個應用程式都是基於H5應用。而H5引用中又基於cordova.js 庫來開發,各個外包公司接了應用,都是一頭霧水,不曉得怎麼開發,這篇文章主要是講解使用基於seajs庫和Bootstrap框架來搭建的一套前端通用框架。
前端架構主要研究了四點
1、 研究Web框架的動態載入技術
##針對行動互聯網環境下行動裝置記憶體、流量、電池資源有限,透過使用動態載入技術,將程式檔案打散成多個小文件,以延遲載入技術(LazyLoading),實現按需載入提升使用者體驗,降低行動端的資源使用率。在業務和樣式上,前端開發人員只需要在JS程式碼區塊頭部引用所需的js庫和css樣式即可。在邏輯上,開發人員只需呼叫後端提供的介面進行讀取與顯示。這種技術的主要優點包括可維護性高、動態載入快、前端效能最佳化好。
2、研究模組化建構技術
在前端人員開發行動應用專案的基礎上,透過使用模組化建置技術,將每個頁面分成多個功能進行分塊化處理,這樣既可快速的實現移動端的頁面獲取,也可在移動端調試的時候快速定位相關問題。透過定義多個模組來相互調用,既保證了各個模組之間不會發生衝突,也提高了開發人員的編碼效率。其優點主要是職責單一、依賴就近。 3、研究多解析度、多尺寸行動終端介面適配技術
針對行動裝置的各個終端設備,在基於bootstrap框架的基礎上,透過媒體查詢功能(Medie Query)來設定統一的樣式,透過視窗(meta)屬性內容,設定等比例窗口,這樣實現了不同手機型號的不同解析度、不同尺寸終端無法適配的問題,進一步減少程式碼的冗餘和再次開發。
4、研究行動端公用元件的封裝
#基於bootstrap框架下一些元件封裝的有限,透過對時間插件(datatime)、彈窗插件(dialog)、圖形插件(echarts)、下拉刷新上拉加載插件(Refresh)、滑動插件(swiper)、省市區選擇(citypicker) 插件、提示資訊插件(UED )等一些插件進行封裝,按需調用,按需加載,以做到不同頁面引用不同的插件,實現組件的調用,大大減少了前端開發人員的時間,同時也提高了用戶體驗。
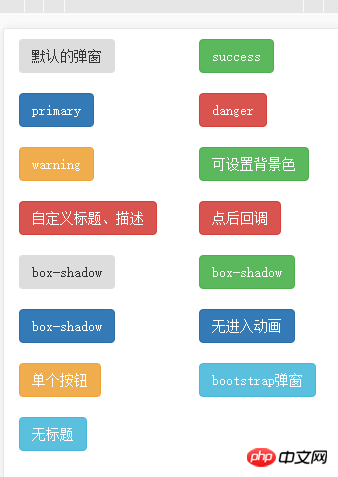
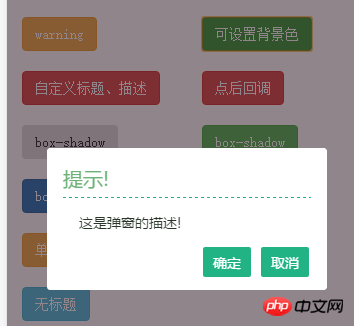
這裡,我們就拿其中一個插件-彈跳視窗來講解先給大家看看效果圖吧


<!DOCTYPE html>
<html>
<head>
    <meta http-equiv="Content-Type" content="text/html; charset=utf-8" />
    <meta name="viewport" content="width=device-width, initial-scale=1, user-scalable=no" />
    <title>首页</title>
    <meta charset="utf-8" />
    <style>.col-xs-6 {
            padding: 10px 1px;
        }</style>
</head>
<body>
    <div class="container">

        <div class="row">
            <div class="col-xs-6"><button class="btn has-hover  input-reverse-tofull">默认的弹窗</button></div>
            <div class="col-xs-6"><button class="btn btn-success has-hover">success</button></div>
            <div class="col-xs-6"><button class="btn btn-primary has-hover">primary</button></div>
            <div class="col-xs-6"><button class="btn btn-danger has-hover">danger</button></div>
            <div class="col-xs-6"><button class="btn btn-warning has-hover">warning</button></div>
            <div class="col-xs-6"><button class="btn btn-success has-hover">可设置背景色</button></div>
            <div class="col-xs-6"><button class="btn btn-danger has-hover">自定义标题、描述</button></div>
            <div class="col-xs-6"><button class="btn btn-danger has-hover">点后回调</button></div>
            <div class="col-xs-6"><button class="btn has-hover  input-reverse-tofull">box-shadow</button></div>
            <div class="col-xs-6"><button class="btn btn-success has-hover">box-shadow</button></div>
            <div class="col-xs-6">
                <button class="btn btn-primary has-hover">box-shadow</button>
            </div>
            <div class="col-xs-6"><button class="btn btn-primary has-hover">无进入动画</button></div>
            <div class="col-xs-6"><button class="btn btn-warning has-hover">单个按钮</button></div>
            <div class="col-xs-6">
                <button type="button" class="btn btn-info" id="btn-modal">bootstrap弹窗</button>
            </div>
            <div class="col-xs-6">
                <button type="button" class="btn btn-info" >无标题</button>
            </div>
        </div>
    </div>
    <script type="text/html" id="modal-tpl">
        <div id="dialogContent">这里是用户获取到的内容,获取的内容,可直接设置在这里,然后在页面显示</div>
    </script>
    <script>var basepath = "../../";//定义当前目录的位置(如果全部在根目录的话,则不需要定义)</script><!--1、首先加载sea.js 我们使用的是模块化来加载文件-->
    <script src="../../js/modules/sea.js"></script>
    <!--2、然后加载配置项-->
    <script src="../../config.js"></script>
    <!--3、最后使用seajs.use来加载当前需要加载的模块-->
    <script>seajs.use("../js/dialogs");</script>
</body>
</html>define(function (require) {
require("bootstrap");//加载bootstrap
require('dialog');//加载弹窗
require('dialogcss');//加载弹窗
var modal = new Modal({
title: '测试案例',
content: $('#modal-tpl').html(),
width: "90%",
onOk: function () {
//操作
alert("你点击了确定");
},
onModalShow: function () {
//弹窗初始化操作
}
});
$(".btn").each(function (index) {
$(this).on("click", function () {
if(index==0)
{
$('body').dailog({ type: 'defalut' });
}else if(index==1)
{
$('body').dailog({ type: 'success' })
}
else if (index == 2) {
$('body').dailog({ type: 'primary' })
}
else if (index == 3) {
$('body').dailog({ type: 'danger' })
}
else if (index == 4) {
$('body').dailog({ type: 'warning' })
}
else if (index ==5) {
$('body').dailog({ type: 'success', maskBg: 'rgba(33,11,22,0.5)' })
}
else if (index ==6) {
$('body').dailog({
type: 'danger', title: '我是自定义标题',
discription: '这里是自定义的描述,可以写上你的描述或者他的描述,总之可以写很多文字,你自己看着办吧'
}, function (ret) {
if (ret.index == 0)
{
alert("你点击了确定按钮");
} else
{
alert("你点击了取消操作");
}
console.log("信息为:"+JSON.stringify(ret));
})
} else if (index ==7) {
$('body').dailog({
type: 'danger', title: '错误提示',
discription: '这里是自定义的描述,可以写上你的描述或者他的描述,总之可以写很多文字,你自己看着办吧',
isInput: true
}, function (ret) {
console.log(ret);
if (ret.index === 0)
{
alert('你点击的是第' + ret.index + '个按钮,状态:' + ret.input.status + ';输入的值为:' + ret.input.value)
};
});
} else if (index == 8) {
$('body').dailog({ type: 'defalut', showBoxShadow: true })
} else if (index ==9) {
$('body').dailog({ type: 'success', showBoxShadow: true, maskBg: '#fff' })
} else if (index == 10) {
$('body').dailog({ type: 'primary', showBoxShadow: true, maskBg: '#ccc' })
} else if (index == 11) {
$('body').dailog({ type: 'primary', showBoxShadow: true, animateStyle: 'none' })
} else if (index == 12) {
$('body').dailog({
type: 'warning', showBoxShadow: true, animateStyle: 'none',
bottons: ['确定'], discription: '也许有点问题!'
})
}else if(index==13)
{
modal.open();
} else if (index == 14) {
$('body').dailog({ type: 'defalut',showBoxShadow: true, animateStyle: 'none',isnobutton:false,
bottons: ['关闭'], discription: '也许有点问题也许有点问题也许有点问题也许有点问题也许有点问题也许有点问题也许有点问题也许有点问题也许有点问题!'
});
}
})
})
})以上是前端框架-彈跳窗的研究的詳細內容。更多資訊請關注PHP中文網其他相關文章!


