


The content of this article is about how to use node.js to implement the real-time chat function of the WeChat applet (with code). It has certain reference value. Friends in need can refer to it. I hope it will be useful to you. helped.
I am a real novice on IM, so those who have never been exposed to it can refer to it.
It always feels weird to implement the chat function on a small program in WeChat, a chat tool. But if the leader asks, you will always do it.
Then search for the keyword real-time communication and shuttle between web pages. However, there were really too many pastings and copies. I searched for a long time and couldn't find what I wanted. However, I still extracted the keywords WebSocket and node.js, and then searched for what these two are and what their relationship is. Finally, I understood a little bit.
Finally determined that the first step is to use node.js to build the service (I installed it under my own window):
1. First. Go to the official website to download node.js, link: https:
//nodejs.org/en/ The installation is very simple. Double-click the downloaded file and go directly to the next step. There is no special choice. The default path is fine
Open the command line window and enter node-v to output the version to verify whether the installation is successful. In fact, this is not necessary
2. Then create a new folder (my node.js is installed In the ? drive, and then create a new folder called web socket under the d drive)
Then use the command to go to the directory: Install the module we want to use in this file: Before installing the module, you need to Mr. into a configuration file, otherwise an error will be reported (I reported it anyway)
Generate configuration file command: npm init -f
After execution, you can see that there is an additional file called package.json under the file Don't worry about the configuration file for now (I won't worry about it later), and then continue to install the module
At first, I installed socket.io, but later I found that the mini program couldn't be used at all, so I won't talk about socket here. io. We use ws
here to install ws command: npm install --save ws (uninstall module command: npm uninstall module name)
3. After installing the module, create a .js file in your directory , this is ws.js. I will definitely have more files here than yours. Don’t worry about it. Then open this .js file and start editing your server code. You can use Notepad or other software for this. The simplest and most basic one is to open the connection and respond to the code:
//引入ws模块
const WebSocket = require('ws');
//创建服务 port是端口
const wss = new WebSocket.Server({ port: 80});
//客户端连接时会进这个
wss.on('connection', function connection(ws) {
    console.log('连接成功');
    //客户端发送消息时会触发这个
    ws.on('message', function incoming(data) {
        console.log('收到消息');
        //data是客户端发送的消息,这里clients.foreach是广播给所有客户端
        wss.clients.forEach(function each(client) {
            //把客户端发来的data,循环发给每个客户端
            client.send(data);
        });
    });
}); Paste a slightly more complete code here. Here is the message saved in the database, using mysql, so you need to install mysql Module
npm install --save mysql
Code:
There are a lot of commented codes here, which are all used during my research. Ignore them and you can delete them or
This MySQL data connection needs to be based on My own modification is also table
The table I use here only has two field IDs, MSG
var http=require('http');
var qs = require('querystring'); //
var ws=require('ws');

var server=http.createServer(function (req, res) {
    res.end("This is a WebSockets server!");
});
var url = require('url');
//验证函数
function ClientVerify(info) {
    var ret = false;//拒绝
    //url参数
    var params = url.parse(info.req.url, true).query;
    //console.log(groupid);
    //groupid=params['groupid']
    //谁谁谁来到了讨论组
    // wss.clients.forEach(function each(client) {
    //     client.send('233');
    // });
    return true;

}
var wss = new ws.Server( { server: server,verifyClient: ClientVerify } );

/*//引入数据库
 var mysql = require('mysql');
 //连接数据库信息 普通版
 var connection = mysql.createConnection({
    host  : '58.87.94.16',
    user  : 'root',
    password : 'root',
    database : 'bootdo'
});*/
//引入数据库
var mysql = require('mysql');
// 创建数据池
const pool  = mysql.createPool({
    host     : '58.87.94.16',   // 数据库地址
    user     : 'root',    // 数据库用户
    password : 'root',   // 数据库密码
    database : 'bootdo'  // 选中数据库
})
/*接收一个sql语句 以及所需的values
这里接收第二参数values的原因是可以使用mysql的占位符 '?'
比如 query(`select * from my_database where id = ?`, [1])
好像可以直接使用pool.query,暂时不明*/
let query = function(sql,values,callback){
    pool.getConnection(function(err,conn){
        if(err){
            callback(err,null,null);
        }else{

            conn.query(sql,values,function(err,results,fields){
                //释放连接
                conn.release();
                //事件驱动回调
                callback(err,results,fields);
            });
        }
    });
};
module.exports=query;

wss.on('connection', function connection(ws) {
    console.log('链接成功!');
    //console.log(ws);
    //查询历史聊天记录 广播给连接的客户端
    var sql='select * from hi_test where groupid=1';
    console.log('sql语句',sql);
    query(sql,function (err,res,fields) {
        console.log('sql操作返回:', res);
        if(res!=null){
            ws.send(JSON.stringify(res));
        }
    });
    //监听客户端发送得消息
    ws.on('message', function incoming(data) {
        console.log('来自客户端得message:',data);
        //保存客户端发送得消息到数据库
        sql="insert into hi_test(msg) values(?)";
        console.log('sql语句',sql);
        query(sql,data,function (err,res,fields) {
            console.log('sql操作返回:',res);//res.insertId
        });
        var sendData=JSON.stringify([{msg:data}])
        /**
         * 把消息发送到所有的客户端
         * wss.clients获取所有链接的客户端
         */
        wss.clients.forEach(function each(client) {
            client.send(sendData);
        });
    });
});

server.listen(80, function listening() {
    console.log('服务器启动成功!');
});


/*发起get请求
var options = {
    hostname: 'www.tjjxsoft.cn',
    path: '/attendanceParameter/getAttendanceParameter/13',
    method: 'GET'
};

var req = http.request(options, function (res) {
    console.log('状态: ' + res.statusCode);
    res.on('data', function (chunk) {
        console.log('返回数据: ' + chunk);
    });
});

req.on('error', function (e) {
    console.log('problem with request: ' + e.message);
});

req.end();*/

/*
/!*构建http服务*!/
var app = require('http').createServer()
/!*引入socket.io*!/
var io = require('socket.io')(app);
/!*定义监听端口,可以自定义,端口不要被占用*!/
var PORT = 80;
/!*监听端口*!/
app.listen(PORT);

/!*定义用户数组*!/
var users = [];
/!**
 *监听客户端连接
 *io是我们定义的服务端的socket
 *回调函数里面的socket是本次连接的客户端socket
 *io与socket是一对多的关系
 *!/
io.on('connection', function (socket) {
    /!*所有的监听on,与发送emit都得写在连接里面,包括断开连接*!/
    socket.on('login',function(data){
        console.log('有人登录了:')
        console.log(data);
        users.push({
            username:data.username
        });
        /!*向所有连接的客户端广播add事件*!/
        io.sockets.emit('add',data)
    })
})
console.log('app listen at'+PORT);*/ Then enter node ws.js (your own file name) on the command line and press Enter, and it will be started. Service
4. Now that the service has been started, paste the code directly on the
side of the mini program:
wxml:
<view class='homeView'>
<scroll-view scroll-y style="height:500px;" scroll-top='{{scrolltop}}'>
<view class='listView'>
<block wx:for="{{serverMsg}}" wx:key='*this'>
<!-- -->
<view wx:if="{{item.user.id!=userInfo.userId}}" class='leftView'>
<view class='name'>{{item.user.name}}</view>
<view class='imgmsgleft'>
<view>
<!-- 我这用的是自己另一个服务的图片 -->
<image class='touimg' src='https://www.tjjxsoft.cn/static/images/img005.png'></image>
</view>
<view>{{item.msg}}</view>
</view>
</view>
<view wx:else class='rightView'>
<view class='name'>{{item.user.name}}</view>
<view class='imgmsg'>
<view>{{item.msg}}</view>
<view>
<!-- 我这用的是自己另一个服务的图片 -->
<image class='touimg' src='https://www.tjjxsoft.cn/static/images/img005.png'></image>
</view>
</view>
</view>
</block>
</view>
</scroll-view>
<view class='sendView'>
<input bindinput='sendTextBind' placeholder="输入聊天内容" value='{{sendText}}' />
<button bindtap='sendBtn' type="primary">发送</button>
</view>
</view>.js file:
var app = getApp();
Page({
data: {
socket_open: false,//判断连接是否打开
sendText: "",//发送的消息
serverMsg: [],//接受的服务端的消息
userInfo: { userId: 1, name: "呵呵",img:'头像'},//app.appData.userInfo,
scrolltop: 999
},
/**输入内容 */
sendTextBind: function(e) {
this.setData({
sendText: e.detail.value
});
console.log(this.data.sendText);
},
/**发送消息 */
sendBtn: function(e) {
console.log('发送消息事件!');
var msgJson = {
user: {
id: this.data.userInfo.userId,//app.appData.userInfo.userId, //唯一ID区分身份
name: this.data.userInfo.name, //显示用姓名
img: this.data.userInfo.img, //显示用头像
},
msg: this.data.sendText,//发送的消息
groupid:1
}
//发送消息
this.send_socket_message(JSON.stringify(msgJson));
this.setData({
sendText: ""//发送消息后,清空文本框
});
},
onLoad: function(options) {
// app.login();
// this.setData({
// userInfo: app.appData.userInfo
// });
//初始化
this.wssInit();
},
wssInit() {
var that = this;
//建立连接
wx.connectSocket({
url: 'ws://localhost'//app.appData.socket
})
//监听WebSocket连接打开事件。
wx.onSocketOpen(function(res) {
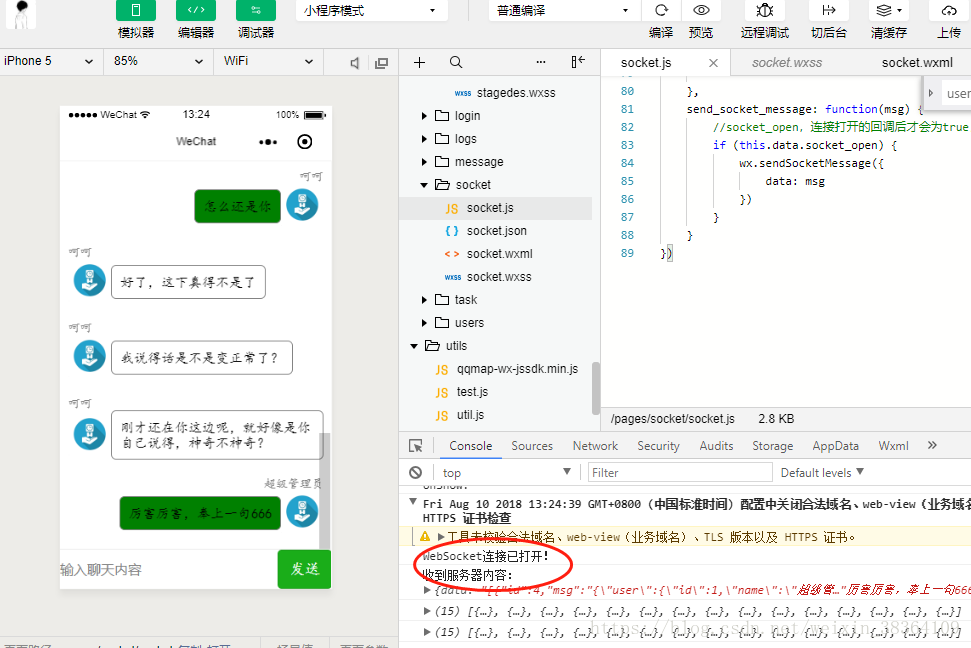
console.log('WebSocket连接已打开!');
that.setData({
socket_open: true
});
});
//监听WebSocket接受到服务器的消息事件。
wx.onSocketMessage(function(res) {
console.log('收到服务器内容:', res);
var server_msg = JSON.parse(res.data);
console.log(server_msg);
if (server_msg != null) {
var msgnew = [];
for (var i = 0; i < server_msg.length; i++) {
msgnew.push(JSON.parse(server_msg[i].msg));
}
msgnew=that.data.serverMsg.concat(msgnew);
that.setData({
serverMsg: msgnew,
scrolltop: msgnew.length * 100
});
console.log(that.data.serverMsg);
}
});
//监听WebSocket错误。
wx.onSocketError(function(res) {
console.log('WebSocket连接打开失败,请检查!', res)
});
},
send_socket_message: function(msg) {
//socket_open,连接打开的回调后才会为true,然后才能发送消息
if (this.data.socket_open) {
wx.sendSocketMessage({
data: msg
})
}
}
})wxss:
.homeView {
    border-top: 1px solid #ededed;
}
.listView{
    padding-bottom: 50px;
}
.listView>view {
    padding: 10px;
}

.rightView {
    text-align: right;
}

.imgmsgleft {
    display: flex;
    justify-content: flex-start;
    align-items: center;
}

.imgmsgleft>view:last-child {
    border: solid 1px gray;
    padding: 10px;
    border-radius: 6px;
}

.imgmsg {
    display: flex;
    justify-content: flex-end;
    align-items: center;
}

.imgmsg>view:first-child {
    border: solid 1px gray;
    padding: 10px;
    border-radius: 6px;
    background-color: green;
}

.touimg {
    width: 50px;
    height: 50px;
}

.name {
    font-size: 14px;
    color: gray;
}

.sendView {
    display: flex;
    width: 100%;
    position: fixed;
    bottom: 0px;
    border-top: 1px #ededed solid;
    background-color: white;
}

.sendView>button {
    width: 20%;
}

.sendView>input {
    width: 80%;
    height: auto;
}Be sure to turn on debugging when previewing, because this is not a wss protocol and cannot be directly Used
Related recommendations:
Introduction to examples of using CSS3 to imitate WeChat chat bubbles
Created using Turing api WeChat chat robot, api chat robot_PHP tutorial
Implementing the chat function of WeChat UI
The above is the detailed content of node.js to implement the real-time chat function of WeChat applet (with code). For more information, please follow other related articles on the PHP Chinese website!


![[Web front-end] Node.js quick start](https://img.php.cn/upload/course/000/000/067/662b5d34ba7c0227.png)


