


This article mainly introduces the relevant information on the summary of WeChat Mini Program UI and container components. Friends in need can refer to the following
Summary of WeChat Mini Program UI and Container Components
1. Summary and overview
2. Container component
2.1 Component container (view)
2.2 Scroll-view container (scroll-view)
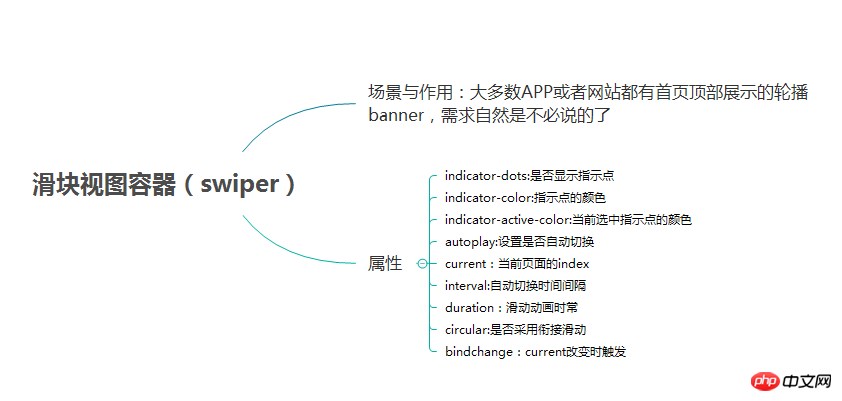
2.3 Slider view container (swiper)
1. Summary and overview
1.1 UI component summary diagram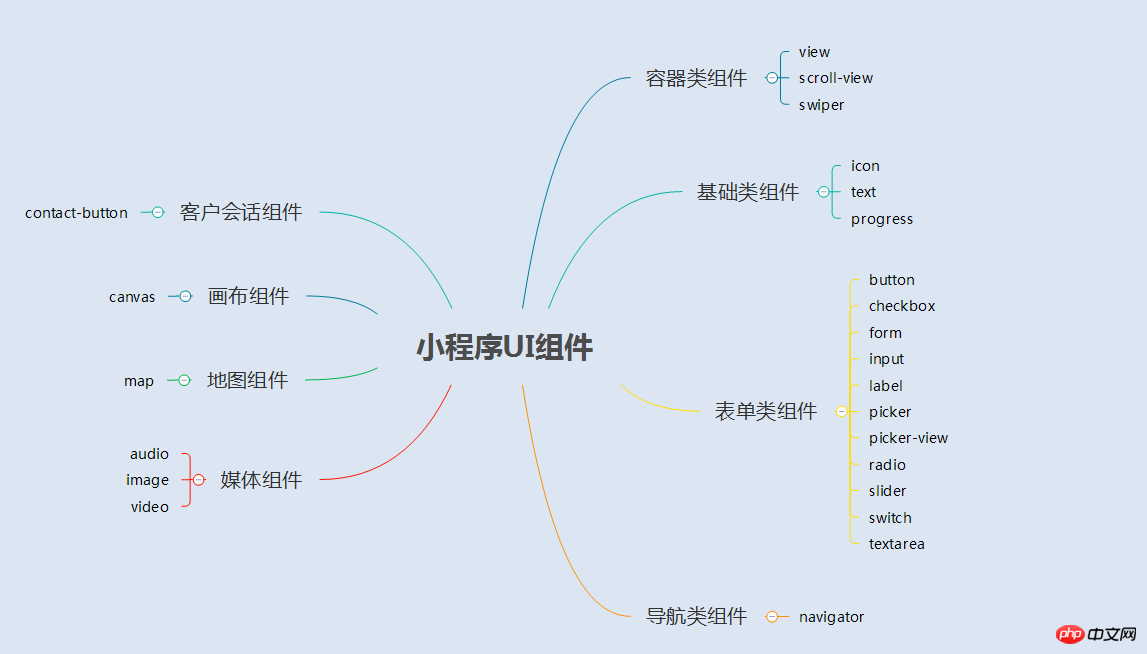
1.2 Overview
The UI component of the applet is a series of tags that define the user interface, similar to html tags. A complete user response process: event triggering——>UI component receives event——>trigger js function to respond to event——>update UI
2. Container component
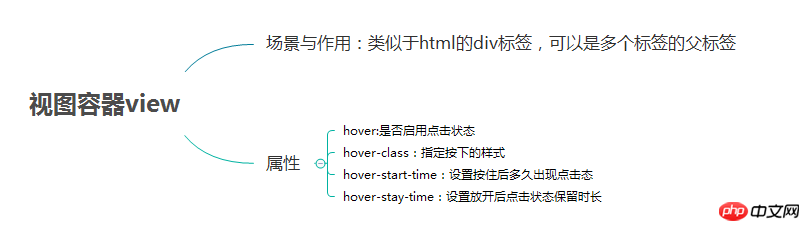
2.1 Container component (view)
(1) Summary
(2) Example
Rendering

水平布局: red green blue 垂直布局: red green blue
.flex-item-red{ background-color: red; height: 200rpx; width: 200rpx; text-align: center; line-height: 200rpx; } .flex-item-green{ background-color: green; height: 200rpx; width: 200rpx; text-align: center; line-height: 200rpx } .flex-item-blue{ background-color: blue; height: 200rpx; width: 200rpx; text-align: center; line-height: 200rpx } .flex-wrp-row{ flex-direction: row; display: flex; margin-left: 10rpx; margin-top: 20rpx; } .flex-wrp-column{ flex-direction: column; display: flex; margin-left: 10rpx; margin-top: 20rpx; } .color-text{ color: snow; font-family: 'Times New Roman', Times, serif; font-weight: bold; } .hover-style{ background-color: black; } .row-view-title,.column-view-title{ margin-left: 20rpx; font-family: 'Times New Roman', Times, serif; font-weight: bold; } /*重要属性: display: flex; //与display:box;是类似,是flexbox的最新语法格式,有更好的适配效果 flex-direction: column; //表示子布局垂直布局 flex-direction: row; //表示子布局为水平布局 */
2.2 Scroll-view Container(scroll-view)
(1) Summary
## page.wxml
水平滚动布局 垂直滚动布局
page.wxss
.x_green{ background-color: green; width: 500rpx; height: 300rpx; display: inline-flex; } .x_red{ background-color: red; width: 500rpx; height: 300rpx; display: inline-flex; } .x_blue{ background-color: blue; width: 500rpx; height: 300rpx; display: inline-flex; } .x_yellow{ background-color: yellow; width: 500rpx; height: 300rpx; display: inline-flex; } .y_green{ background-color: green; width: 100%; height: 300rpx; } .y_red{ background-color: red; width: 100%; height: 300rpx; } .y_yellow{ background-color: yellow; width: 100%; height: 300rpx; } .y_blue{ background-color: blue; width: 100%; height: 300rpx; } .scroll-view-x{ display: flex; white-space: nowrap; width: 100%; margin-bottom: 20px; margin-top: 10px; height: 300rpx; } .scroll-view-y{ height: 400rpx; } /*重要属性: white-space: nowrap;//设置内部元素不换行显示,与display: inline-flex;属性联合使用才会有水平布局的效果 */
page.js
//index.js //获取应用实例 var app = getApp() //var color_index=['green','red','yellow','blue']; Page({ data:{ toview:'red', }, /*滑动到左边触发*/ scrollXToUpper:function(){ console.log('scrollXToUpper') }, /*滑动到右边触发 */ scrollXToLower:function(){ console.log('scrollXToLower') }, /*滑动到顶部触发*/ scrollYToUpper:function(){ console.log('scrollYToUpper') }, /*滑动到左边触发 */ scrollYToLower:function(){ console.log('scrollYToLower') }, /*滑动触发 */ scroll:function(){ console.log("scroll") }, onLoad: function () { console.log('onLoad') var that = this }, })
(1) Summary
(2) Example
Rendering:
 ## page.wxml
//game.js Page({ data: { imgUrls: [ '/image/wechat.png', 'http://img02.tooopen.com/images/20150928/tooopen_sy_143912755726.jpg', 'http://img06.tooopen.com/images/20160818/tooopen_sy_175866434296.jpg', 'http://img06.tooopen.com/images/20160818/tooopen_sy_175833047715.jpg' ], indicatorDots: true, autoplay: true, interval: 3000, duration: 1000, current:1, }, durationChange: function(e) { this.setData({ duration: e.detail.value }) }, durationChange: function(e) { this.setData({ duration: e.detail.value }) }, itemChangeFunc:function(e){ // console.log(e.target.dataset.current) console.log(e.detail) } })
Introduction to the use of WeChat applet button component
How to use WeChat applet textarea
Introduction to WeChat applet chart plug-in (wx-charts)
The above is the detailed content of Introduction to UI and container components in WeChat mini programs. For more information, please follow other related articles on the PHP Chinese website!
 Mini program path acquisition
 The latest ranking of the top ten exchanges in the currency circle
 c language else if statement usage
 What are the calling methods of java reflection
 How to connect html files and css files
 Which laptop battery testing software is best?
 bios cannot detect solid state drive
 centos


![[Web front-end] Node.js quick start](https://img.php.cn/upload/course/000/000/067/662b5d34ba7c0227.png)


