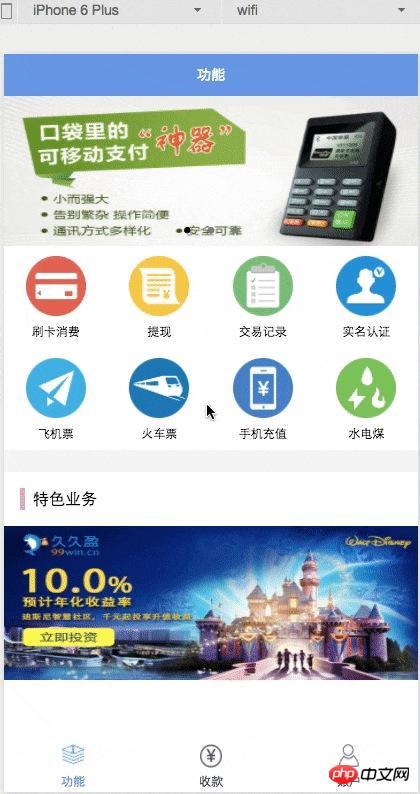
This article uses a practical example to explain how to build a WeChat mini program page. First, let’s take a look at the page effect to be achieved in this article:

Development tool download: WeChat officially has developer tools, which integrate development and debugging, code editing, and program release functions.
WeChat Mini Program Architecture:

This is the basic structure of the program. The most critical and essential ones are app.js, app.json, and app.wxss. Among them, the .js suffix is a script file, the .json suffix is a configuration file, and the .wxss suffix is a style sheet file.
Bottom label The bottom label is a tabBar. The implementation is relatively simple and only requires simple configuration. app.json
{
  "pages":[
    "pages/function/function",
    "pages/pay/pay",
    "pages/account/account",
    "pages/index/index",
    "pages/logs/logs"
  ],
  "tabBar":{
    "color": "#464a56",
    "selectedColor": "#6595e9",
    "backgroundColor": "#FFFFFF",
    "borderStyle": "white",
    "list": [{
        "pagePath": "pages/function/function",
        "text": "功能",
        "iconPath": "images/tab_function_default.png",
        "selectedIconPath": "images/tab_function_sel.png"
    },{
        "pagePath": "pages/pay/pay",
        "text": "收款",
        "iconPath": "images/tab_consume_default.png",
        "selectedIconPath": "images/tab_consume_sel.png"
    },{
        "pagePath": "pages/account/account",
        "text": "账户",
        "iconPath": "images/tab_account_default.png",
        "selectedIconPath": "images/tab_account_sel.png"
    }]
  },
  "window":{
    "navigationBarBackgroundColor": "#6595e9",
    "navigationBarTextStyle":"white",
    "navigationBarTitleText": "V50",
    "backgroundColor": "#eeeeee",
    "backgroundTextStyle":"light"
  }
}It is worth noting that pages accepts an array, each item is a string, to specify which pages the mini program consists of. Each item represents the [path + file name] information of the corresponding page, and the first item in the array represents the initial page of the mini program.
Adding/reducing pages in the mini program requires modifying the pages array.
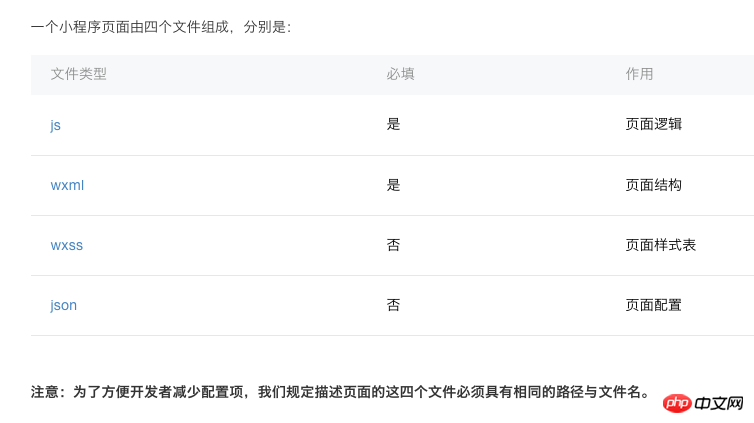
There is no need to write a file suffix in the file name, because the framework will automatically look for the four files in the path .json, .js, .wxml, .wxss for integration.
Page title:
Page title How to implement this title? Let’s take a look at the official documentation.

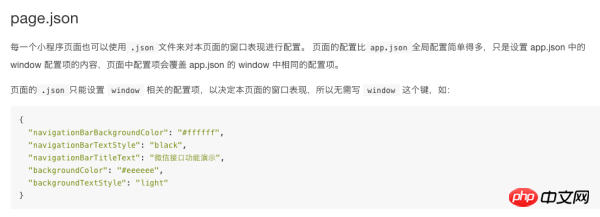
After seeing this, you should know that you need to configure the page in the json file of the specified page. Continue to view the official documentation

#That’s it! We only need to put the configuration common to all pages in page.json, and then configure the unique properties of each page in the .json file of each page. Because the window attribute of the general page has been configured in the above app.json, we only need to configure the page title in function.json:
{
     "navigationBarTitleText": "功能"
}Carousel chart
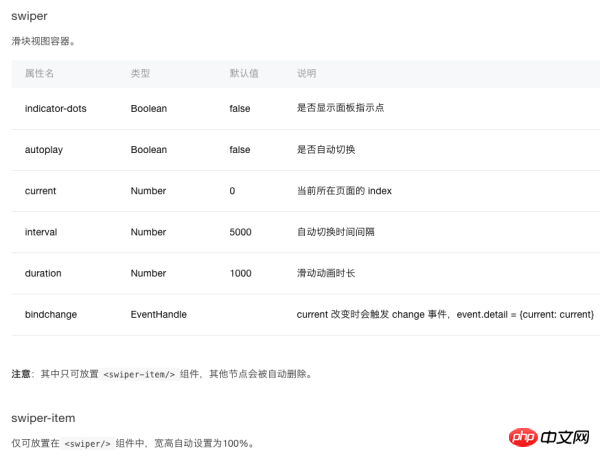
Next, implement the top Carousel image. WeChat provides a swiper component to implement carousel charts.

The code comes out: function.wxml
<swiper indicator-dots="{{indicatorDots}}"
autoplay="{{autoplay}}" interval="{{interval}}" duration="{{duration}}">
<block wx:for="{{imgUrls}}">
<swiper-item>
<image src="{{item}}" class="slide-image" />
</swiper-item>
</block>
</swiper>
function.js
//function.js
Page({
data: {
indicatorDots: true,
autoplay: true,
interval: 5000,
duration: 1000,
imgUrls: [
'http://img02.tooopen.com/images/20150928/tooopen_sy_143912755726.jpg',
'http://img06.tooopen.com/images/20160818/tooopen_sy_175866434296.jpg',
'http://img06.tooopen.com/images/20160818/tooopen_sy_175833047715.jpg'
],
},
})Yes, the carousel image of the WeChat applet is that simple! Some students may ask here: "The carousel pictures use URL addresses. What if I want to use local pictures? Can it be achieved?"
This official document does not introduce it, but after testing, It is achievable. The code is as follows
imgUrls: [
    '../../images/adv_50.png',
    '../../images/adv_60.png',
    '../../images/adv_80.png'
],Intermediate function module
The 8 functional modules in the middle are similar to Android's GridView effect. This article adopts a loop method to implement: function.wxml
<view class='function_container'>
<view class='function_item' wx:for="{{functions}}" wx:for-index="idx" wx:for-item="function">
<image class='function_img' src='{{function.pic_url}}'/>
<view class='function_name'>{{function.name}}</view>
</view>
</view>
function.js
functions: [
{
"name": "刷卡消费",
"pic_url": '../../images/icon_consume.png'
},
{
"name": "提现",
"pic_url": '../../images/icon_withdrawals.png'
},
{
"name": "交易记录",
"pic_url": '../../images/icon_records.png'
},
{
"name": "实名认证",
"pic_url": '../../images/icon_auth.png'
},
{
"name": "飞机票",
"pic_url": '../../images/icon_airplane.png'
},
{
"name": "火车票",
"pic_url": '../../images/icon_train.png'
},
{
"name": "手机充值",
"pic_url": '../../images/icon_phone_recharge.png'
},
{
"name": "水电煤",
"pic_url": '../../images/icon_water.png'
}
]
function.wxss
/**function.wxss**/
.container {
height: 650px;
}
.slide-image{
display: block;
height: 280rpx;
width:100%
}
.function_container{
display:flex;
flex-wrap: wrap;
width:100%;
}
.function_item{
width:25%;
display:flex;
flex-direction:column;
justify-content:center;
align-items:center;
font-size:12px;
box-sizing:border-box;
padding-bottom:10px;
padding-top:10px
}
.function_img{
width:60px;
height:60px;
}
.function_name{
padding-top:10px
}Here, width: 25% is used to achieve the effect of arranging four function buttons in each row.
Complete code
The layout below is relatively simple, just upload the complete code: function.wxml
<!--function.wxml-->
<scroll-view scroll-y="true" class="container">
<swiper indicator-dots="{{indicatorDots}}"
autoplay="{{autoplay}}" interval="{{interval}}" duration="{{duration}}">
<block wx:for="{{imgUrls}}">
<swiper-item>
<image src="{{item}}" class="slide-image" />
</swiper-item>
</block>
</swiper>
<view class='function_container'>
<view class='function_item' wx:for="{{functions}}" wx:for-index="idx" wx:for-item="function">
<image class='function_img' src='{{function.pic_url}}'/>
<view class='function_name'>{{function.name}}</view>
</view>
</view>
<view class='divider' />
<view class='specialities_layout'>
<view class='view_divider' />
<text class="specialities_text">特色业务</text>
</view>
<image class='bottom-image' src='../../images/app_banner.jpg'/>
</scroll-view>
function.wxss
/**function.wxss**/
.container {
height: 650px;
}
.slide-image{
display: block;
height: 280rpx;
width:100%
}
.function_container{
display:flex;
flex-wrap: wrap;
width:100%;
}
.function_item{
width:25%;
display:flex;
flex-direction:column;
justify-content:center;
align-items:center;
font-size:12px;
box-sizing:border-box;
padding-bottom:10px;
padding-top:10px
}
.function_img{
width:60px;
height:60px;
}
.function_name{
padding-top:10px
}
.divider{
background: #f5f5f5;
height: 40rpx;
width:100%;
}
.specialities_layout{
display:flex;
flex-wrap: wrap;
width:100%;
flex-direction:row;
margin-left: 16px;
margin-top:16px;
margin-bottom: 16px;
}
.view_divider{
background: #EEA9B8;
height: 40rpx;
width:10rpx;
}
.specialities_text {
margin-left: 8px;
font-size: 16px;
height: auto;
width:auto;
margin-top: 6rpx;
}
.bottom-image{
height: 280rpx;
width:100%;
}
.Absolute-Center {
margin: auto;
position: absolute;
top: 0; left: 0; bottom: 0; right: 0;
}
function.js
//function.js
//获取应用实例
var app = getApp()
Page({
data: {
userInfo: {},
indicatorDots: true,
autoplay: true,
interval: 5000,
duration: 1000,
// imgUrls: [
// 'http://img02.tooopen.com/images/20150928/tooopen_sy_143912755726.jpg',
// 'http://img06.tooopen.com/images/20160818/tooopen_sy_175866434296.jpg',
// 'http://img06.tooopen.com/images/20160818/tooopen_sy_175833047715.jpg'
// ],
imgUrls: [
'../../images/adv_50.png',
'../../images/adv_60.png',
'../../images/adv_80.png'
],
functions: [
{
"name": "刷卡消费",
"pic_url": '../../images/icon_consume.png'
},
{
"name": "提现",
"pic_url": '../../images/icon_withdrawals.png'
},
{
"name": "交易记录",
"pic_url": '../../images/icon_records.png'
},
{
"name": "实名认证",
"pic_url": '../../images/icon_auth.png'
},
{
"name": "飞机票",
"pic_url": '../../images/icon_airplane.png'
},
{
"name": "火车票",
"pic_url": '../../images/icon_train.png'
},
{
"name": "手机充值",
"pic_url": '../../images/icon_phone_recharge.png'
},
{
"name": "水电煤",
"pic_url": '../../images/icon_water.png'
}
]
},
//事件处理函数
bindViewTap: function () {
wx.navigateTo({
url: '../logs/logs'
})
},
onLoad: function () {
console.log('onLoad')
var that = this
//调用应用实例的方法获取全局数据
app.getUserInfo(function (userInfo) {
//更新数据
that.setData({
userInfo: userInfo
})
that.update()
})
}
})For more detailed explanations of WeChat mini program cases: For articles related to page construction, please pay attention to the PHP Chinese website !


