
In the previous article "WeChat Development—WeChat Development Environment Construction" we have completed the preparations for WeChat development. After the preparations are completed, we will start to get down to business.
Before starting, let’s briefly introduce the basic principles of WeChat public platform.
The WeChat server is equivalent to a forwarding server. The terminal (mobile phone, Pad, etc.) initiates a request to the WeChat server, and the WeChat server then forwards the request to our application server. After the application server completes processing, it sends the response data back to the WeChat server, and the WeChat server then replies the specific response information to the WeChat App terminal.
The communication protocol is: HTTP
The data transmission format is: XML
The specific process is as shown in the figure below:

Let’s get a more intuitive picture:
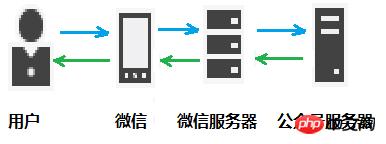
What we need to do is to respond to the HTTP request forwarded by the WeChat server. We parse the specific request content according to a specific XML format. After processing, we must also return it according to a specific XML format.
In the WeChat public platform developer documentation, the section on public account access is written in more detail in the access guide. In the document It is said that accessing the official account requires three steps, which are:
1. Fill in the server configuration
2. Verify the validity of the server address
3. Implement business logic based on the interface document
In fact, step 3 can no longer be regarded as the step of connecting the official account, but after the connection, developers can do some development based on the interface provided by the WeChat official account.
The server configuration in step 1 includes server address (URL), Token and EncodingAESKey.
The server address is the entry address for the business logic provided by the public account backend. Currently, it only supports port 80. It will later include access verification and any other operation requests (such as message sending, menu management, material management, etc.) You must enter from this address. The difference between access verification and other requests is that access verification is a get request, and other times it is a post request;
Token can be filled in by the developer arbitrarily and used to generate a signature (the Token will be the same as the one in the interface URL The included Token is compared to verify security);
The EncodingAESKey is manually filled in by the developer or randomly generated, and will be used as the message body encryption and decryption key.In this example, all messages are in unencrypted plain text, and this configuration item is not involved.
Step 2, verify the validity of the server address. When the "Submit" button is clicked, the WeChat server will send an http get request to the server address just filled in, and carry four Parameters:

After receiving the request, we need to do the following three steps. If it is confirmed that the GET request comes from the WeChat server, the If the content of the echostr parameter is returned, the access will take effect, otherwise the access will fail.
1. Sort the three parameters token, timestamp, and nonce in lexicographic order
2. Splice the three parameter strings into one string for sha1 encryption
3. After the developer obtains the encryption The string can be compared with signature to indicate that the request comes from WeChat
Let’s use Java code to demonstrate this verification process
Use IDE (Eclipse or IntelliJ IDEA) to create a JavaWeb project. Here I am using IntelliJ IDEA. The project directory structure is as shown below:
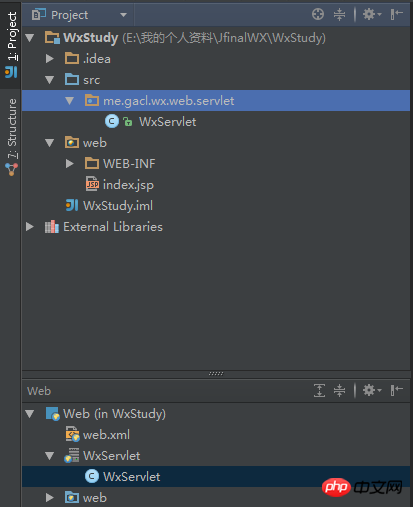
Write a servlevt and define the verification method in the doGet method. The specific code is as follows:
package me.gacl.wx.web.servlet; import javax.servlet.ServletException; import javax.servlet.annotation.WebServlet; import javax.servlet.http.HttpServlet; import javax.servlet.http.HttpServletRequest; import javax.servlet.http.HttpServletResponse; import java.io.IOException; import java.security.MessageDigest; import java.security.NoSuchAlgorithmException; import java.util.Arrays; /** * Created by xdp on 2016/1/25. * 使用@WebServlet注解配置WxServlet,urlPatterns属性指明了WxServlet的访问路径 */ @WebServlet(urlPatterns="/WxServlet") public class WxServlet extends HttpServlet { /** * Token可由开发者可以任意填写,用作生成签名(该Token会和接口URL中包含的Token进行比对,从而验证安全性) * 比如这里我将Token设置为gacl */ private final String TOKEN = "gacl"; protected void doPost(HttpServletRequest request, HttpServletResponse response) throws ServletException, IOException { } protected void doGet(HttpServletRequest request, HttpServletResponse response) throws ServletException, IOException { System.out.println("开始校验签名"); /** * 接收微信服务器发送请求时传递过来的4个参数 */ String signature = request.getParameter("signature");//微信加密签名signature结合了开发者填写的token参数和请求中的timestamp参数、nonce参数。 String timestamp = request.getParameter("timestamp");//时间戳 String nonce = request.getParameter("nonce");//随机数 String echostr = request.getParameter("echostr");//随机字符串 //排序 String sortString = sort(TOKEN, timestamp, nonce); //加密 String mySignature = sha1(sortString); //校验签名 if (mySignature != null && mySignature != "" && mySignature.equals(signature)) { System.out.println("签名校验通过。"); //如果检验成功输出echostr,微信服务器接收到此输出,才会确认检验完成。 //response.getWriter().println(echostr); response.getWriter().write(echostr); } else { System.out.println("签名校验失败."); } } /** * 排序方法 * * @param token * @param timestamp * @param nonce * @return */ public String sort(String token, String timestamp, String nonce) { String[] strArray = {token, timestamp, nonce}; Arrays.sort(strArray); StringBuilder sb = new StringBuilder(); for (String str : strArray) { sb.append(str); } return sb.toString(); } /** * 将字符串进行sha1加密 * * @param str 需要加密的字符串 * @return 加密后的内容 */ public String sha1(String str) { try { MessageDigest digest = MessageDigest.getInstance("SHA-1"); digest.update(str.getBytes()); byte messageDigest[] = digest.digest(); // Create Hex String StringBuffer hexString = new StringBuffer(); // 字节数组转换为 十六进制 数 for (int i = 0; i < messageDigest.length; i++) { String shaHex = Integer.toHexString(messageDigest[i] & 0xFF); if (shaHex.length() < 2) { hexString.append(0); } hexString.append(shaHex); } return hexString.toString(); } catch (NoSuchAlgorithmException e) { e.printStackTrace(); } return ""; } }
I use Servlet3.0 here. The advantage of using Servlet3.0 is that you can directly use the@WebServletannotation to map the access path of the Servlet. You no longer need to do it in the web.xml file. Configuration.
Deploy the WxStudy project to the Tomcat server, start the project directly, and then use ngrok to map the local 8080 port to the external network (for how to use ngrok, please refer to the blog "WeChat Development—WeChat Development Environment Construction") . As shown below:
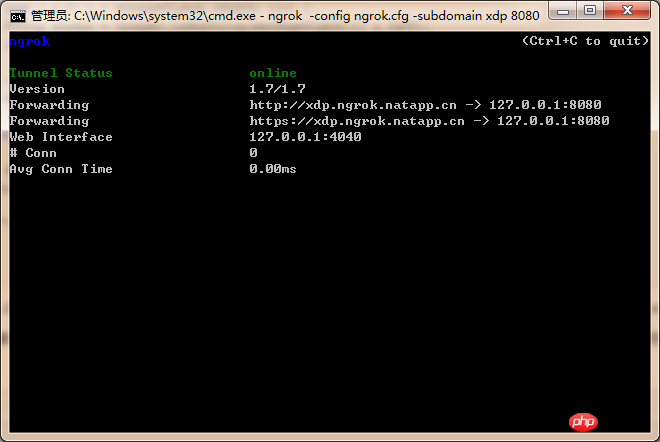
测试是否可以通过http://xdp.ngrok.natapp.cn地址正常访问,测试结果如下:

可以看到,我们的项目已经可以被外网正常访问到了。
进入微信测试公众号管理界面,在接口配置信息中填入映射的外网地址和token,如下图所示:
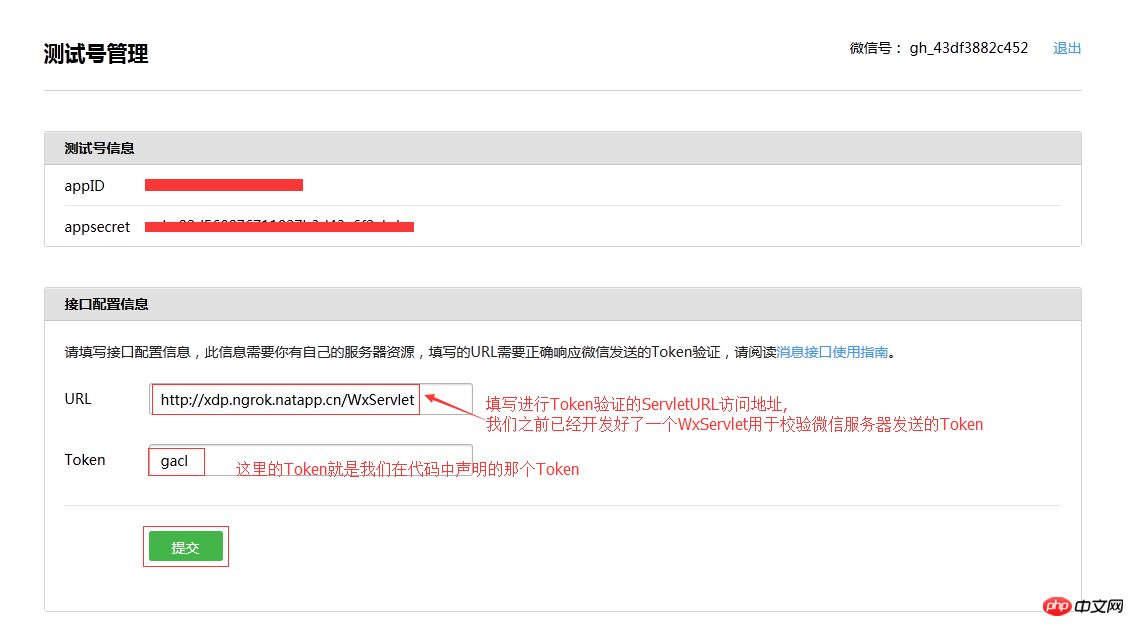
点击提交按钮,页面会提示配置成功,

IDE的控制台中输出了校验通过的信息,如下图所示:

到此,我们的公众号应用已经能够和微信服务器正常通信了,也就是说我们的公众号已经接入到微信公众平台了。
我们的公众号和微信服务器对接成功之后,接下来要做的就是根据我们的业务需求调用微信公众号提供的接口来实现相应的逻辑了。在使用微信公众号接口中都需要一个access_token。
关于access_token,在微信公众平台开发者文档上的获取接口调用凭据有比较详细的介绍:access_token是公众号的全局唯一票据,公众号调用各接口时都需使用access_token,开发者需要妥善保存access_token的存储至少要保留512个字符空间。access_token的有效期目前为2个小时,需定时刷新,重复获取将导致上次获取的access_token失效。并且每天调用获取access_token接口的上限是2000次。
总结以上说明,access_token需要做到以下两点:
1.因为access_token有2个小时的时效性,要有一个机制保证最长2个小时重新获取一次。
2.因为接口调用上限每天2000次,所以不能调用太频繁。
关于access_token的获取方式,在微信公众平台开发者文档上有说明,公众号可以调用一个叫"获取access token"的接口来获取access_token。
获取access token接口调用请求说明
http请求方式: GET
请求的URL地址:https://api.weixin.qq.com/cgi-bin/token?grant_type=client_credential&appid=APPID&secret=APPSECRET
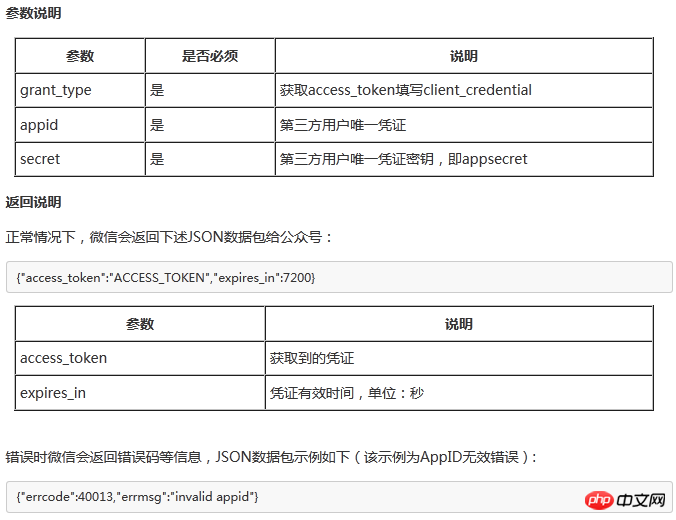
我们可以看到,调用过程中需要传递appID和AppSecret,appID和AppSecret是在申请公众号的时候自动分配给公众号的,相当于公众号的身份标示,使用微信公众号的注册帐号登录到腾讯提供的微信公众号管理后台就可以看到自己申请的公众号的AppID和AppSecret,如下图所示:

这是我申请公众号测试帐号时分配到的AppID和AppSecret。
这里采用的方案是这样的,定义一个默认启动的servlet,在init方法中启动一个Thread,这个进程中定义一个无限循环的方法,用来获取access_token,当获取成功后,此进程休眠7000秒(7000秒=1.944444444444444小时),否则休眠3秒钟继续获取。流程图如下:
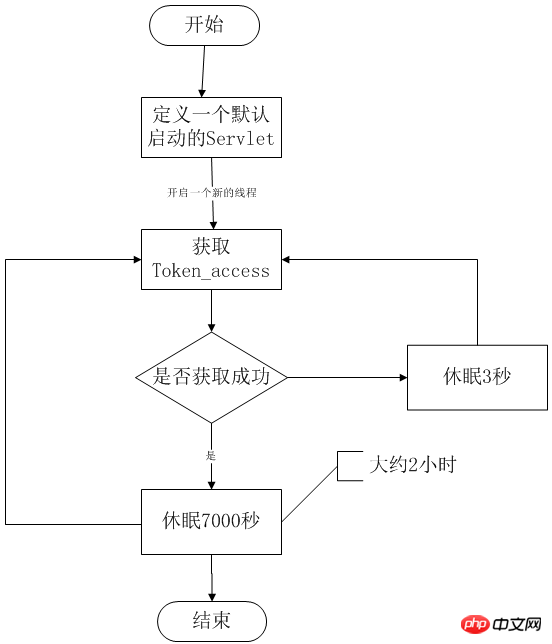
下面正式开始在工程中实现以上思路,因为返回的数据都是json格式,这里会用到阿里的fastjson库,为构造请求和处理请求后的数据序列化和反序列化提供支持。
1.定义一个AccessToken实体类
package me.gacl.wx.entry; /** * AccessToken的数据模型 * Created by xdp on 2016/1/25. */ public class AccessToken { //获取到的凭证 private String accessToken; //凭证有效时间,单位:秒 private int expiresin; public String getAccessToken() { return accessToken; } public void setAccessToken(String accessToken) { this.accessToken = accessToken; } public int getExpiresin() { return expiresin; } public void setExpiresin(int expiresin) { this.expiresin = expiresin; } }
2.定义一个AccessTokenInfo类,用于存放获取到的AccessToken,代码如下:
package me.gacl.wx.Common; import me.gacl.wx.entry.AccessToken; /** * Created by xdp on 2016/1/25. */ public class AccessTokenInfo { //注意是静态的 public static AccessToken accessToken = null; }
3.编写一个用于发起https请求的工具类NetWorkHelper,代码如下:
package me.gacl.wx.util; import javax.net.ssl.*; import java.io.BufferedReader; import java.io.InputStream; import java.io.InputStreamReader; import java.net.URL; import java.security.cert.CertificateException; import java.security.cert.X509Certificate; /** * 访问网络用到的工具类 */ public class NetWorkHelper { /** * 发起Https请求 * @param reqUrl 请求的URL地址 * @param requestMethod * @return 响应后的字符串 */ public String getHttpsResponse(String reqUrl, String requestMethod) { URL url; InputStream is; String resultData = ""; try { url = new URL(reqUrl); HttpsURLConnection con = (HttpsURLConnection) url.openConnection(); TrustManager[] tm = {xtm}; SSLContext ctx = SSLContext.getInstance("TLS"); ctx.init(null, tm, null); con.setSSLSocketFactory(ctx.getSocketFactory()); con.setHostnameVerifier(new HostnameVerifier() { @Override public boolean verify(String arg0, SSLSession arg1) { return true; } }); con.setDoInput(true); //允许输入流,即允许下载 //在android中必须将此项设置为false con.setDoOutput(false); //允许输出流,即允许上传 con.setUseCaches(false); //不使用缓冲 if (null != requestMethod && !requestMethod.equals("")) { con.setRequestMethod(requestMethod); //使用指定的方式 } else { con.setRequestMethod("GET"); //使用get请求 } is = con.getInputStream(); //获取输入流,此时才真正建立链接 InputStreamReader isr = new InputStreamReader(is); BufferedReader bufferReader = new BufferedReader(isr); String inputLine; while ((inputLine = bufferReader.readLine()) != null) { resultData += inputLine + "\n"; } System.out.println(resultData); } catch (Exception e) { e.printStackTrace(); } return resultData; } X509TrustManager xtm = new X509TrustManager() { @Override public X509Certificate[] getAcceptedIssuers() { return null; } @Override public void checkServerTrusted(X509Certificate[] arg0, String arg1) throws CertificateException { } @Override public void checkClientTrusted(X509Certificate[] arg0, String arg1) throws CertificateException { } }; }
getHttpsResponse方法是请求一个https地址,参数requestMethod为字符串“GET”或者“POST”,传null或者“”默认为get方式。
4.定义一个默认启动的servlet,在init方法中启动一个新的线程去获取accessToken
package me.gacl.wx.web.servlet; import com.alibaba.fastjson.JSON; import com.alibaba.fastjson.JSONObject; import me.gacl.wx.Common.AccessTokenInfo; import me.gacl.wx.entry.AccessToken; import me.gacl.wx.util.NetWorkHelper; import javax.servlet.ServletException; import javax.servlet.annotation.WebInitParam; import javax.servlet.annotation.WebServlet; import javax.servlet.http.HttpServlet; /** * 用于获取accessToken的Servlet * Created by xdp on 2016/1/25. */ @WebServlet( name = "AccessTokenServlet", urlPatterns = {"/AccessTokenServlet"}, loadOnStartup = 1, initParams = { @WebInitParam(name = "appId", value = "wxbe4d433e857e8bb1"), @WebInitParam(name = "appSecret", value = "ccbc82d560876711027b3d43a6f2ebda") }) public class AccessTokenServlet extends HttpServlet { @Override public void init() throws ServletException { System.out.println("启动WebServlet"); super.init(); final String appId = getInitParameter("appId"); final String appSecret = getInitParameter("appSecret"); //开启一个新的线程 new Thread(new Runnable() { @Override public void run() { while (true) { try { //获取accessToken AccessTokenInfo.accessToken = getAccessToken(appId, appSecret); //获取成功 if (AccessTokenInfo.accessToken != null) { //获取到access_token 休眠7000秒,大约2个小时左右 Thread.sleep(7000 * 1000); //Thread.sleep(10 * 1000);//10秒钟获取一次 } else { //获取失败 Thread.sleep(1000 * 3); //获取的access_token为空 休眠3秒 } } catch (Exception e) { System.out.println("发生异常:" + e.getMessage()); e.printStackTrace(); try { Thread.sleep(1000 * 10); //发生异常休眠1秒 } catch (Exception e1) { } } } } }).start(); } /** * 获取access_token * * @return AccessToken */ private AccessToken getAccessToken(String appId, String appSecret) { NetWorkHelper netHelper = new NetWorkHelper(); /** * 接口地址为https://api.weixin.qq.com/cgi-bin/token?grant_type=client_credential&appid=APPID&secret=APPSECRET,其中grant_type固定写为client_credential即可。 */ String Url = String.format("https://api.weixin.qq.com/cgi-bin/token?grant_type=client_credential&appid=%s&secret=%s", appId, appSecret); //此请求为https的get请求,返回的数据格式为{"access_token":"ACCESS_TOKEN","expires_in":7200} String result = netHelper.getHttpsResponse(Url, ""); System.out.println("获取到的access_token="+result); //使用FastJson将Json字符串解析成Json对象 JSONObject json = JSON.parseObject(result); AccessToken token = new AccessToken(); token.setAccessToken(json.getString("access_token")); token.setExpiresin(json.getInteger("expires_in")); return token; } }
AccessTokenServlet采用注解的方式进行配置
至此代码实现完毕,将项目部署,看到控制台输出如下:

为了方便看效果,可以把休眠时间设置短一点,比如10秒获取一次,然后将access_token输出。
下面做一个测试jsp页面,并把休眠时间设置为10秒,这样过10秒刷新页面,就可以看到变化
<%-- Created by IntelliJ IDEA. --%> <%@ page contentType="text/html;charset=UTF-8" language="java" %> <%@ page import="me.gacl.wx.Common.AccessTokenInfo"%>微信学习
access_token为:<%=AccessTokenInfo.accessToken.getAccessToken()%>
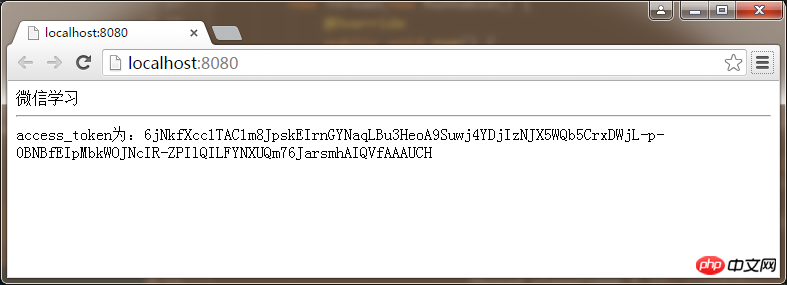
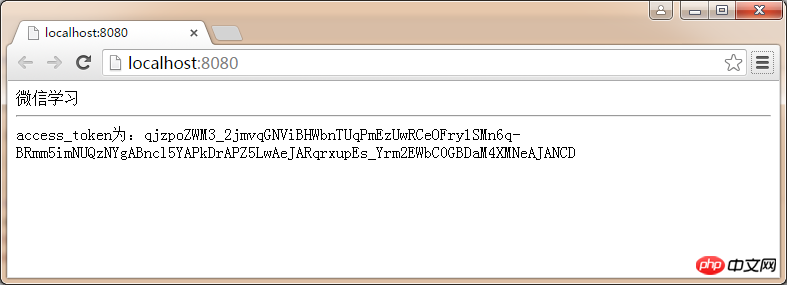
10秒钟后刷新页面,access_token变了,如下图所示:
经过上述的三步,我们开发前的准备工作已经完成了,接下来要做的就是接收微信服务器发送的消息并做出响应
从微信公众平台接口消息指南中可以了解到,当用户向公众帐号发消息时,微信服务器会将消息通过POST方式提交给我们在接口配置信息中填写的URL,而我们就需要在URL所指向的请求处理类WxServlet的doPost方法中接收消息、处理消息和响应消息。
编写处理消息的工具栏,工具类代码如下:
package me.gacl.wx.util; import org.dom4j.Document; import org.dom4j.Element; import org.dom4j.io.SAXReader; import javax.servlet.http.HttpServletRequest; import java.io.InputStream; import java.text.DateFormat; import java.text.SimpleDateFormat; import java.util.Date; import java.util.HashMap; import java.util.List; import java.util.Map; /** * 消息处理工具类 * Created by xdp on 2016/1/26. */ public class MessageHandlerUtil { /** * 解析微信发来的请求(XML) * @param request * @return map * @throws Exception */ public static Map parseXml(HttpServletRequest request) throws Exception { // 将解析结果存储在HashMap中 Map map = new HashMap(); // 从request中取得输入流 InputStream inputStream = request.getInputStream(); System.out.println("获取输入流"); // 读取输入流 SAXReader reader = new SAXReader(); Document document = reader.read(inputStream); // 得到xml根元素 Element root = document.getRootElement(); // 得到根元素的所有子节点 List elementList = root.elements(); // 遍历所有子节点 for (Element e : elementList) { System.out.println(e.getName() + "|" + e.getText()); map.put(e.getName(), e.getText()); } // 释放资源 inputStream.close(); inputStream = null; return map; } // 根据消息类型 构造返回消息 public static String buildXml(Map map) { String result; String msgType = map.get("MsgType").toString(); System.out.println("MsgType:" + msgType); if(msgType.toUpperCase().equals("TEXT")){ result = buildTextMessage(map, "孤傲苍狼在学习和总结微信开发了,构建一条文本消息:Hello World!"); }else{ String fromUserName = map.get("FromUserName"); // 开发者微信号 String toUserName = map.get("ToUserName"); result = String .format( "" + "%s " + " ", fromUserName, toUserName, getUtcTime(), "请回复如下关键词:\n文本\n图片\n语音\n视频\n音乐\n图文"); } return result; } /** * 构造文本消息 * * @param map * @param content * @return */ private static String buildTextMessage(Map map, String content) { //发送方帐号 String fromUserName = map.get("FromUserName"); // 开发者微信号 String toUserName = map.get("ToUserName"); /** * 文本消息XML数据格式 * 1348831860 1234567890123456 */ return String.format( "" + "%s " + " ", fromUserName, toUserName, getUtcTime(), content); } private static String getUtcTime() { Date dt = new Date();// 如果不需要格式,可直接用dt,dt就是当前系统时间 DateFormat df = new SimpleDateFormat("yyyyMMddhhmm");// 设置显示格式 String nowTime = df.format(dt); long dd = (long) 0; try { dd = df.parse(nowTime).getTime(); } catch (Exception e) { } return String.valueOf(dd); } }
为了方便解析微信服务器发送给我们的xml格式的数据,这里我们借助于开源框架dom4j去解析xml(这里使用的是dom4j-2.0.0-RC1.jar)
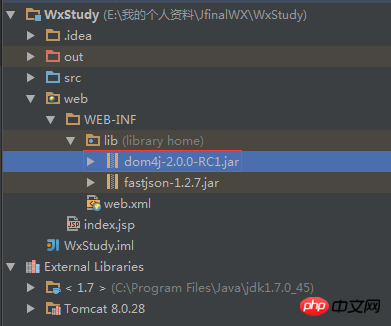
WxServlet的doPost方法的代码如下:
/** * 处理微信服务器发来的消息 */ protected void doPost(HttpServletRequest request, HttpServletResponse response) throws ServletException, IOException { // TODO 接收、处理、响应由微信服务器转发的用户发送给公众帐号的消息 // 将请求、响应的编码均设置为UTF-8(防止中文乱码) request.setCharacterEncoding("UTF-8"); response.setCharacterEncoding("UTF-8"); System.out.println("请求进入"); String result = ""; try { Map map = MessageHandlerUtil.parseXml(request); System.out.println("开始构造消息"); result = MessageHandlerUtil.buildXml(map); System.out.println(result); if(result.equals("")){ result = "未正确响应"; } } catch (Exception e) { e.printStackTrace(); System.out.println("发生异常:"+ e.getMessage()); } response.getWriter().println(result); }
到此,我们的WxServlet已经可以正常处理用户的请求并做出响应了.接下来我们测试一下我们开发好的公众号应用是否可以正常和微信用户交互
将WxStudy部署到Tomcat服务器,启动服务器,记得使用ngrok将本地Tomcat服务器的8080端口映射到外网,保证接口配置信息的URL地址:http://xdp.ngrok.natapp.cn/WxServlet可以正常与微信服务器通信
登录到我们的测试公众号的管理后台,然后用微信扫描一下测试号的二维码,如下图所示:

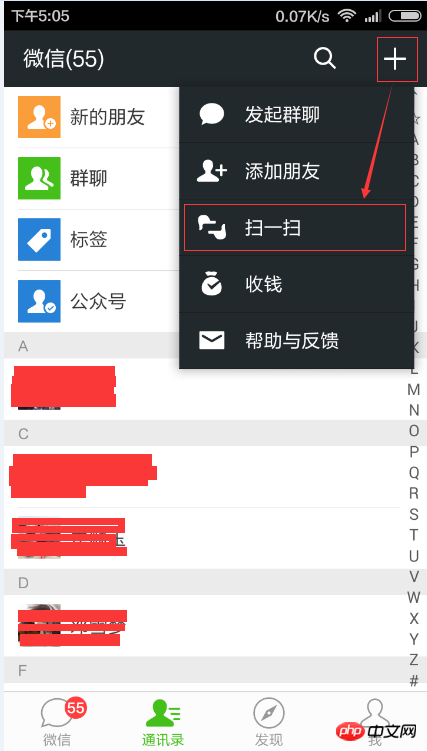
关注成功后,我们开发好的公众号应用会先给用户发一条提示用户操作的文本消息,微信用户根据提示操作输入"文本",我们的公众号应用接收到用户请求后就给用户回复了一条我们自己构建好的文本消息,如下图所示:
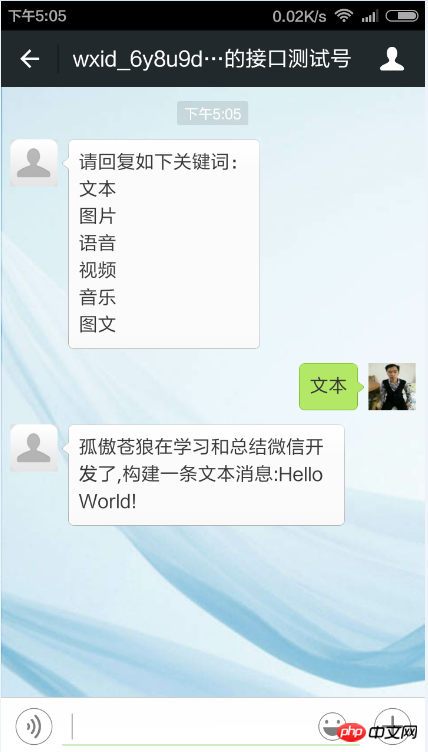
我们的公众号应用响应给微信用户的文本消息的XML数据如下:
1453755900000
测试公众号的管理后台也可以看到关注测试号的用户列表,如下图所示:

通过这个简单的入门程序,我们揭开了微信开发的神秘面纱了.
更多Summary of introductory learning for WeChat development相关文章请关注PHP中文网!


