

Course Intermediate 10916
Course Introduction:"Self-study IT Network Linux Load Balancing Video Tutorial" mainly implements Linux load balancing by performing script operations on web, lvs and Linux under nagin.

Course Advanced 16863
Course Introduction:"Shangxuetang MySQL Video Tutorial" introduces you to the process from installing to using the MySQL database, and introduces the specific operations of each link in detail.

Course Advanced 10582
Course Introduction:"Brothers Band Front-end Example Display Video Tutorial" introduces examples of HTML5 and CSS3 technologies to everyone, so that everyone can become more proficient in using HTML5 and CSS3.
The website user backend wants to add a column, please give me a solution! ! ! !
2020-03-15 11:16:46 0 0 1085
2019-05-29 11:47:49 0 2 1245
2023-09-14 13:44:44 0 2 558
2021-12-21 10:41:35 0 0 1018
What is chrome-extension:// installHook.js being downloaded in the About Me page?
2023-11-04 23:40:49 0 2 799
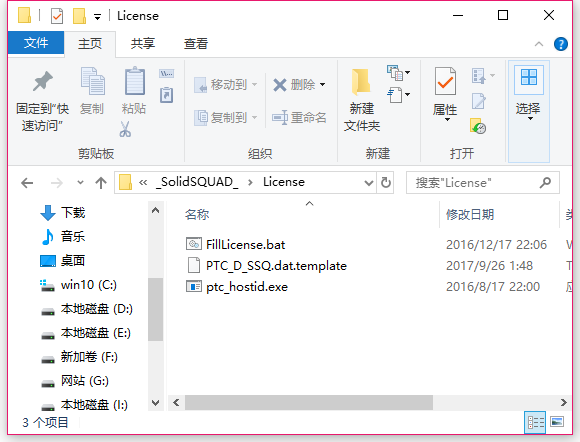
Course Introduction:Many novice friends still don’t know how to install creo, so the editor below brings relevant tutorials on creo installation. Friends in need should take a look at it. I hope it can help you. 1. Open the downloaded installation package and find the License folder, as shown in the figure below: 2. Then copy it to the directory on the C drive, as shown in the figure below: 3. Double-click to enter and see if there is a license file, as shown below As shown in the picture: 4. Then copy the license file to this file, as shown in the following picture: 5. In the PROGRAMFILES file of the C drive, create a new PLC folder, as shown in the following picture: 6. Copy the license file as well Click in, as shown in the figure below: 7. Double-click the installation file of the main program. To install, check the box to install new software.
2024-03-04 comment 0 1304

Course Introduction:Many users are asking whether the OneDrive folder can be transferred to other locations. In fact, the method is very simple. Users can directly find the OneDrive icon and select settings to perform the operation. Let this site carefully introduce to users how to transfer the OneDrive folder to another location in Win10. How to transfer the OneDrive folder to another location in Win10 1. Open the OneDrive application: Find the OneDrive icon in the lower right corner of the taskbar, right-click it, and select "Settings". 2. Open the "Settings" menu: In the OneDrive settings window, select
2024-02-10 comment 0 1144

Course Introduction:WeChat on the computer is an essential software for office workers. It is much more convenient to transfer files through the computer than through the mobile phone. So in which folder on the computer are our WeChat files stored? Let’s talk to you about which folder the computer version of WeChat files are stored in. 1. After logging into WeChat on our computer, click on the lower left corner and then click Settings. 2. After opening the settings window, click File Management on the left, and then click Open Folder. 3. After waiting for a while, you will see the window as shown below. Click on the selected folder as shown below to enter. 4. After entering, there are several folders. The three folders selected in the picture below are where our WeChat files are saved. If you want to clear the records, just delete these three folders.
2024-02-06 comment 0 2014
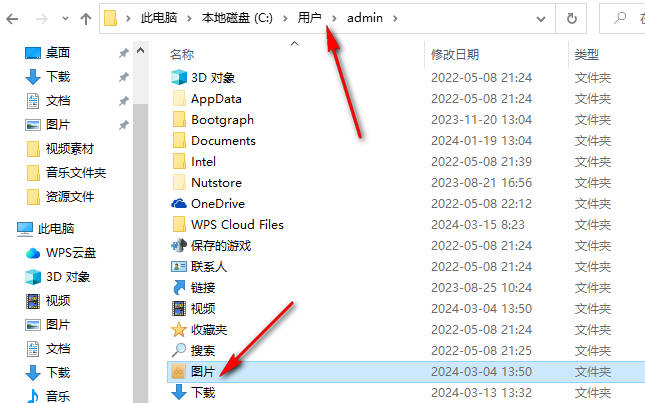
Course Introduction:How to transfer user folders to drive D in win10? The user folder contains folders such as documents, pictures, and videos. It would be great if you could customize the folders you want to move and set up the move. Let’s do this together. Find out how. 1. First, we need to open the user folder that we want to move and find the files that need to be moved. 2. For example, we need to move the [Pictures] folder in the user folder, select it, right-click it, and select the [Properties] option to enter. 3. At this time, in the page that opens, we need to click the [Location] option to view the storage location of the current picture folder. 4. We need to click the [Move] option on the page
2024-03-20 comment 0 1153

Course Introduction:The way to display file names in winXP thumbnails is to switch the thumbnails to other modes first. For example, if you switch to tile mode, you can see the file name of the file. Then hold down shift on the keyboard and click again to select. Description of the problem with the method of displaying file names in winXP thumbnails: As shown below, when the folder with pictures is switched to mode, the file name of the file is not displayed. Solution: 1. This problem occurs because of the Windows mode switching index. You can switch the thumbnail to other modes first. 2. For example, if you switch to tile mode, you can see the file name of the file. 3. Then hold down the keyboard shift and click again to select. 4. As shown in the figure, the file name that was not displayed just now is back. Alternative solution: If the file name is very long, use the above
2024-01-29 comment 0 537