

Course 2857
Course Introduction:Course introduction: 1. Cross-domain processing, token management, route interception; 2. Real interface debugging, API layer encapsulation; 3. Secondary encapsulation of Echarts and paging components; 4. Vue packaging optimization and answers to common problems.

Course 1795
Course Introduction:Apipost is an API R&D collaboration platform that integrates API design, API debugging, API documentation, and automated testing. It supports grpc, http, websocket, socketio, and socketjs type interface debugging, and supports privatized deployment. Before formally learning ApiPost, you must understand some related concepts, development models, and professional terminology. Apipost official website: https://www.apipost.cn

Course 5521
Course Introduction:(Consult WeChat: phpcn01) The comprehensive practical course aims to consolidate the learning results of the first two stages, achieve flexible application of front-end and PHP core knowledge points, complete your own projects through practical training, and provide guidance on online implementation. Comprehensive practical key practical courses include: social e-commerce system backend development, product management, payment/order management, customer management, distribution/coupon system design, the entire WeChat/Alipay payment process, Alibaba Cloud/Pagoda operation and maintenance, and project online operation. .....

Course 5172
Course Introduction:(Consult WeChat: phpcn01) Starting from scratch, you can solve conventional business logic, operate MySQL with PHP to add, delete, modify, and query, display dynamic website data, master the MVC framework, master the basics of the ThinkPHP6 framework, and learn and flexibly master all knowledge involved in PHP development. point.

Course 8713
Course Introduction:(Consult WeChat: phpcn01) The learning objectives of the front-end development part of the 22nd issue of PHP Chinese website: 1. HTML5/CSS3; 2. JavaScript/ES6; 3. Node basics; 4. Vue3 basics and advanced; 5. Mobile mall/ Website background homepage layout; 6. Automatic calculation of tabs/carousels/shopping carts...
How to get a circular outline on a circular <button> using CSS in Safari
2023-10-26 09:54:54 0 2 604
Need help centering content and making image links clickable
2023-09-13 12:12:49 0 1 235
SQL; How to write an "Order By" statement that switches as soon as the first match is found
2023-09-12 17:25:22 0 1 175
Change the location of the default file picker dialog
2023-09-10 16:24:25 0 1 229
2023-09-04 21:59:55 0 1 274
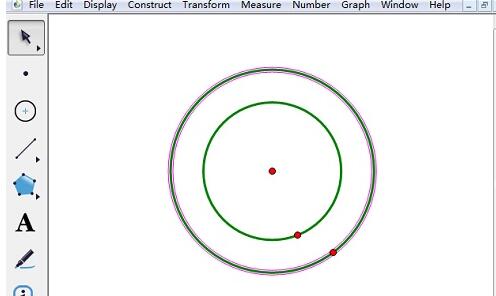
Course Introduction:Step 1: Create concentric circles. Open the drawing board, click the [Circle Tool] on the left toolbar, click the mouse in the blank area of the drawing board to determine the position of the center of the circle, move the left mouse button to determine the radius length, and click the mouse to draw a circle. Then move the mouse to the center of the circle, hold down the left mouse button, and drag outward until the radius is appropriate and release the mouse, thus drawing concentric circles. Step 2 Adjust the concentric circles 1. Adjust the size of the concentric circles. Click the [Move Arrow Tool] on the left toolbar and hold down the center of the concentric circles and drag to change the size and position of the concentric circles. 2. Adjust the size of the large circle. Click the left tool Click [Move Arrow Tool] on the left toolbar and drag the red dot on the edge of the large concentric circle to change the size and position of the large circle. 3. To adjust the size of the small circle, click [Move Arrow Tool] on the left toolbar.
2024-04-17 comment 592
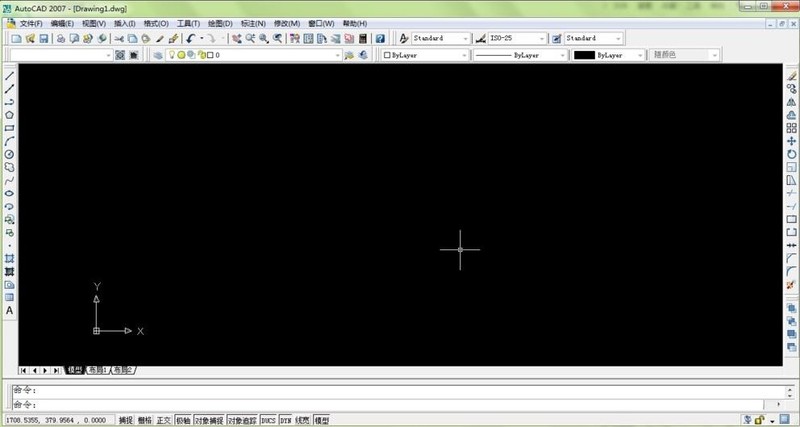
Course Introduction:首先,打开AutoCAD2007软件,如图所示。点击上方菜单栏里的【绘图】选项,弹出下拉菜单,找到【圆】功能按钮,弹出下拉菜单,可以看到多种绘制圆形的方式,如下图所示。可以点击下拉菜单里的【圆心、半径】选项,首先指定一个圆心,然后再输入半径,即可生成一个圆形。如下图所示。用同样的方法,点击【圆心、半径】选项,指定第一个圆的圆心为第二个圆的圆心,然后输入半径数值,即可生成另外一个圆形,如下图所示。这样,同心圆就基本绘制完毕了,但是由于AutoCAD软件背景的特殊性,这样的图形显得比较单调,接下来还可以为图形
2024-05-22 comment 539
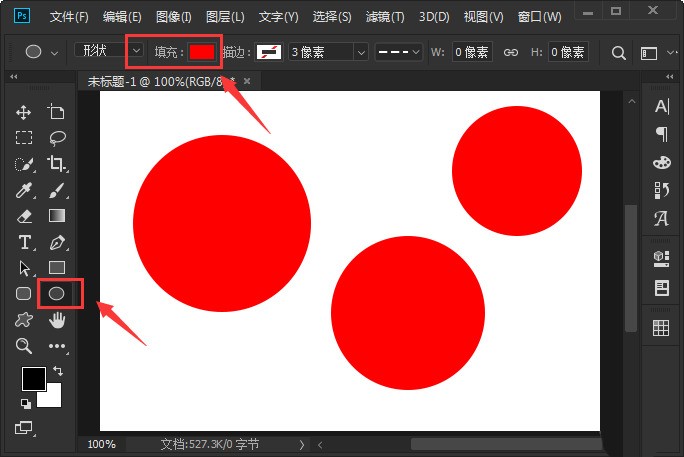
Course Introduction:首先用【椭圆工具】分别绘画出3个不同大小的圆形,把填充颜色设置为【红色】。然后选中椭圆1的图层,把不透明度调整为【8%】。接着选中椭圆2的图层,把不透明度调整为【16%】。最后把3个图层一起选中,设置为【水平居中对齐】和【垂直居中对齐】就完成了。
2024-05-25 comment 292
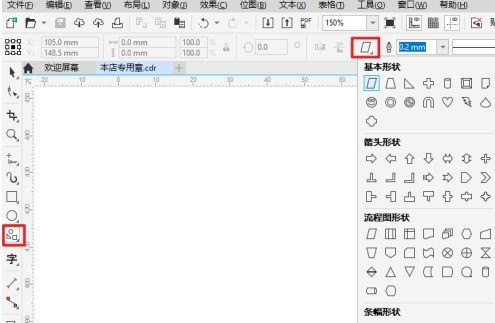
Course Introduction:1.双击启动CorelDRAW2019软件。2.CorelDRAW2019中快速找到圆心。3.画一个标准圆,会出现8个点,画上十字形参考线,交叉点重合到圆心时,会出现【中心】二字,即为圆心。4.选中钢笔工具,先点中圆,会出现4个点,画上十字形参考线,然后将圆拖走。5.利用Ctrl+shift对着中心点画圆,将鼠标朝着四个点移动,当移动显示【节点】就放开鼠标左键,这个方法比较靠谱。
2024-05-27 comment 0 266
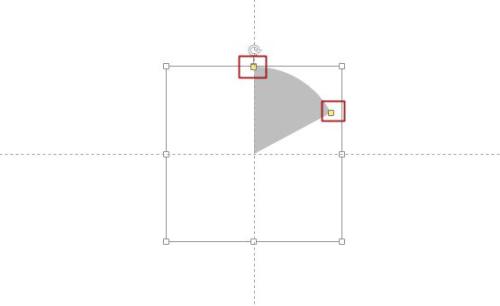
Course Introduction:I insert a sector in ppt and the sectors share the center but the radius of the sector is different and adjustable. How to make it? Solution: First, we need to use the "Sector" tool to draw a rough shape and set the desired color. In order to ensure that all sectors share a circle center, it is recommended to turn on [Reference Lines] under the [View] menu. As shown in the figure below, pay attention to the control points in the red line box, which are used to adjust the angle of the sector. The second step is to copy the sector you just created, then paste and move it so that it aligns with the center of the circle. Next, hold down the [Ctrl+Shift] key combination and drag the control points at the four corners of the fan shape to enlarge it (holding down the key combination can keep the center position of the circle unchanged while making it larger in equal proportions). Then, change the shape of the fan and set the appropriate color
2024-01-13 comment 730