

Course 2857
Course Introduction:Course introduction: 1. Cross-domain processing, token management, route interception; 2. Real interface debugging, API layer encapsulation; 3. Secondary encapsulation of Echarts and paging components; 4. Vue packaging optimization and answers to common problems.

Course 1795
Course Introduction:Apipost is an API R&D collaboration platform that integrates API design, API debugging, API documentation, and automated testing. It supports grpc, http, websocket, socketio, and socketjs type interface debugging, and supports privatized deployment. Before formally learning ApiPost, you must understand some related concepts, development models, and professional terminology. Apipost official website: https://www.apipost.cn

Course 5521
Course Introduction:(Consult WeChat: phpcn01) The comprehensive practical course aims to consolidate the learning results of the first two stages, achieve flexible application of front-end and PHP core knowledge points, complete your own projects through practical training, and provide guidance on online implementation. Comprehensive practical key practical courses include: social e-commerce system backend development, product management, payment/order management, customer management, distribution/coupon system design, the entire WeChat/Alipay payment process, Alibaba Cloud/Pagoda operation and maintenance, and project online operation. .....

Course 5172
Course Introduction:(Consult WeChat: phpcn01) Starting from scratch, you can solve conventional business logic, operate MySQL with PHP to add, delete, modify, and query, display dynamic website data, master the MVC framework, master the basics of the ThinkPHP6 framework, and learn and flexibly master all knowledge involved in PHP development. point.

Course 8713
Course Introduction:(Consult WeChat: phpcn01) The learning objectives of the front-end development part of the 22nd issue of PHP Chinese website: 1. HTML5/CSS3; 2. JavaScript/ES6; 3. Node basics; 4. Vue3 basics and advanced; 5. Mobile mall/ Website background homepage layout; 6. Automatic calculation of tabs/carousels/shopping carts...
Merge associative arrays with shared column values
2023-11-09 08:47:41 0 2 217
Filtering arrays of objects based on properties: a guide
2023-10-09 16:41:54 0 2 381
Share React components between projects
2023-09-21 00:01:52 0 1 304
Do the flat files need to have the same json format?
2023-09-07 09:19:43 0 1 273
Separate calculation functions shared by Vue compilation into separate packages
2023-09-01 17:46:49 0 1 339
Course Introduction:How to create a homegroup in Windows 11? Many users are using Windows 11 system, so do you know how to create a homegroup in Windows 1 system? In fact, the method is not complicated! Below, the editor will share with you a tutorial on creating a shared homegroup in Windows 11. Friends who don’t know how to operate can learn it together! Windows 11 tutorial to create a shared homegroup to share 1. First, right-click Network on the Win11 system desktop, and then click Properties in the menu. 2. Then click the Home Group in the lower left corner of the Network and Sharing Center window. 3. Open the homegroup window and click Create Homegroup. 4. Enter the Create Homegroup Wizard and click Next to create it. 5. Choose what you want to share
2023-07-03 comment 0 2087

Course Introduction:Computers can only add other computers for sharing after creating a homegroup, which makes it easier to use. After the latest win11 system update, I believe many users still don’t know how to operate it. Here is how to establish sharing. Homegroup win11 tutorial, come and try it. How to create a shared homegroup win111, first right-click Network on the Win11 system desktop, and then click Properties in the menu. 2. Then click the Home Group in the lower left corner of the Network and Sharing Center window. 3. Open the homegroup window and click Create Homegroup. 4. Enter the Create Homegroup Wizard and click Next to create it. 5. Select the permissions you want to share with other family group members and click Next. 6. After clicking, the system will start to create a home
2024-01-08 comment 896
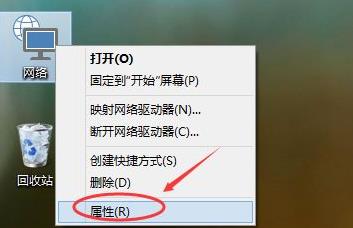
Course Introduction:Some friends want to create a shared homegroup in Win11 system, but they don’t know how to create a shared homegroup in Win11. Next, the editor will give you a detailed introduction to the tutorial on creating a shared homegroup in Win11. Friends who are in need, please come and join us. Let’s take a look and find out more. 1. Right-click the "Network" icon on the desktop and select "Properties" in the menu option to open it. 2. In the new interface that opens, click the "Homegroup" option in the lower left corner. 3. Then click the "Create Homegroup" button in the lower right corner. 4. Click Next to create. 5. Then select the appropriate permissions for other family group members and click Next. 6. Created
2024-01-11 comment 0 833

Course Introduction:There will be a family sharing function on steam, so how to enable family sharing? Players need to click on Family in the steam settings, and then click to authorize library sharing on this device. This introduction to the steam family sharing operation method will tell you the specific method. The following is a detailed introduction, hurry up and take a look! "Steam Usage Tutorial" How to do steam family sharing: Find the family in the settings, and then select to authorize library sharing on this device. The specific method: 1. First, click the steam mark on the upper right. 2. Select to set this button. 3. After entering settings, click the Family option on the right. 4. Then find the switch to authorize library sharing on this device. 5. In the list that appears, select the items that need to be shared.
2024-03-22 comment 688

Course Introduction:Players can purchase various games on steam, and can turn on family sharing when using steam. Many players do not know how to turn on steam family sharing. Players need to click on the "Family" option on the left in the settings interface and check "In Authorize library sharing on this computer" option. How to turn on steam home sharing 1. In the Steam main interface after logging in, click the "Steam" button in the upper left corner and select the "Settings" option in the pop-up menu. Open the Steam settings interface. 2. In the settings interface that opens, click the "Family" option on the left. This will display settings related to Home Sharing. 3. In the Family Options page, check the "Authorize library sharing on this computer" option. This will allow other accounts to
2024-03-28 comment 322