Redis Cluster:
If deployed to multiple computers, it will be the same as a normal cluster; because Redis is single-threaded and multi-core The CPU can only use one core, so if it is deployed on the same computer and runs multiple Redis instances to form a cluster, the CPU utilization can be improved.
Recommended:
redis video tutorial Build a Redis cluster under Windows system:Requires 4 components:
Redis, Ruby language operating environment, Redis Ruby driver redis-xxxx.gem, tool for creating Redis cluster redis-trib.rb
Install Redis and run 3 instances (Redis cluster requires at least More than 3 nodes, less than 3 cannot be created);
Use the redis-trib.rb tool to create a Redis cluster. Since this file is written in ruby language, you need to install the Ruby development environment and driver. redis-xxxx.gem
1. Download and install Redis
The GitHub path is as follows: https://github.com/MSOpenTech/redis/releases/
Redis provides Download files in msi and zip formats. Download zip format version 3.0.504 here.
Just decompress the downloaded Redis-x64-3.0.504.zip. For ease of use, it is recommended to place it in the root directory of the drive letter. Next, and change the directory name to Redis, such as: C:\Redis or D:\Redis
Start 3 different Redis instances through the configuration file. Since the default port of Redis is 6379, 6380 is used here. , 6381, and 6382 to run 3 Redis instances.
Note: In order to avoid unnecessary errors, try to save the configuration file in utf8 format and do not contain comments;
There are two ways to save logs in the configuration file (save in file, Save to System Log) Please choose one of them according to your needs:
loglevel notice #The recording level of the log, notice is suitable for the production environmentlogfile "D:/ Redis/Logs/redis6380_log.txt" #Specify the path to keep the log. The default is to create it in the Redis installation directory. If there are subdirectories, you need to create them manually, such as the Logs directory here
syslog-enabled yes #Whether to use System log
syslog-ident redis6380 #In the identification name of the system log
, the method of saving in a file is used, so first create a new Logs under the Redis directory D:/Redis The contents of the folder
redis.6380.conf are as follows:
port 6380 loglevel notice logfile "D:/Redis/Logs/redis6380_log.txt" appendonly yes appendfilename "appendonly.6380.aof" cluster-enabled yes cluster-config-file nodes.6380.conf cluster-node-timeout 15000 cluster-slave-validity-factor 10 cluster-migration-barrier 1 cluster-require-full-coverage yes
The contents of redis.6381.conf are as follows:
port 6381 loglevel notice logfile "D:/Redis/Logs/redis6381_log.txt" appendonly yes appendfilename "appendonly.6381.aof" cluster-enabled yes cluster-config-file nodes.6381.conf cluster-node-timeout 15000 cluster-slave-validity-factor 10 cluster-migration-barrier 1 cluster-require-full-coverage yes
redis.6382.conf The contents are as follows:
port 6382 loglevel notice logfile "D:/Redis/Logs/redis6382_log.txt" appendonly yes appendfilename "appendonly.6382.aof" cluster-enabled yes cluster-config-file nodes.6382.conf cluster-node-timeout 15000 cluster-slave-validity-factor 10 cluster-migration-barrier 1 cluster-require-full-coverage yes
The configuration content is explained as follows:
port 6380 #端口号 loglevel notice #日志的记录级别,notice是适合生产环境的 logfile "Logs/redis6380_log.txt" #指定log的保持路径,默认是创建在Redis安装目录下,如果有子目录需要手动创建,如此处的Logs目录 syslog-enabled yes #是否使用系统日志 syslog-ident redis6380 #在系统日志的标识名 appendonly yes #数据的保存为aof格式 appendfilename "appendonly.6380.aof" #数据保存文件 cluster-enabled yes #是否开启集群 cluster-config-file nodes.6380.conf cluster-node-timeout 15000 cluster-slave-validity-factor 10 cluster-migration-barrier 1 cluster-require-full-coverage yes
Save the above configuration files to the Redis directory, and use these configuration files to install 3 redis services. The command is as follows:
Note : It is best to use the full path for configuration files such as redis.6380.conf to avoid problems when restarting the Redis cluster. The blogger’s installation directory is D:/Redis
D:/Redis/redis-server.exe --service-install D:/Redis/redis.6380.conf --service-name redis6380 D:/Redis/redis-server.exe --service-install D:/Redis/redis.6381.conf --service-name redis6381 D:/Redis/redis-server.exe --service-install D:/Redis/redis.6382.conf --service-name redis6382
To start these three services, the command is as follows:
D:/Redis/redis-server.exe --service-start --service-name Redis6380 D:/Redis/redis-server.exe --service-start --service-name Redis6381 D:/Redis/redis-server.exe --service-start --service-name Redis6382
Execution result:
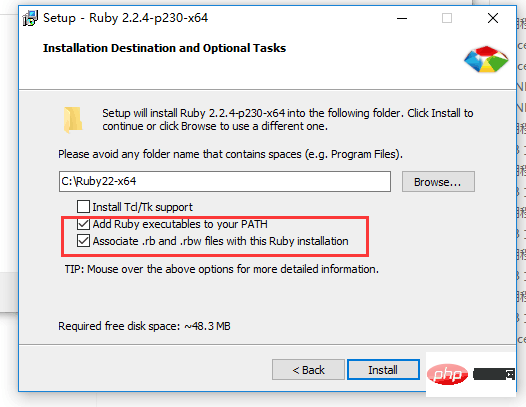
##2. Download and install ruby
2.2. Download the Redis driver in ruby environment. Considering compatibility, the download here is version 3.2.2
The command is as follows:
gem install --local path_to_gem/filename.gem
Actual operation As follows:
2.3. Download the ruby script file redis-trib.rb officially provided by Redis to create a Redis cluster. The path is as follows:
注意:因为redis-trib.rb是ruby代码,必须用ruby来打开,若redis-trib.rb无法识别,需要手动选择该文件的打开方式:
**选择ruby为的打开方式后,redis-trib.rb的logo都会发生改变,如下图:
3.创建Redis集群
CMD下切换到Redis目录,使用redis-trib.rb来创建Redis集群:
redis-trib.rb create --replicas 0 127.0.0.1:6380 127.0.0.1:6381 127.0.0.1:6382
执行结果:
检验是否真的创建成功,输入以下命令:
redis-trib.rb check 127.0.0.1:6380
出现以下信息,说明创建的Redis集群是没问题的
使用Redis客户端Redis-cli.exe来查看数据记录数,以及集群相关信息
D:/Redis/redis-cli.exe -c -p 6380
-c 表示 cluster
-p 表示 port 端口号
输入dbsize查询 记录总数
dbsize
或者一次输入完整命令:
D:/Redis/redis-cli.exe -c -p 6380 dbsize
结果如下:
输入cluster info可以从客户端的查看集群的信息:
cluster info
结果如下:
更多redis知识请关注redis使用教程栏目。
The above is the detailed content of Example of building a redis cluster under Windows. For more information, please follow other related articles on the PHP Chinese website!