Introduction to Flask
Flask is a lightweight web framework compared to Django.
Unlike Django, Flask is built on a series of open source software packages, the most important of which are the WSGI application development library Werkzeug and the template engine Jinja:
Strategy: the two libraries werkzeug and Jinja and Like Flask, it is developed by the pocoo team. This may reflect Pocoo's ecological strategy when competing with Django. The natural extension of this strategy is that the Flask framework does not include database components, whether ORM or others.
Focus: Flask is a WSGI application framework, which means that when we develop Flask, we do not need to pay attention to network operations. The entrance of the Flask application is the encapsulated network request packet, and the exit is the network response. We only need to pay attention to it. The processing logic within this stage.
WSGI server: Although Flask has a simple built-in WSGI server, its performance is only suitable for debugging during the development period. The Flask official website recommends a variety of WSGI servers, with implementation methods ranging from multi-process to multi-thread to coroutine. We will not cover this choice in this course.
REST adaptability: Although Flask and Django are the same, the initial starting point is server-side dynamic web applications. However, Flask's design makes it quite suitable for resource-oriented REST architecture. In the field of WEB development where single-page applications are becoming more and more mobile and important, this is Flask's considerable advantage over Django.
Hello Flask
It is quite easy to write a hello world based on Flask:
1. Import the Flask class
from flask import Flask
The Flask class is the core class of the Flask framework, which implements the WSGI application specification.
2. Create a Flask instance
app = Flask(__name__)
The first parameter of the Flask constructor specifies an import name/importname. The Flask framework uses this name to locate static resources, templates, and error messages. Unless you clearly understand its purpose, normally we should always use the special variable _name.
The Flask instance is callable (has a call method), and this instance can directly connect to the WSGI server.
3. Register routing
@route('/')
def index():
    return 'Hello,Flask!'
Registering routing is to establish the association between URL rules and processing functions. The Flask framework relies on routing to complete the distribution of HTTP requests.
The function in the route is called a view function, and its return value will be used as the body content of the HTTP response.
4. Connect and start the WSGI server
Flask encapsulates a simple WSGI server for development. We can start the server by calling run():
app.run(host='0.0.0.0',port=80)
Overview
Routing is a web framework with MVC architecture It is a very important concept and is also the focus of this course.
As the name implies, routing means finding a way out of confusion. In the Flask framework, routing means finding the corresponding processing function for the URL requested by the user.
In this course, we will mainly explain routing in the Flask framework from the following aspects:
How to register routing for an application? How do I specify for a route the HTTP methods it supports? How to match dynamic URL? How to filter variable types in URL? How to understand access point/endpoint? How to set static routing for application? How to avoid hardcoding URLs pointing to other views?
Register Route
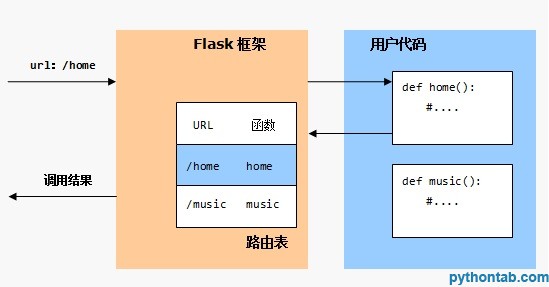
In a Flask application, routing refers to the mapping between the URL requested by the user and the view function. The Flask framework matches the predefined URL rules in the routing table according to the URL of the HTTP request, finds the corresponding view function, and returns the execution result of the view function to the WSGI server:

It can be seen that the routing table is at the core of the Flask application s position. The contents of the routing table are populated by the application developer.
route decorator: You can use the route decorator of the Flask application instance to bind a URL rule to a view function.
For example, the following example binds the URL rule /test to the view function test():
@app.route('/test')
def test():
return 'this is response'If this application is deployed in the root directory of the host ezhost.com, then when the user accesses:
http:// pythontab.com/teset
The Flask framework will call our test() function, and its return result will be passed to the WSGI server and sent to the visitor.
add_url_rule(): Another equivalent way of writing is to use the add_url_route() method of the Flask application instance. The following example registers the same route as the previous example:
def test():
    return 'this is response'
app.add_url_route('/test',view_func=test)
In fact, the route registration is also implemented inside the route decorator by calling the add_url_route() method. But obviously, using decorators makes the code look more elegant.
Specify the HTTP method for the route
By default, Flask routing only supports HTTP GET requests. You can use the methods keyword argument to explicitly declare the HTTP methods supported by the view method when registering the route.
For example, the following example binds the URL rule/auth to the view function v_auth(), this route only supports the POST method:
@app.route('/auth',methods=['POST'])
def v_auth():pass
指定多种HTTP方法支持
关键字参数methods的类型为list,因此可以同时指定多种HTTP方法。
下面的示例中,使URL规则/user同时支持POST方法和GET方法:
@app.route('/user',methods=['POST','GET'])
def v_users():
    if request.method == 'GET':
        return ... # 返回用户列表
    if request.method == 'POST'
return ... #创建新用户这个特性使Flask非常易于开发REST架构的后台服务,而不仅仅局限于传统的动态网页。
匹配动态URL
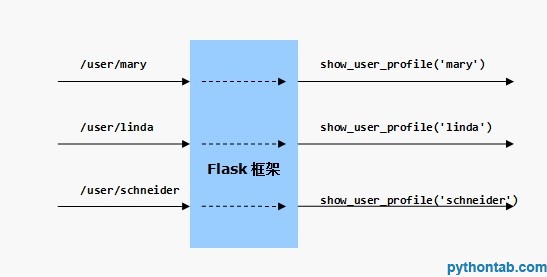
有时我们需要将同一类URL映射到同一个视图函数处理,比如,使用同一个视图函数 来显示不同用户的个人档案。我们希望以下的URL都可以分发到同一个视图函数:

在Flask中,可以将URL中的可变部分使用一对小括号<>声明为变量, 并为视图函数声明同名的参数:
@app.route('/user/')
def v_user(uname):
    return '%s\'s Profile' % uname
在上面的示例中,URL规则中的表示这部分是可变的,Flask将提取用户请求的 URL中这部分的内容,并作为视图函数v_user()的uname参数进行调用。
URL变量类型过滤
考虑下面的示例,我们希望通过HTTP共享文件夹/var/readonly中的文件:
/var
/readonly
/a.txt
/b.txt
/repo
/c.txt
/d.txt
简单思考一下就有答案了。我们可以构造URL规则/file/,然后直接 读取文件内容返回给用户。注册如下的路由:
@app.route('/file/')
def v_file(fname):
    fullname = os.path.join('/var/readonly',fname)
    f = open(fullname)
    cnt =  f.read()
    f.close()
return cnt测试结果表明,/file/a.txt和/file/b.txt都没有问题,但是/file/repo/c.txt和 /file/repo/d.txt却会失败。
这是因为,默认情况下,在URL规则中的变量被视为不包含/的字符串。/file/repo/c.txt 是没有办法匹配URL规则/file/的。
可以使用内置的path转换器告诉Flask框架改变这一默认行为。path转换器允许 规则匹配包含/的字符串:
@app.route('/file/')
在Flask中,转换器/converter用来对从URL中提取的变量进行预处理,这个过程 发生在调用视图函数之前。Flask预置了四种转换器:
string - 匹配不包含/的字符串,这是默认的转换器
path - 匹配包含/的字符串
int - 只有当URL中的变量是整型值时才匹配,并将变量转换为整型
float - 只有当URL中的变量是浮点值时才匹配,并将变量转换为浮点型
访问点/endpoint
我们一直强调,路由的作用是根据请求的URL,找到对应的视图函数。这没错,但是在 Flask框架中,请求任务的分发并不是直接从用户请求的URL一步定位到视图函数, 两者之间隔着一个访问点/endpoint。
以下面的代码为例,我们看Flask怎样实现请求的分发:
@app.route('/home')
def home():pass
在Flask内部使用两张表维护路由:
url_map :维护URL规则和endpoint的映射
view_functions :维护endpoint和视图函数的映射。
以用户访问URL/home为例,Flask将首先利用url_map找到所请求URL对应的 endpoint,即访问点home,然后再利用view_functions表查找home这个访问点 对应的视图函数,最终匹配到函数home():
默认访问点 :当我们使用route装饰器注册路由时,默认使用被装饰函数的 函数名(name)作为访问点,因此,你看到上面的表中,路由中的访问点为home。
自定义访问点 :可以在使用route装饰器或调用add_url_rule()方法注册路由时,使用 endpoint关键字参数改变这一默认行为:
1
2
@app.route('/home',endpoint='whocare')
def home():pass
此时的两张路由表将变成这样:
静态目录路由
当创建应用实例时,Flask将自动添加一条静态目录路由,其访问点 始终被设置为static,URL规则默认被设置为/static,本地路径默认被 设置为应用文件夹下的static子文件夹:
+------------------------------------------------------------+ | url rule | endpoint | view_function | | /static | static | Flask.send_static_file | +------------------------------------------------------------+ 如果你的应用目录如下:
/app
/web.py
/static
/main.css
/jquery.min.js
那么启动应用后就可以通过URL/static/main.css访问static文件夹下的main.css了。
除了访问点被固定为static,静态目录的URL规则和本地目录都是可以根据应用情况进行调整。
改变默认的本地路径 :可以在创建应用对象时使用关键字参数static_folder改变 默认的静态文件夹。例如,你的静态文件都存放在应用下的assets目录下, 那么可以按如下的方式创建应用对象:
app = Flask(name,static_folder='assets') 也可以使用一个绝对路径:
app = Flask(name,static_folder='/var/www/static') 改变默认的本地路径并不会对路由表产生影响。
改变默认的URL规则 : 如果不喜欢静态目录URL/static,也可以在创建应用 对象时使用关键字参数static_url_path换一个别的名字。
下面的示例中,将应用下的assets文件夹注册为静态目录/assets:
app = Flask(name,static_folder='assets',static_url_path='/assets') 当应用运行后,通过URL/assets/main.css就可以访问assets文件夹下的 main.css文件了。
这时的路由表变化为:
+------------------------------------------------------------+ | url | endpoint | view_function | | /assets | static | Flask.send_static_file | +------------------------------------------------------------+
构造URL
在一个实用的视图中,不可避免地存在指向其他视图的链接。在之前的课程示例中,我们 都是在视图函数中这样硬编码这些链接URL的:
@app.route('/')
def v_index():
    return 'tech'
@app.route('/tech')
def v_tech():pass
大部分情况下这种硬编码URL是可以工作的。但如果这个应用被挂在WSGI服务器的一个 子路径下,比如:/app1,那么用户访问URL/tech是不会成功的,这时应当访问/app1/tech 才可以正确地路由到视图函数v_tech()。
我们应当使用访问点让Flask框架帮我们计算链接URL。简单地给url_for()函数传入 一个访问点,它返回将是一个可靠的URL地址:
@app.route('/')
def v_index():
    print url_for('v_contacts')  # /contact
    return 'see console output!'
@app.route('/contact')
def v_contacts():pass
添加查询参数 : 使用关键字参数,可以在构造的URL中生成查询串。下面的调用将生成 /contact?
format=json
@app.route('/')
def v_index():
    print url_for('v_contacts',format='json')
    return  ''
@app.route('/contact')
def v_contacts():pass
添加URL变量 : 如果指定访问点对应的视图函数接收参数,那么关键字参数将生成对应的参数URL。下面的 示例将生成/contact/Julia?format=html:
@app.route('/')
def v_index():
    print url_for('v_contact',name='Julia',format='html')
    return ''
@app.route('/contact/')
def v_contact(name):pass
添加锚点 :使用_anchor关键字可以为生成的URL添加锚点。下面的示例将生成URL /contact#part2
@app.route('/')
def v_index():
    print url_for('v_contacts',_anchor='part2')
@app.route('/contact')
def v_contacts():pass
外部URL : 默认情况下,url_for()生成站内URL,可以设置关键字参数_external 为True,生成包含站点地址的外部URL。下面的示例将生成URLhttp:///contacts:
@app.route('/')
def v_index():
    print url_for('v_contacts',_external=True)
@app.route('/contact')
def v_contacts():pass


