
PHP8 alpha1已经在昨天发布,相信关于JIT是大家最关心的,PHP8 JIT是什么,又怎么用,又有什么要注意的,以及性能提升到底咋样?
视频教程推荐:《PHP编程从入门到精通》
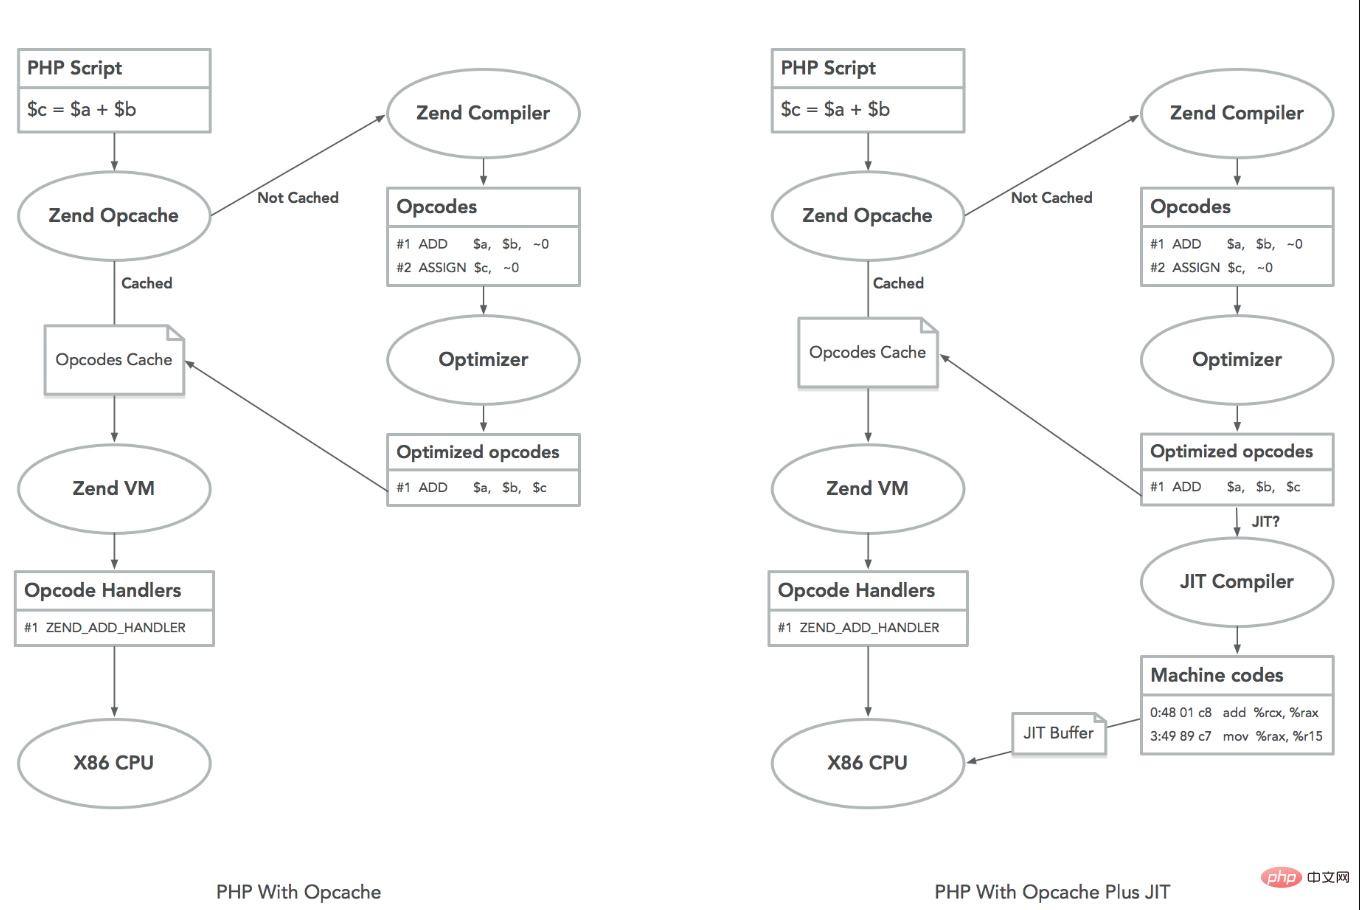
首先,我们来看一张图:

(右图有点错误就是,当JIT以后,下次请求的时候,会直接从JIT Buffer中读取执行,后续我把图改一下)
左图是PHP8之前的Opcache流程示意图, 右图是PHP8中的Opcache示意图, 可以看出几个关键点:
Opcache会做opcode层面的优化,比如图中的俩条opcode合并为一条
JIT在Opcache优化之后的基础上,再次优化,直接生成机器码
PHP8的JIT是在Opcache之中提供的
目前PHP8只支持x86架构的CPU
JIT是在原来Opcache优化的优化基础之上进行优化的,不是替代
事实上JIT共用了很多原来Opcache做优化的基础数据结构,比如data flow graph, call graph, SSA等,关于这部分,后续如果有时间,可以单独在写一个文章来介绍,今天就只是着重在使用层面。
下载安装好以后,除掉原有的opcache配置以外,对于JIT我们需要添加如下配置到php.ini:
opcache.jit=1205
opcache.jit_buffer_size=64M
opcache.jit这个配置看起来稍微有点复杂,我来解释下, 这个配置由4个独立的数字组成,从左到右分别是(请注意,这个是基于目前alpha1的版本设置,一些配置可能会随着后续版本做微调):
0: 不使用
1: 使用
0: 不使用寄存器分配
1: 局部(block)域分配
2: 全局(function)域分配
0: PHP脚本载入的时候就JIT
1: 当函数第一次被执行时JIT
2: 在一次运行后,JIT调用次数最多的百分之(opcache.prof_threshold * 100)的函数
3: 当函数/方法执行超过N(N和opcache.jit_hot_func相关)次以后JIT
4: 当函数方法的注释中含有@jit的时候对它进行JIT
5: 当一个Trace执行超过N次(和opcache.jit_hot_loop, jit_hot_return等有关)以后JIT
0: 不JIT
1: 做opline之间的跳转部分的JIT
2: 内敛opcode handler调用
3: 基于类型推断做函数级别的JIT
4: 基于类型推断,过程调用图做函数级别JIT
5: 基于类型推断,过程调用图做脚本级别的JIT
基于此,我们可以大概得到如下几个结论:
尽量使用12x5型的配置,此时应该是效果最优的
对于x, 如果是脚本级别的,推荐使用0, 如果是Web服务型的,可以根据测试结果选择3或5
@jit的形式,在有了attributes以后,可能变为<
现在,我们来测试下启用和不启用JIT的时候,Zend/bench.php的差异,首先是不启用(php -d opcache.jit_buffer_size=0 Zend/bench.php):
simple             0.008
simplecall         0.004
simpleucall        0.004
simpleudcall       0.004
mandel             0.035
mandel2            0.055
ackermann(7)       0.020
ary(50000)         0.004
ary2(50000)        0.003
ary3(2000)         0.048
fibo(30)           0.084
hash1(50000)       0.013
hash2(500)         0.010
heapsort(20000)    0.027
matrix(20)         0.026
nestedloop(12)     0.023
sieve(30)          0.013
strcat(200000)     0.006
------------------------
Total              0.387
根据上面的介绍,我们选择opcache.jit=1205, 因为bench.php是脚本(php -d opcache.jit_buffer_size=64M -d opcache.jit=1205 Zend/bench.php):
simple             0.002
simplecall         0.001
simpleucall        0.001
simpleudcall       0.001
mandel             0.010
mandel2            0.011
ackermann(7)       0.010
ary(50000)         0.003
ary2(50000)        0.002
ary3(2000)         0.018
fibo(30)           0.031
hash1(50000)       0.011
hash2(500)         0.008
heapsort(20000)    0.014
matrix(20)         0.015
nestedloop(12)     0.011
sieve(30)          0.005
strcat(200000)     0.004
------------------------
Total              0.157
可见,对于Zend/bench.php, 相比不开启JIT,开启了以后,耗时降低将近60%,性能提升将近2倍。
对于大家研究学习来说,可以通过opcache.jit_debug来观测JIT后生成的汇编结果,比如对于:
function simple() {
  $a = 0;
  for ($i = 0; $i < 1000000; $i++)
    $a++;
}我们通过php -d opcache.jit=1205 -dopcache.jit_debug=0x01 可以看到:
JIT$simple: ; (/tmp/1.php)
	sub $0x10, %rsp
	xor %rdx, %rdx
	jmp .L2
.L1:
	add $0x1, %rdx
.L2:
	cmp $0x0, EG(vm_interrupt)
	jnz .L4
	cmp $0xf4240, %rdx
	jl .L1
	mov 0x10(%r14), %rcx
	test %rcx, %rcx
	jz .L3
	mov $0x1, 0x8(%rcx)
.L3:
	mov 0x30(%r14), %rax
	mov %rax, EG(current_execute_data)
	mov 0x28(%r14), %edi
	test $0x9e0000, %edi
	jnz JIT$$leave_function
	mov %r14, EG(vm_stack_top)
	mov 0x30(%r14), %r14
	cmp $0x0, EG(exception)
	mov (%r14), %r15
	jnz JIT$$leave_throw
	add $0x20, %r15
	add $0x10, %rsp
	jmp (%r15)
.L4:
	mov $0x45543818, %r15
	jmp JIT$$interrupt_handler
大家可以尝试阅读这段汇编,比如其中针对i的递增,可以看到优化力度很大,比如因为i是局部变量直接分配在寄存器中,i的范围推断不会大于10000,所以不需要判断是否整数溢出等等。
而如果我们采用opcache.jit=1201, 我们可以得到如下结果:
JIT$simple: ; (/tmp/1.php)
	sub $0x10, %rsp
	call ZEND_QM_ASSIGN_NOREF_SPEC_CONST_HANDLER
	add $0x40, %r15
	jmp .L2
.L1:
	call ZEND_PRE_INC_LONG_NO_OVERFLOW_SPEC_CV_RETVAL_UNUSED_HANDLER
	cmp $0x0, EG(exception)
	jnz JIT$$exception_handler
.L2:
	cmp $0x0, EG(vm_interrupt)
	jnz JIT$$interrupt_handler
	call ZEND_IS_SMALLER_LONG_SPEC_TMPVARCV_CONST_JMPNZ_HANDLER
	cmp $0x0, EG(exception)
	jnz JIT$$exception_handler
	cmp $0x452a0858, %r15d
	jnz .L1
	add $0x10, %rsp
	jmp ZEND_RETURN_SPEC_CONST_LABEL
这就只是简单的内敛部分opcode handler的调用了。
你也可以尝试各种opcache.jit的策略结合debug的配置,来观测结果的不同,你也可以尝试各种opcache.jit_debug的配置,比如0xff,将会有更多的辅助信息输出。
好了,JIT的使用就简单介绍到这里,关于JIT本身的实现等细节,以后有时间,我再来写吧。
大家现在就可以去php.net下载PHP8来测试了 :)
The above is the detailed content of What is PHP JIT? Detailed graphic and text explanation of JIT, the new features of PHP8. For more information, please follow other related articles on the PHP Chinese website!