
This article mainly introduces the WeChat group messaging developed by PHP WeChat public platform in detail. It has certain reference value. Interested friends can refer to it
1. Purpose
Finished sending group messages in the WeChat public account. Here just complete the simple text sending. You can also send voice pictures, etc., but the data format is different. There is a link below to query the data sending format of the data type.
2. The process of sending group text messages
Obtain a test public account (those who have an account do not need a test account, but formal accounts have more restrictions) Users follow the public account above The account obtains our access_token through appid and appsecret and sends group text messages through access_token
3. Obtain the test public account and follow the public account
1), obtain the public test account
Visit the above link and select "Interface Test Number Application" to open it directly http://mp.weixin.qq.com/debug/cgi-bin/sandboxinfo?action=showinfo&t=sandbox/indexScan the QR code to log in through the WeChat client.
After logging in, you can get the information of a test public account. There are mainly two parameters, appId and appsecret, which will uniquely identify an official account, and they need to be used as parameters to obtain the user's information. ,

2) Configuring interface information
You can refer to the WeChat access instructions for this step. This page provides an example download of php, which is very simple and basically Just modify the custom TOKEN, and then put the verification page on your own server.
Here I provide an example of what I did:
Preparation resources:
Domain name space (mine is the sae space Wanwang domain name), PHP file for verification only
I created a wx_sample.php in the space root directory pointed to by the domain name
wx_sample.php
<?php
/**
* wechat php test
*/
//define your token
define("TOKEN", "weixin");
$wechatObj = new wechatCallbackapiTest();
$wechatObj->valid();
class wechatCallbackapiTest
{
public function valid()
{
$echoStr = $_GET["echostr"];
//valid signature , option
if($this->checkSignature()){
echo $echoStr;
exit;
}
}
public function responseMsg()
{
//get post data, May be due to the different environments
$postStr = $GLOBALS["HTTP_RAW_POST_DATA"];
//extract post data
if (!empty($postStr)){
/* libxml_disable_entity_loader is to prevent XML eXternal Entity Injection,
the best way is to check the validity of xml by yourself */
libxml_disable_entity_loader(true);
$postObj = simplexml_load_string($postStr, 'SimpleXMLElement', LIBXML_NOCDATA);
$fromUsername = $postObj->FromUserName;
$toUsername = $postObj->ToUserName;
$keyword = trim($postObj->Content);
$time = time();
$textTpl = "<xml>
<ToUserName><![CDATA[%s]]></ToUserName>
<FromUserName><![CDATA[%s]]></FromUserName>
<CreateTime>%s</CreateTime>
<MsgType><![CDATA[%s]]></MsgType>
<Content><![CDATA[%s]]></Content>
<FuncFlag>0</FuncFlag>
</xml>";
if(!empty( $keyword ))
{
$msgType = "text";
$contentStr = "Welcome to wechat world!";
$resultStr = sprintf($textTpl, $fromUsername, $toUsername, $time, $msgType, $contentStr);
echo $resultStr;
}else{
echo "Input something...";
}
}else {
echo "";
exit;
}
}
private function checkSignature()
{
// you must define TOKEN by yourself
if (!defined("TOKEN")) {
throw new Exception('TOKEN is not defined!');
}
$signature = $_GET["signature"];
$timestamp = $_GET["timestamp"];
$nonce = $_GET["nonce"];
$token = TOKEN;
$tmpArr = array($token, $timestamp, $nonce);
// use SORT_STRING rule
sort($tmpArr, SORT_STRING);
$tmpStr = implode( $tmpArr );
$tmpStr = sha1( $tmpStr );
if( $tmpStr == $signature ){
return true;
}else{
return false;
}
}
}
?>Then fill in the configuration information Token (must match the above in wx_sample.php token is consistent), URL (the address of wx_sample.php)

Then submit it
If the prompt fails, please check the Token and URL [If yes Please register your own domain name and space; for Baidu sae and Sina sae, you need to apply for it yourself and pass the certification (that is, take a photo of your hand holding the ID and upload it, it is very simple and it will take as little as 2 days). This step is required】
3) Configure JS interface security domain name
Be sure not to include protocol when filling in this domain name. For example, http://www.sagosoft.com/ This is wrong. This is a URL, not a domain name
The domain name should be similar to www.sagosoft.com [Otherwise, invalid url domain will be prompted when accessing WeChat js-sdk]

4) Pay attention to the public Account
Only when a user follows this official account can he authorize a third-party to log in and obtain user information by opening a link with the official account information. Therefore, we also need to use our WeChat to follow the WeChat ID. The operation is as follows:
It is still the page that jumped after successful login. We can see that the page has a QR code. We can scan the Follow the QR code. If you follow successfully, there will be one more user's information in the "User List" on the right. As shown in the figure below:

5) Configure the callback function
When we access a third-party webpage (that is, our own webpage) on the WeChat client, We can use the WeChat web page authorization mechanism. We not only need the appid and appsecret obtained previously, but also need the domain name settings for callback after the user authorizes, that is, where the page will jump to after the user authorizes. The specific configuration is as follows:
Still on the page just now, there is a "Webpage Authorization to Obtain User Basic Information", click on the subsequent modification

to fill in the callback Domain name:
The domain name is the root domain name configured above. If the URL you filled in the "Interface Configuration Information" above is zcr.sinaaappc.com/wx_sample.php, you only need to fill in zcr.sinaaappc.com here.
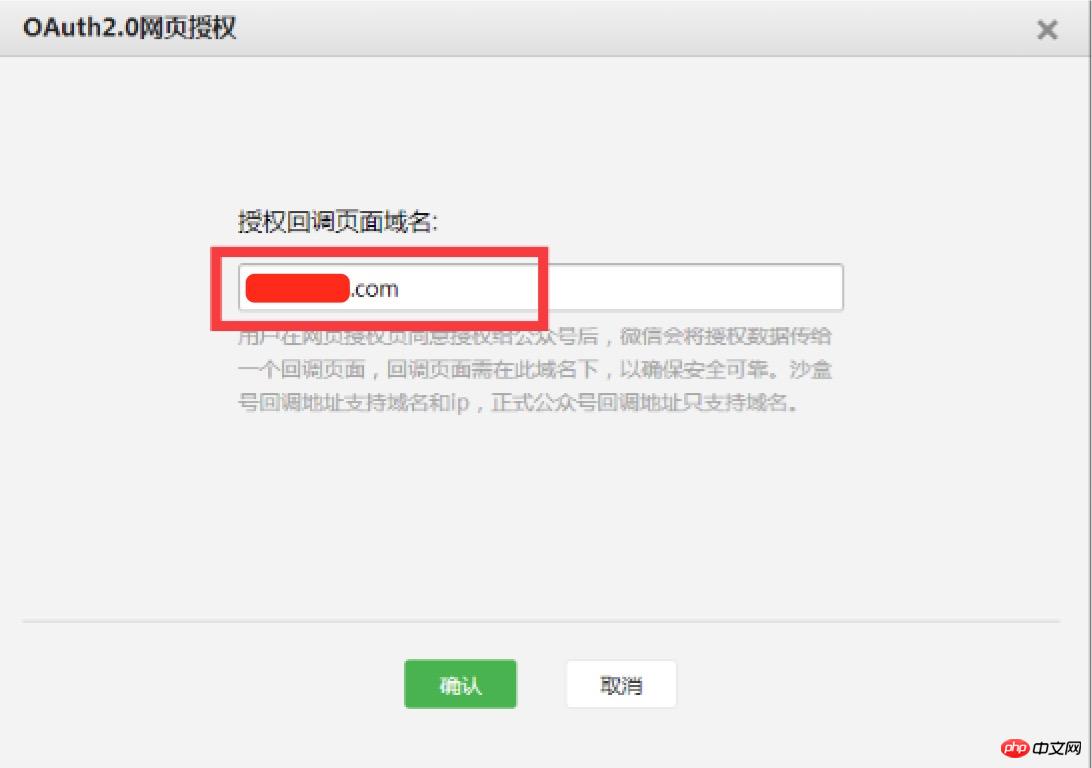
If your URL has not been blacklisted, it will appear at the top


Notice:
1、这里填写的是域名(是一个字符串),而不是URL,因此请勿加http://等协议头;
2、授权回调域名配置规范为全域名,比如需要网页授权的域名为:www.qq.com,配置以后此域名下面的页面http://www.qq.com/music.html 、 http://www.qq.com/login.html 都可以进行OAuth2.0鉴权。但http://pay.qq.com 、 http://music.qq.com 、 http://qq.com无法进行OAuth2.0鉴权
到这里,我们就完成了公众号测试账号的获取和配置,已经用户关注微信公众号。
4、通过appid和appsecret获取我们的access_token
access_token是公众号的全局唯一票据,公众号调用各接口时都需使用access_token。开发者需要进行妥善保存。access_token的存储至少要保留512个字符空间。access_token的有效期目前为2个小时,需定时刷新,重复获取将导致上次获取的access_token失效。
获取方法:
http请求方式: GET
https://api.weixin.qq.com/cgi-bin/token?grant_type=client_credential&appid=APPID&secret=APPSECRET
参数说明:

返回说明
正常情况下,微信会返回下述JSON数据包给公众号:
复制代码 代码如下:
{"access_token":"ACCESS_TOKEN","expires_in":7200}

错误时微信会返回错误码等信息,JSON数据包示例如下(该示例为AppID无效错误):
复制代码 代码如下:
{"errcode":40013,"errmsg":"invalid appid"}
例子:
获取access_token:
复制代码 代码如下:
https://api.weixin.qq.com/cgi-bin/token?grant_type=client_credential&appid=wx4d1cb8dbd827a16e9&secret=d462d4c36b116795d1d99dcf0547af5443d
返回数据:
{
"access_token": "qR5UK2vMf5aTHV8e-uB10FZW0caTZm_1kbkUe4OPK2ILVvNaoa7pLzYWqLUAmx6Sjq1E7pKHrVAtuG0_1MPkqmDfOkm2750kaLWNk59DS-iDOpjjxompJtXa3WhbN5FKRWNhADAVAR",
"expires_in": 7200
}5、通过access_token群发短信
在公众平台网站上,为订阅号提供了每天一条的群发权限,为服务号提供每月(自然月)4条的群发权限。而对于某些具备开发能力的公众号运营者,可以通过高级群发接口,实现更灵活的群发能力。
请注意:
1、对于认证订阅号,群发接口每天可成功调用1次,此次群发可选择发送给全部用户或某个分组;
2、对于认证服务号虽然开发者使用高级群发接口的每日调用限制为100次,但是用户每月只能接收4条,无论在公众平台网站上,还是使用接口群发,用户每月只能接收4条群发消息,多于4条的群发将对该用户发送失败;
3、具备微信支付权限的公众号,在使用群发接口上传、群发图文消息类型时,可使用标签加入外链;
4、开发者可以使用预览接口校对消息样式和排版,通过预览接口可发送编辑好的消息给指定用户校验效果。
1)根据分组进行群发【订阅号与服务号认证后均可用】
调用接口:
复制代码 代码如下:
http请求方式: POSThttps://api.weixin.qq.com/cgi-bin/message/mass/sendall?access_token=ACCESS_TOKEN
在body添加如下数据(以JSON格式数据发送)——发送其他格式数据,只需要改里面参数信息即可,具体可查看微信官方文档:
{
"filter":{
"is_to_all":false,
"group_id":2
},
"text":{
"content":"CONTENT"
},
"msgtype":"text"
}参数说明:
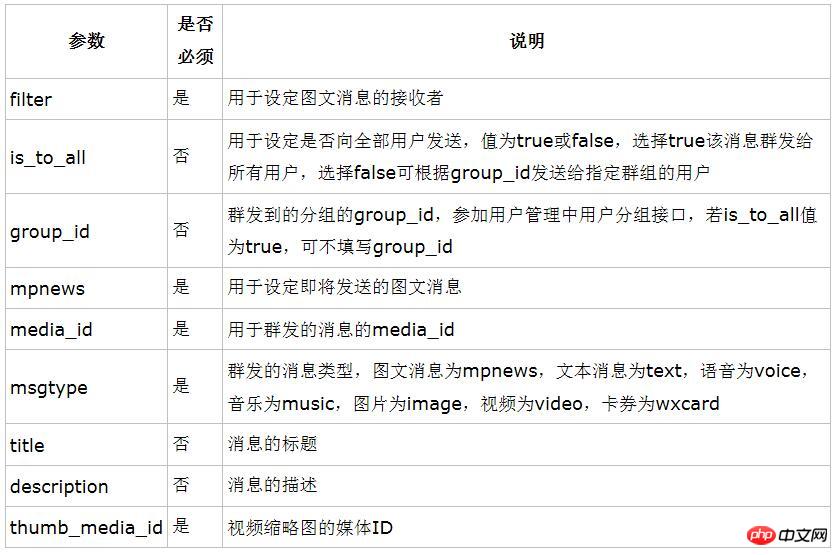
例子:发送给所有人
url:
复制代码 代码如下:
https://api.weixin.qq.com/cgi-bin/message/mass/sendall?access_token=KBoNONaJZ4-KhafQVJoQ6VBX0F-bls7nAsJBn8Fy7GLwav4Be1lRJcob1RHH6wW35IxxFwkJnZfnc-On9EQITg3oxEWUw7O2YyVW9naDknu6PQX9fnSmQcr8ojTK8Ug-HDTcAAABXN
发送的json数据:发送给所有人
{
"filter":{
"is_to_all":true
},
"text":{
"content":"CONTENT"
},
"msgtype":"text"
}返回数据:
{
"errcode": 0,
"errmsg": "send job submission success",
"msg_id": 1000000003
}参数意义:
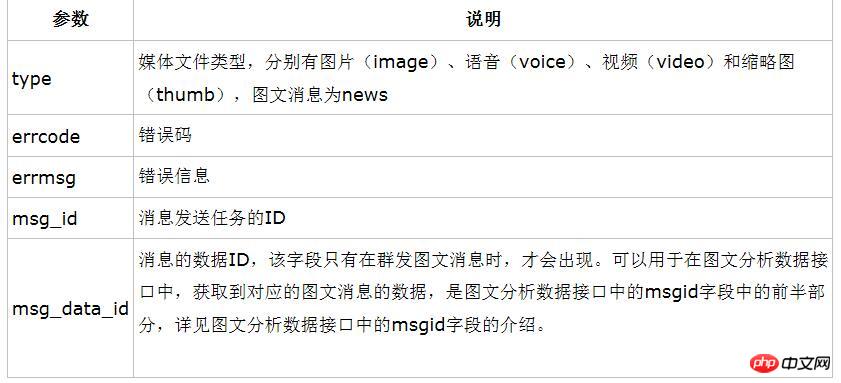
错误码及其以及查询:
全局错误码解析
使用postman模拟https请求发送如下图所示:

2)根据OpenID列表群发【订阅号不可用,服务号认证后可用】
发送的http请求url:(注意:和上面的不同)
复制代码 代码如下:
http请求方式: POSThttps://api.weixin.qq.com/cgi-bin/message/mass/send?access_token=ACCESS_TOKEN
数据格式:
复制代码 代码如下:
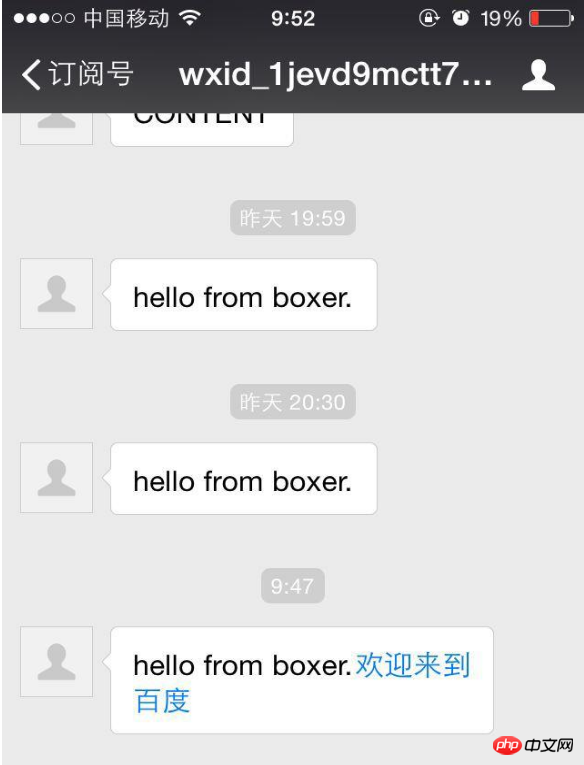
{"touser":["OPENID1","OPENID2"],"msgtype": "text","text": { "content": "hello from boxer."}}
其中OPENID1和OPENID2是我们要发送的微信用户openId(用户的唯一标示)。
例子:
发送"oF3PcsnsrMiJzEwalZZbAfWQpxCI","oF3PcshH1CUIhR_WYau6swUiPzlw" 两个用户。
内容为:hello from boxer.欢迎来到百度
url:
复制代码 代码如下:
https://api.weixin.qq.com/cgi-bin/message/mass/send?access_token=wRyTbnsiu18ssEhMPLf4bDfeT-Bt6e6tgR4CQGVLBipRcyJPkdAKPYfM6-qkKuHUN8uRKJh6Xvm0OuAdFgqOo8Ru8hoDxl-cGc9bh-ezJb2ZUcJSnQk2s416zI8kbEOfOGYdAFARJB
json数据:
{
"touser":[
"oF3PcsnsrMiJzEwalZZbAfWQpxCI",
"oF3PcshH1CUIhR_WYau6swUiPzlw"
],
"msgtype": "text",
"text": { "content": "hello from boxer.<a href='http://www.seewoedu.com/'>欢迎希沃学院</a>"}
}返回数据:
{
"errcode": 0,
"errmsg": "send job submission success",
"msg_id": 3147483654
}使用postman模拟发送请求如下:
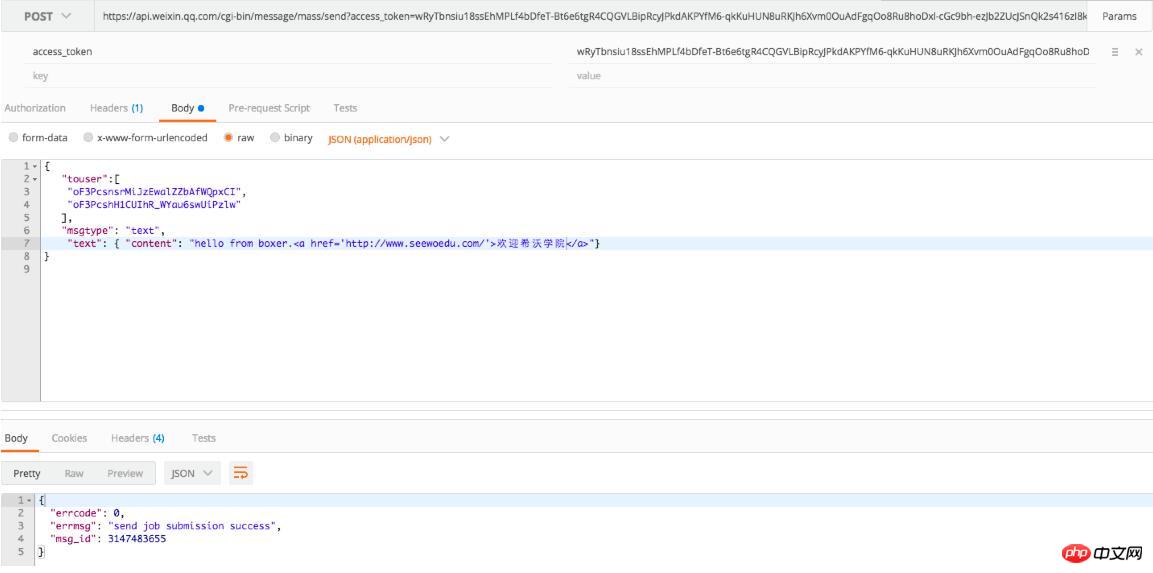
微信号接收到的内容:
致谢:感谢您的阅读!
总结:以上就是本篇文的全部内容,希望能对大家的学习有所帮助。
相关推荐:
PHP实现屏蔽关键字的方法
PHP实现的自定义数组排序函数与排序类的方法
PHP实现的自定义数组排序函数与排序类
The above is the detailed content of PHP WeChat public platform development WeChat group messaging example sharing. For more information, please follow other related articles on the PHP Chinese website!


