


SpringBoot has become one of the most mainstream Java Web development frameworks today because it provides a variety of out-of-the-box plug-ins. Mybatis is a very lightweight and easy-to-use ORM framework. Redis is a very mainstream distributed key-value database today. In web development, we often use it to cache database query results. This article will introduce how to quickly build a modern web project through Spring Boot, Mybatis and Redis, and also introduce how to elegantly write unit tests under Spring Boot to ensure the quality of our code.
This blog will introduce how to use SpringBoot to quickly build a web application, and use Mybatis as our ORM framework. In order to improve performance, we use Redis as the second-level cache of Mybatis. To test our code, we wrote unit tests and used an H2 in-memory database to generate our test data. Through this project, we hope that readers can quickly master the skills and best practices of modern Java Web development.
The sample code of this article can be downloaded from Github: https://github.com/Lovelcp/spring-boot-mybatis-with-redis/tree/master
Development environment: mac 10.11
ide: Intellij 2017.1
jdk: 1.8
Spring-Boot: 1.5.3.RELEASE
Redis: 3.2.9
Mysql: 5.7
Spring-Boot
New project
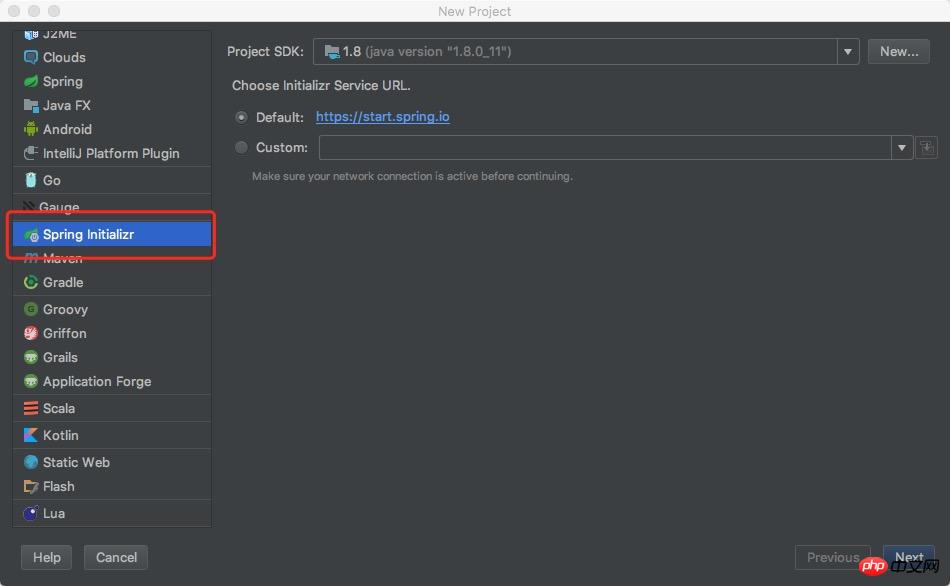
First, we need to initialize our Spring-Boot project. Through Intellij's Spring Initializer, it becomes very simple to create a new Spring-Boot project. First, we select New Project in Intellij:
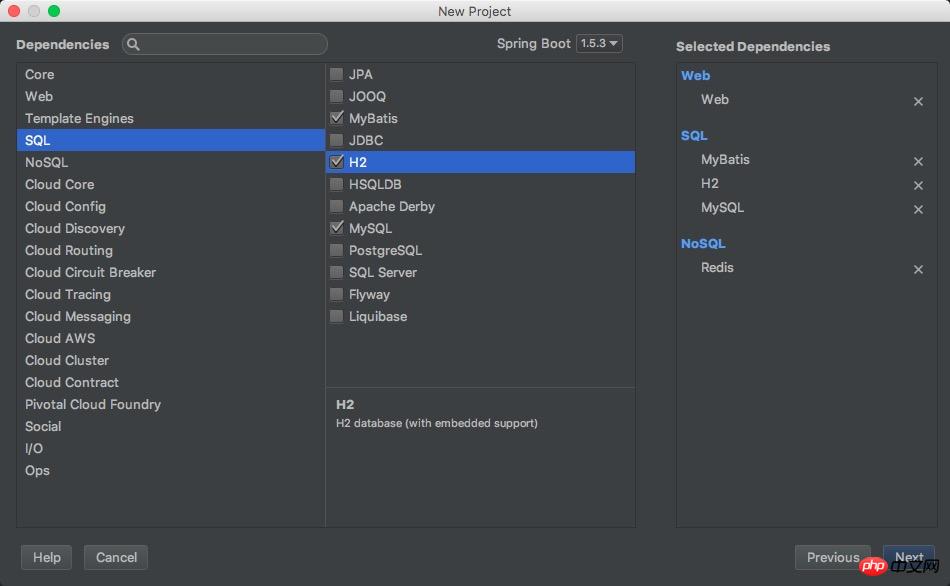
Then in the interface to select dependencies, check Web, Mybatis, Redis, Mysql, H2:
After the new project is successfully created, we can see the initial structure of the project as shown below:
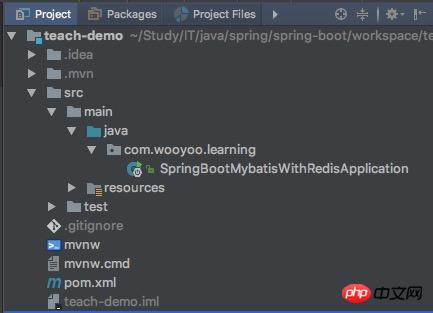
Spring Initializer has been automatically generated for us A startup class - SpringBootMybatisWithRedisApplication. The code of this class is very simple:
@SpringBootApplication public class SpringBootMybatisWithRedisApplication { public static void main(String[] args) { SpringApplication.run(SpringBootMybatisWithRedisApplication.class, args); } }
@SpringBootApplication annotation indicates enabling the automatic configuration feature of Spring Boot. Okay, now our project skeleton has been successfully built. Interested readers can start it through Intellij to see the effect.
New API interface
Next, we have to write a Web API. Assume that our Web project is responsible for processing the merchant's products. We need to provide a get interface that returns product information based on product id and a put interface that updates product information. First we define the Product class, which includes product id, product name and price:
public class Product implements Serializable { private static final long serialVersionUID = 1435515995276255188L; private long id; private String name; private long price; // getters setters }
Then we need to define the Controller class. Since Spring Boot uses Spring MVC internally as its Web component, we can quickly develop our interface class through annotations:
@RestController @RequestMapping("/product") public class ProductController { @GetMapping("/{id}") public Product getProductInfo( @PathVariable("id") Long productId) { // TODO return null; } @PutMapping("/{id}") public Product updateProductInfo( @PathVariable("id") Long productId, @RequestBody Product newProduct) { // TODO return null; } }
Let’s briefly introduce it The functions of the annotations used in the above code:
@RestController: indicates that the class is a Controller and provides a Rest interface, that is, all interface values are returned in Json format. This annotation is actually a combined annotation of @Controller and @ResponseBody, which facilitates us to develop Rest API.
@RequestMapping, @GetMapping, @PutMapping: Indicates the URL address of the interface. The @RequestMapping annotation marked on the class indicates that the URLs of all interfaces under the class begin with /product. @GetMapping indicates that this is a Get HTTP interface, and @PutMapping indicates that this is a Put HTTP interface.
@PathVariable, @RequestBody: Indicates the mapping relationship of parameters. Suppose there is a Get request accessing /product/123, then the request will be processed by the getProductInfo method, and 123 in the URL will be mapped to productId. Similarly, if it is a Put request, the request body will be mapped to the newProduct object.
Here we have only defined the interface, and the actual processing logic has not yet been completed, because the product information is stored in the database. Next we will integrate mybatis in the project and interact with the database.
Integrate Mybatis
Configure data source
First we need to configure our data source in the configuration file. We use mysql as our database. Here we use yaml as the format of our configuration file. We create a new application.yml file in the resources directory:
spring: # 数据库配置 datasource: url: jdbc:mysql://{your_host}/{your_db} username: {your_username} password: {your_password} driver-class-name: org.gjt.mm.mysql.Driver
Since Spring Boot has the feature of automatic configuration, we do not need to create a new DataSource configuration class, Spring Boot The configuration file will be automatically loaded and the database connection pool will be established based on the information in the configuration file, which is very convenient.
The author recommends that you use yaml as the configuration file format. XML seems verbose and properties have no hierarchical structure. YAML just makes up for the shortcomings of these two. This is why Spring Boot supports the yaml format by default.
Configuring Mybatis
我们已经通过Spring Initializer在pom.xml中引入了mybatis-spring-boot-starte库,该库会自动帮我们初始化mybatis。首先我们在application.yml中填写mybatis的相关配置:
# mybatis配置 mybatis: # 配置映射类所在包名 type-aliases-package: com.wooyoo.learning.dao.domain # 配置mapper xml文件所在路径,这里是一个数组 mapper-locations: - mappers/ProductMapper.xml
然后,再在代码中定义ProductMapper类:
@Mapper public interface ProductMapper { Product select( @Param("id") long id); void update(Product product); }
这里,只要我们加上了@Mapper注解,Spring Boot在初始化mybatis时会自动加载该mapper类。
Spring Boot之所以这么流行,最大的原因是它自动配置的特性。开发者只需要关注组件的配置(比如数据库的连接信息),而无需关心如何初始化各个组件,这使得我们可以集中精力专注于业务的实现,简化开发流程。
访问数据库
完成了Mybatis的配置之后,我们就可以在我们的接口中访问数据库了。我们在ProductController下通过@Autowired引入mapper类,并且调用对应的方法实现对product的查询和更新操作,这里我们以查询接口为例:
@RestController @RequestMapping("/product") public class ProductController { @Autowired private ProductMapper productMapper; @GetMapping("/{id}") public Product getProductInfo( @PathVariable("id") Long productId) { return productMapper.select(productId); } // 避免篇幅过长,省略updateProductInfo的代码 }
然后在你的mysql中插入几条product的信息,就可以运行该项目看看是否能够查询成功了。
至此,我们已经成功地在项目中集成了Mybatis,增添了与数据库交互的能力。但是这还不够,一个现代化的Web项目,肯定会上缓存加速我们的数据库查询。接下来,将介绍如何科学地将Redis集成到Mybatis的二级缓存中,实现数据库查询的自动缓存。
集成Redis
配置Redis
同访问数据库一样,我们需要配置Redis的连接信息。在application.yml文件中增加如下配置:
spring: redis: # redis数据库索引(默认为0),我们使用索引为3的数据库,避免和其他数据库冲突 database: 3 # redis服务器地址(默认为localhost) host: localhost # redis端口(默认为6379) port: 6379 # redis访问密码(默认为空) password: # redis连接超时时间(单位为毫秒) timeout: 0 # redis连接池配置 pool: # 最大可用连接数(默认为8,负数表示无限) max-active: 8 # 最大空闲连接数(默认为8,负数表示无限) max-idle: 8 # 最小空闲连接数(默认为0,该值只有为正数才有作用) min-idle: 0 # 从连接池中获取连接最大等待时间(默认为-1,单位为毫秒,负数表示无限) max-wait: -1
上述列出的都为常用配置,读者可以通过注释信息了解每个配置项的具体作用。由于我们在pom.xml中已经引入了spring-boot-starter-data-redis库,所以Spring Boot会帮我们自动加载Redis的连接,具体的配置类
org.springframework.boot.autoconfigure.data.redis.RedisAutoConfiguration。通过该配置类,我们可以发现底层默认使用Jedis库,并且提供了开箱即用的redisTemplate和stringTemplate。
将Redis作为二级缓存
Mybatis的二级缓存原理本文不再赘述,读者只要知道,Mybatis的二级缓存可以自动地对数据库的查询做缓存,并且可以在更新数据时同时自动地更新缓存。
实现Mybatis的二级缓存很简单,只需要新建一个类实现org.apache.ibatis.cache.Cache接口即可。
该接口共有以下五个方法:
String getId():mybatis缓存操作对象的标识符。一个mapper对应一个mybatis的缓存操作对象。
void putObject(Object key, Object value):将查询结果塞入缓存。
Object getObject(Object key):从缓存中获取被缓存的查询结果。
Object removeObject(Object key):从缓存中删除对应的key、value。只有在回滚时触发。一般我们也可以不用实现,具体使用方式请参考:org.apache.ibatis.cache.decorators.TransactionalCache。
void clear():发生更新时,清除缓存。
int getSize():可选实现。返回缓存的数量。
ReadWriteLock getReadWriteLock():可选实现。用于实现原子性的缓存操作。
接下来,我们新建RedisCache类,实现Cache接口:
public class RedisCache implements Cache { private static final Logger logger = LoggerFactory.getLogger(RedisCache.class); private final ReadWriteLock readWriteLock = new ReentrantReadWriteLock(); private final String id; // cache instance id private RedisTemplate redisTemplate; private static final long EXPIRE_TIME_IN_MINUTES = 30; // redis过期时间 public RedisCache(String id) { if (id == null) { throw new IllegalArgumentException("Cache instances require an ID"); } this.id = id; } @Override public String getId() { return id; } /** * Put query result to redis * * @param key * @param value */ @Override @SuppressWarnings("unchecked") public void putObject(Object key, Object value) { RedisTemplate redisTemplate = getRedisTemplate(); ValueOperations opsForValue = redisTemplate.opsForValue(); opsForValue.set(key, value, EXPIRE_TIME_IN_MINUTES, TimeUnit.MINUTES); logger.debug("Put query result to redis"); } /** * Get cached query result from redis * * @param key * @return */ @Override public Object getObject(Object key) { RedisTemplate redisTemplate = getRedisTemplate(); ValueOperations opsForValue = redisTemplate.opsForValue(); logger.debug("Get cached query result from redis"); return opsForValue.get(key); } /** * Remove cached query result from redis * * @param key * @return */ @Override @SuppressWarnings("unchecked") public Object removeObject(Object key) { RedisTemplate redisTemplate = getRedisTemplate(); redisTemplate.delete(key); logger.debug("Remove cached query result from redis"); return null; } /** * Clears this cache instance */ @Override public void clear() { RedisTemplate redisTemplate = getRedisTemplate(); redisTemplate.execute((RedisCallback) connection -> { connection.flushDb(); return null; }); logger.debug("Clear all the cached query result from redis"); } @Override public int getSize() { return 0; } @Override public ReadWriteLock getReadWriteLock() { return readWriteLock; } private RedisTemplate getRedisTemplate() { if (redisTemplate == null) { redisTemplate = ApplicationContextHolder.getBean("redisTemplate"); } return redisTemplate; } }
讲解一下上述代码中一些关键点:
自己实现的二级缓存,必须要有一个带id的构造函数,否则会报错。
我们使用Spring封装的redisTemplate来操作Redis。网上所有介绍redis做二级缓存的文章都是直接用jedis库,但是笔者认为这样不够Spring Style,而且,redisTemplate封装了底层的实现,未来如果我们不用jedis了,我们可以直接更换底层的库,而不用修改上层的代码。更方便的是,使用redisTemplate,我们不用关心redis连接的释放问题,否则新手很容易忘记释放连接而导致应用卡死。
需要注意的是,这里不能通过autowire的方式引用redisTemplate,因为RedisCache并不是Spring容器里的bean。所以我们需要手动地去调用容器的getBean方法来拿到这个bean,具体的实现方式请参考Github中的代码。
我们采用的redis序列化方式是默认的jdk序列化。所以数据库的查询对象(比如Product类)需要实现Serializable接口。
这样,我们就实现了一个优雅的、科学的并且具有Spring Style的Redis缓存类。
开启二级缓存
接下来,我们需要在ProductMapper.xml中开启二级缓存:
UPDATE products SET name = #{name}, price = #{price} WHERE id = #{id} LIMIT 1
测试
配置H2内存数据库
至此我们已经完成了所有代码的开发,接下来我们需要书写单元测试代码来测试我们代码的质量。我们刚才开发的过程中采用的是mysql数据库,而一般我们在测试时经常采用的是内存数据库。这里我们使用H2作为我们测试场景中使用的数据库。
要使用H2也很简单,只需要跟使用mysql时配置一下即可。在application.yml文件中:
--- spring: profiles: test # 数据库配置 datasource: url: jdbc:h2:mem:test username: root password: 123456 driver-class-name: org.h2.Driver schema: classpath:schema.sql data: classpath:data.sql
为了避免和默认的配置冲突,我们用---另起一段,并且用profiles: test表明这是test环境下的配置。然后只要在我们的测试类中加上@ActiveProfiles(profiles = "test")注解来启用test环境下的配置,这样就能一键从mysql数据库切换到h2数据库。
在上述配置中,schema.sql用于存放我们的建表语句,data.sql用于存放insert的数据。这样当我们测试时,h2就会读取这两个文件,初始化我们所需要的表结构以及数据,然后在测试结束时销毁,不会对我们的mysql数据库产生任何影响。这就是内存数据库的好处。另外,别忘了在pom.xml中将h2的依赖的scope设置为test。
使用Spring Boot就是这么简单,无需修改任何代码,轻松完成数据库在不同环境下的切换。
编写测试代码
因为我们是通过Spring Initializer初始化的项目,所以已经有了一个测试类——SpringBootMybatisWithRedisApplicationTests。
Spring Boot提供了一些方便我们进行Web接口测试的工具类,比如TestRestTemplate。然后在配置文件中我们将log等级调成DEBUG,方便观察调试日志。具体的测试代码如下:
@RunWith(SpringRunner.class) @SpringBootTest(webEnvironment = SpringBootTest.WebEnvironment.RANDOM_PORT) @ActiveProfiles(profiles = "test") public class SpringBootMybatisWithRedisApplicationTests { @LocalServerPort private int port; @Autowired private TestRestTemplate restTemplate; @Test public void test() { long productId = 1; Product product = restTemplate.getForObject("http://localhost:" + port + "/product/" + productId, Product.class); assertThat(product.getPrice()).isEqualTo(200); Product newProduct = new Product(); long newPrice = new Random().nextLong(); newProduct.setName("new name"); newProduct.setPrice(newPrice); restTemplate.put("http://localhost:" + port + "/product/" + productId, newProduct); Product testProduct = restTemplate.getForObject("http://localhost:" + port + "/product/" + productId, Product.class); assertThat(testProduct.getPrice()).isEqualTo(newPrice); } }
在上述测试代码中:
我们首先调用get接口,通过assert语句判断是否得到了预期的对象。此时该product对象会存入redis中。
然后我们调用put接口更新该product对象,此时redis缓存会失效。
最后我们再次调用get接口,判断是否获取到了新的product对象。如果获取到老的对象,说明缓存失效的代码执行失败,代码存在错误,反之则说明我们代码是OK的。
书写单元测试是一个良好的编程习惯。虽然会占用你一定的时间,但是当你日后需要做一些重构工作时,你就会感激过去写过单元测试的自己。
查看测试结果
我们在Intellij中点击执行测试用例,测试结果如下:

显示的是绿色,说明测试用例执行成功了。
本篇文章介绍了如何通过Spring Boot、Mybatis以及Redis快速搭建一个现代化的Web项目,并且同时介绍了如何在Spring Boot下优雅地书写单元测试来保证我们的代码质量。当然这个项目还存在一个问题,那就是mybatis的二级缓存只能通过flush整个DB来实现缓存失效,这个时候可能会把一些不需要失效的缓存也给失效了,所以具有一定的局限性。希望本文能帮助到大家。
相关推荐:
The above is the detailed content of Spring Boot, Mybatis, and Redis quickly build modern Web projects. For more information, please follow other related articles on the PHP Chinese website!
 mybatis first level cache and second level cache
 Commonly used database software
 What are the in-memory databases?
 What is the difference between ibatis and mybatis
 How to configure database connection in mybatis
 What is the working principle and process of mybatis
 What are the differences between hibernate and mybatis
 Which one has faster reading speed, mongodb or redis?


![[Web front-end] Node.js quick start](https://img.php.cn/upload/course/000/000/067/662b5d34ba7c0227.png)


