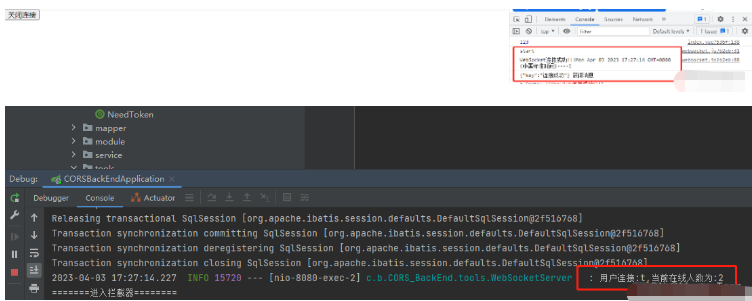
Mula-mula kita perlu memperkenalkan dependencies yang diperlukan untuk WebSocket dan dependencies untuk memproses format output
<!--格式转换-->
<!-- https://mvnrepository.com/artifact/com.alibaba/fastjson -->
<dependency>
   <groupId>com.alibaba</groupId>
   <artifactId>fastjson</artifactId>
   <version>1.2.73</version>
</dependency>
<!--WebSocket依赖-->
<dependency>
    <groupId>org.springframework.boot</groupId>
    <artifactId>spring-boot-starter-websocket</artifactId>
</dependency>import org.springframework.context.annotation.Bean;
import org.springframework.context.annotation.Configuration;
import org.springframework.web.socket.server.standard.ServerEndpointExporter;
/**
* @author: tjp
* @create: 2023-04-03 09:58
* @Description: WebSocket配置
*/
@Configuration
public class WebSocketConfig {
@Bean
public ServerEndpointExporter serverEndpointExporter() {
return new ServerEndpointExporter();
}
}Dalam langkah ini, kami menggunakan userId sebagai pengecam untuk membezakan pengguna yang sepadan dalam sistem. Kami juga boleh melakukan perkara lain berdasarkan ini pada masa hadapan.
import com.alibaba.fastjson.JSON;
import com.alibaba.fastjson.JSONObject;
import com.alibaba.excel.util.StringUtils;
import lombok.extern.slf4j.Slf4j;
import org.springframework.stereotype.Component;

import javax.websocket.*;
import javax.websocket.server.PathParam;
import javax.websocket.server.ServerEndpoint;
import java.io.IOException;
import java.util.HashMap;
import java.util.Iterator;
import java.util.concurrent.ConcurrentHashMap;

/**
 * @author: tjp
 * @create: 2023-04-03 13:55
 * @Description: WebSocket服务
 */

@ServerEndpoint("/websocket/{userId}")
@Slf4j
@Component
public class WebSocketServer {
    /**
     * 静态变量,用来记录当前在线连接数。应该把它设计成线程安全的。
     */
    private static int onlineCount = 0;
    /**
     * concurrent包的线程安全Set,用来存放每个客户端对应的MyWebSocket对象。
     */
    private static ConcurrentHashMap<String, WebSocketServer> webSocketMap = new ConcurrentHashMap<>();
    /**
     * 与某个客户端的连接会话,需要通过它来给客户端发送数据
     */
    private Session session;
    /**
     * 接收userId
     */
    private String userId = "";

    /**
     * 连接建立成功调用的方法
     */
    @OnOpen
    public void onOpen(Session session, @PathParam("userId") String userId) {
        this.session = session;
        this.userId = userId;
        if (webSocketMap.containsKey(userId)) {
            webSocketMap.remove(userId);
            //加入set中
        } else {
            webSocketMap.put(userId, this);
            //加入set中
            addOnlineCount();
            //在线数加1
        }

        log.info("用户连接:" + userId + ",当前在线人数为:" + getOnlineCount());

        try {
            HashMap<Object, Object> map = new HashMap<>();
            map.put("key", "连接成功");
            sendMessage(JSON.toJSONString(map));
        } catch (IOException e) {
            log.error("用户:" + userId + ",网络异常!!!!!!");
        }
    }


    /**
     * 连接关闭调用的方法
     */
    @OnClose
    public void onClose() {
        if (webSocketMap.containsKey(userId)) {
            webSocketMap.remove(userId);
            //从set中删除
            subOnlineCount();
        }
        log.info("用户退出:" + userId + ",当前在线人数为:" + getOnlineCount());
    }

    /**
     * 收到客户端消息后调用的方法
     *
     * @param message 客户端发送过来的消息
     */
    @OnMessage
    public void onMessage(String message, Session session) {
        log.info("用户消息:" + userId + ",报文:" + message);
        //可以群发消息
        //消息保存到数据库、redis
        if (StringUtils.isNotBlank(message)) {
            try {
                //解析发送的报文
                JSONObject jsonObject = JSONObject.parseObject(message);
                //追加发送人(防止串改)
                jsonObject.put("fromUserId", this.userId);
                String fromUserId = jsonObject.getString("fromUserId");
                //传送给对应toUserId用户的websocket
                if (StringUtils.isNotBlank(fromUserId) && webSocketMap.containsKey(fromUserId)) {
                    webSocketMap.get(fromUserId).sendMessage(jsonObject.toJSONString());
                    //自定义-业务处理

//                    DeviceLocalThread.paramData.put(jsonObject.getString("group"),jsonObject.toJSONString());
                } else {
                    log.error("请求的userId:" + fromUserId + "不在该服务器上");
                    //否则不在这个服务器上,发送到mysql或者redis
                }
            } catch (Exception e) {
                e.printStackTrace();
            }
        }
    }

    /**
     * 发生错误时候
     *
     * @param session
     * @param error
     */
    @OnError
    public void onError(Session session, Throwable error) {
        log.error("用户错误:" + this.userId + ",原因:" + error.getMessage());
        error.printStackTrace();
    }

    /**
     * 实现服务器主动推送
     */
    public void sendMessage(String message) throws IOException {
        //加入线程锁
        synchronized (session) {
            try {
                //同步发送信息
                this.session.getBasicRemote().sendText(message);
            } catch (IOException e) {
                log.error("服务器推送失败:" + e.getMessage());
            }
        }
    }


    /**
     * 发送自定义消息
     * */
    /**
     * 发送自定义消息
     *
     * @param message  发送的信息
     * @param toUserId 如果为null默认发送所有
     * @throws IOException
     */
    public static void sendInfo(String message, String toUserId) throws IOException {
        //如果userId为空,向所有群体发送
        if (StringUtils.isEmpty(toUserId)) {
            //向所有用户发送信息
            Iterator<String> itera = webSocketMap.keySet().iterator();
            while (itera.hasNext()) {
                String keys = itera.next();
                WebSocketServer item = webSocketMap.get(keys);
                item.sendMessage(message);
            }
        }
        //如果不为空,则发送指定用户信息
        else if (webSocketMap.containsKey(toUserId)) {
            WebSocketServer item = webSocketMap.get(toUserId);
            item.sendMessage(message);
        } else {
            log.error("请求的userId:" + toUserId + "不在该服务器上");
        }
    }

    public static synchronized int getOnlineCount() {
        return onlineCount;
    }

    public static synchronized void addOnlineCount() {
        WebSocketServer.onlineCount++;
    }

    public static synchronized void subOnlineCount() {
        WebSocketServer.onlineCount--;
    }

    public static synchronized ConcurrentHashMap<String, WebSocketServer> getWebSocketMap() {
        return WebSocketServer.webSocketMap;
    }

}Dapatkan bilangan orang semasa dalam talian
import com.......WebSocketServer;

@ApiOperation(value = "获取当前在线人数")
@GetMapping("/getOnlineCount")
public Integer getOnlineCount() {
    return WebSocketServer.getOnlineCount();
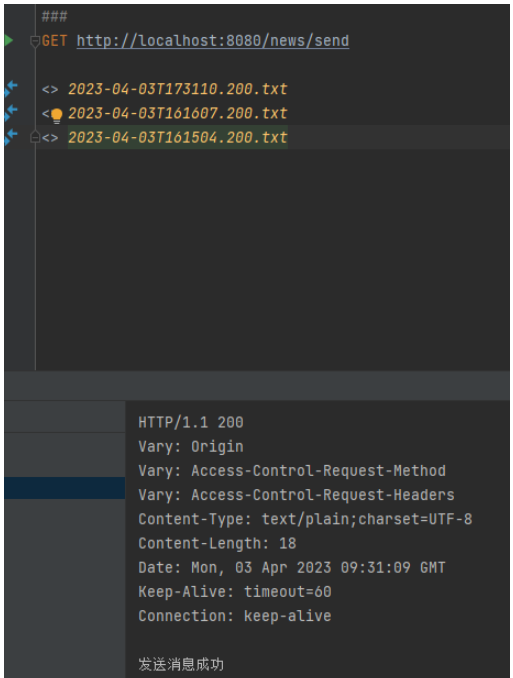
}Tolak mesej kepada pengguna hadapan melalui antara muka
import com.......WebSocketServer;
import org.springframework.web.bind.annotation.GetMapping;
import org.springframework.web.bind.annotation.RequestMapping;
import org.springframework.web.bind.annotation.RestController;

import java.io.IOException;

/**
 * @author: tjp
 * @create: 2023-04-03 13:57
 * @Description: 测试
 */
@RestController
@RequestMapping("/news")
public class NewsController {
    @GetMapping("/send")
    public String send() {
        try {
            WebSocketServer.sendInfo("这是websocket发送过来的消息!", "需要推送的用户的编号");
        } catch (IOException e) {
            throw new RuntimeException(e);
        }
        return "发送消息成功";
    }

}Buat kelas alat websocket.js UserId di sini ialah userId yang digunakan sebagai pengecam
/**
 * @author: tjp
 * @create: 2023-04-03 11:22
 * @Description: Socket客户端
 */
export class WebSocketClient {
  constructor(userId) {
    this.userId = userId;
    this.websocket = null;
    this.timeout = 10000; // 心跳超时时间,单位ms
    this.timeoutObj = null; // 心跳定时器
    this.serverTimeoutObj = null; // 服务器超时定时器
    this.lockReconnect = false; // 避免重复连接
    this.timeoutnum = null; // 重连延迟定时器
  }

  // 初始化WebSocket连接
  initWebSocket() {
    let wsUrl = `ws://127.0.0.1:8080/websocket/${this.userId}`;
    this.websocket = new WebSocket(wsUrl);
    this.websocket.onopen = this.websocketonopen.bind(this);
    this.websocket.onerror = this.websocketonerror.bind(this);
    this.websocket.onmessage = this.setOnmessageMessage.bind(this);
    this.websocket.onclose = this.websocketclose.bind(this);
    // 监听窗口关闭事件,当窗口关闭时,主动去关闭websocket连接,防止连接还没断开就关闭窗口,server端会抛异常。
    window.onbeforeunload = this.websocketclose.bind(this);
  }

  // 启动心跳
  start() {
    console.log('start');
    // 清除延时器
    this.timeoutObj && clearTimeout(this.timeoutObj);
    this.serverTimeoutObj && clearTimeout(this.serverTimeoutObj);
    /*// 向服务器发送心跳消息
    let actions = { "test": "12345" };
    this.websocket && this.websocket.readyState == 1 && this.websocket.send(JSON.stringify(actions));
    // 启动心跳定时器
    this.timeoutObj = setTimeout(() => {
      this.start();
      // 定义一个延时器等待服务器响应,若超时,则关闭连接,重新请求server建立socket连接
      this.serverTimeoutObj = setTimeout(() => {
        this.websocket.close();
      }, this.timeout)
    }, this.timeout)*/
  }

  // 重置心跳
  reset() {
    // 清除时间
    clearTimeout(this.timeoutObj);
    clearTimeout(this.serverTimeoutObj);
    // 重启心跳
    this.start();
  }

  // 重新连接
  reconnect() {
    if (this.lockReconnect) return;
    this.lockReconnect = true;
    // 没连接上会一直重连,设置延迟避免请求过多
    this.timeoutnum && clearTimeout(this.timeoutnum);
    this.timeoutnum = setTimeout(() => {
      this.initWebSocket();
      this.lockReconnect = false;
    }, 5000)
  }

  // 处理收到的消息
  async setOnmessageMessage(event) {
    console.log(event.data, '获得消息');
    // 重置心跳
    // this.reset();
    // 自定义全局监听事件
    window.dispatchEvent(new CustomEvent('onmessageWS', {
      detail: {
        data: event.data
      }
    }))
    // //发现消息进入    开始处理前端触发逻辑
    // if (event.data === 'success' || event.data === 'heartBath') return
  }

  // WebSocket连接成功回调
  websocketonopen() {
    // 开启心跳
    this.start();
    console.log("WebSocket连接成功!!!" + new Date() + "----" + this.websocket.readyState);
    clearInterval(this.otimer);//停止
  }

  // WebSocket连接错误回调
  websocketonerror(e) {
    console.log("WebSocket连接发生错误" + e);
  }

  // WebSocket连接关闭回调
  websocketclose(e) {
    this.websocket.close();
    clearTimeout(this.timeoutObj);
    clearTimeout(this.serverTimeoutObj);
    console.log("websocketcloe关闭连接")
  }

  // 关闭WebSocket连接
  closeWebSocket() {
    this.websocket.close();
    console.log("closeWebSocket关闭连接")
  }

  // 监听窗口关闭事件
  onbeforeunload() {
    this.closeWebSocket();
  }
}Tetapkan sambungan Soket dalam mana-mana halaman yang anda ingin buat sambungan
Sebagai contoh, selepas pengguna mengklik butang log masuk
Anda boleh menggunakan prototaip di sini untuk mencipta objek sambungan, dan Mulakan sambungan
<script>
import Vue from "vue";
import {WebSocketClient} from "@/utils/websocket";
......
......
methods:{
handleLogin() {
this.$refs.loginForm.validate(valid => {
if (valid) {
this.loading = true
this.$store.dispatch('user/login', this.loginForm).then(() => {
this.$router.push({path: this.redirect || '/'})
this.loading = false
/*-----------在此处放入原型中------------*/
Vue.prototype.$WebSocketClientInstance = new WebSocketClient('t');
Vue.prototype.$WebSocketClientInstance.initWebSocket()
/*-----------------end------------*/
}).catch(() => {
this.loading = false
})
} else {
this.$message({message: '请填写正确格式的用户名或密码', type: 'error'})
return false
}
})
}
}
.....
.....
</script>
Pada halaman yang anda ingin pantau, gunakan pendengar untuk mendengar
<script>
....
....
mounted() {
// 添加socket通知监听
window.addEventListener('onmessageWS', this.getSocketData)
},
methods: {
// 收到消息处理
getSocketData(res) {
console.log(res.detail)
console.log("llll")
},
}
....
....
</script>Pada masa ini, anda boleh menghantarnya melalui antara muka bahagian belakang
Lakukan ujian


Buat butang
<template>
  <div>
    <button @click="closeConnect">关闭连接</button>
  </div>
</template>

<script>
import {WebSocketClient} from "@/utils/websocket";
import Vue from "vue";

export default {
  methods: {
    closeConnect() {
      console.dir(Vue.prototype)
      Vue.prototype.$WebSocketClientInstance.closeWebSocket();
    },
  }
}
</script>
Atas ialah kandungan terperinci Cara menggunakan Spring Boot+Vue untuk melaksanakan tolak pemberitahuan Soket. Untuk maklumat lanjut, sila ikut artikel berkaitan lain di laman web China PHP!


