


推荐(免费):redis数据库教程
最近也不知道写啥,看之前写过Kafka整合Springboot的文章,大家反响还挺热烈的,嘿嘿嘿,就感觉帮助到大家了还挺好的,也算是达到了自己的目的,正好,今天业务模块是springboot整合redis,因为之前做过,所以有现成的代码,cv一下之后就可以了,所以时间比较多,那就给大家整理一下Springboot整合Redis的代码实现吧,从项目搭建到源码实现,下面全都有,耐心看完,相信会对你有所帮助的
好了,话不多说,我们开始吧,同样的,还是建议能够自己在自己的PC端实现一下
个人公众号:Java架构师联盟,每日更新技术好文
1、File→New→Project
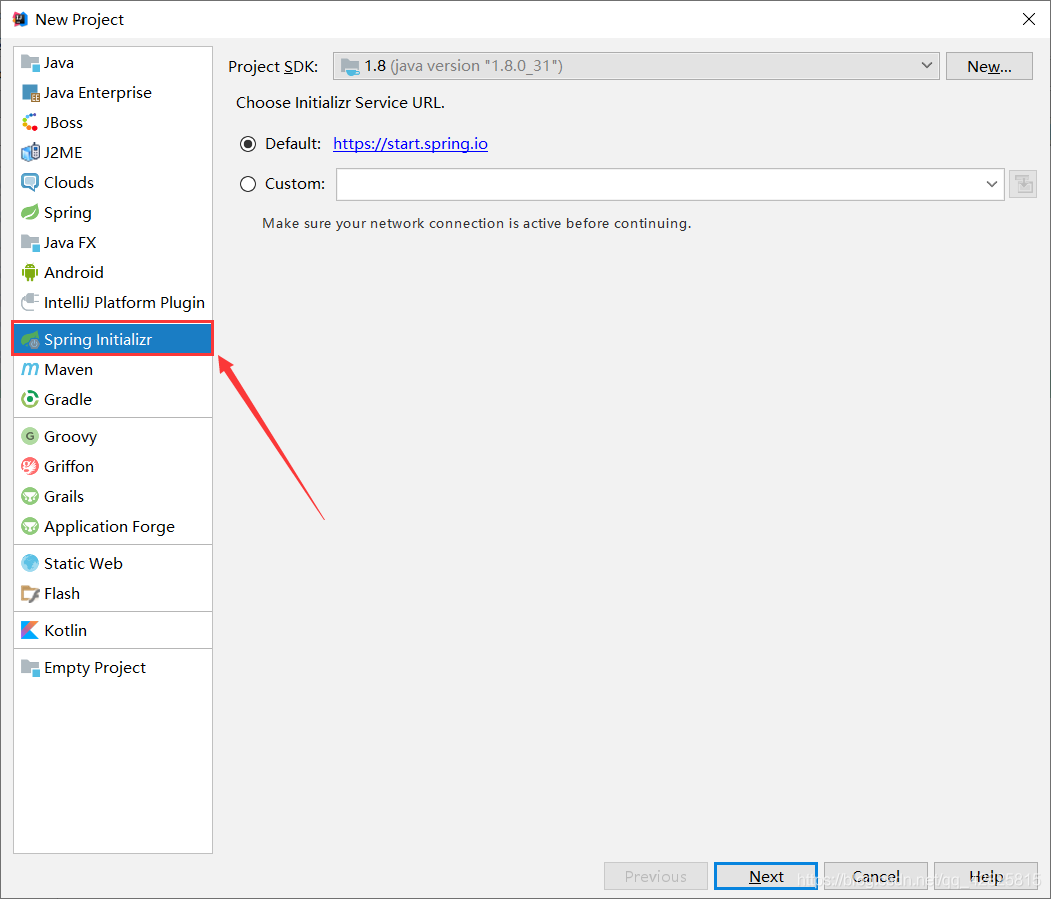
2、点击Next如图所示,命名好Group和Artifact
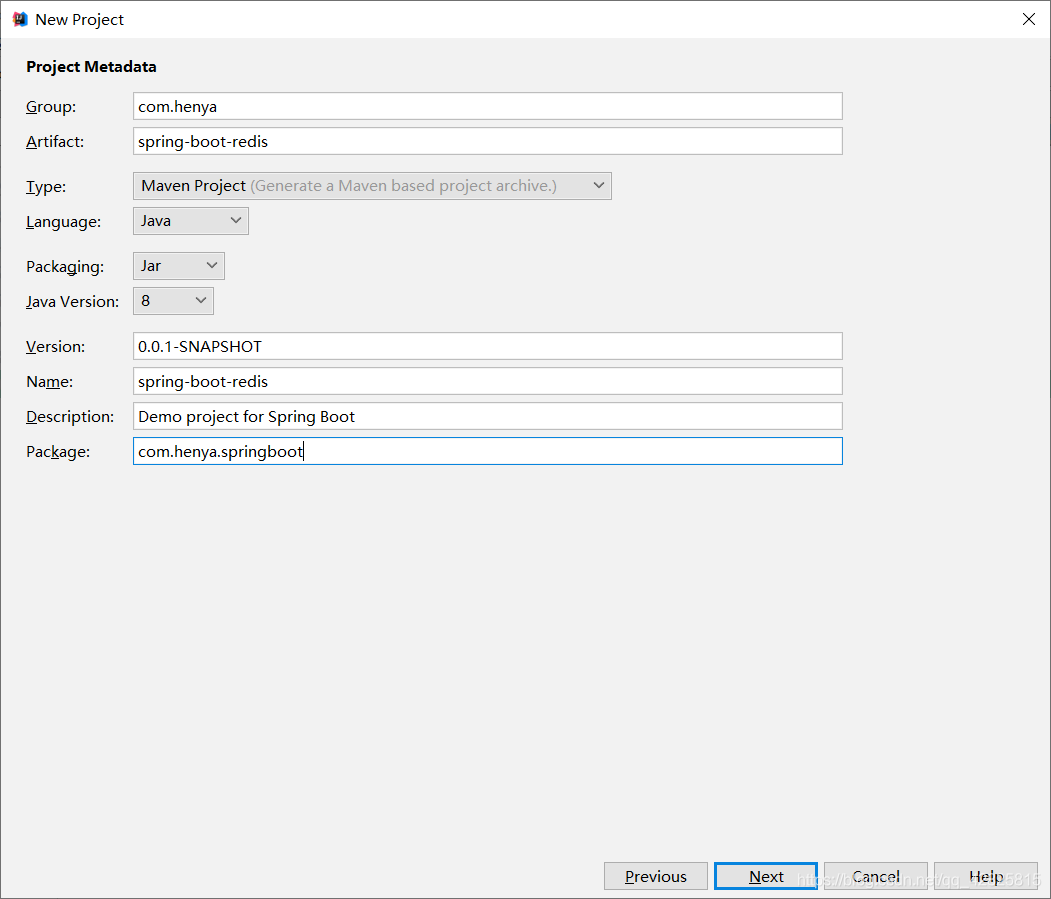
3、Next后如图所示,勾选中需要的依赖,Spring Initializr会自动导入所需的starter
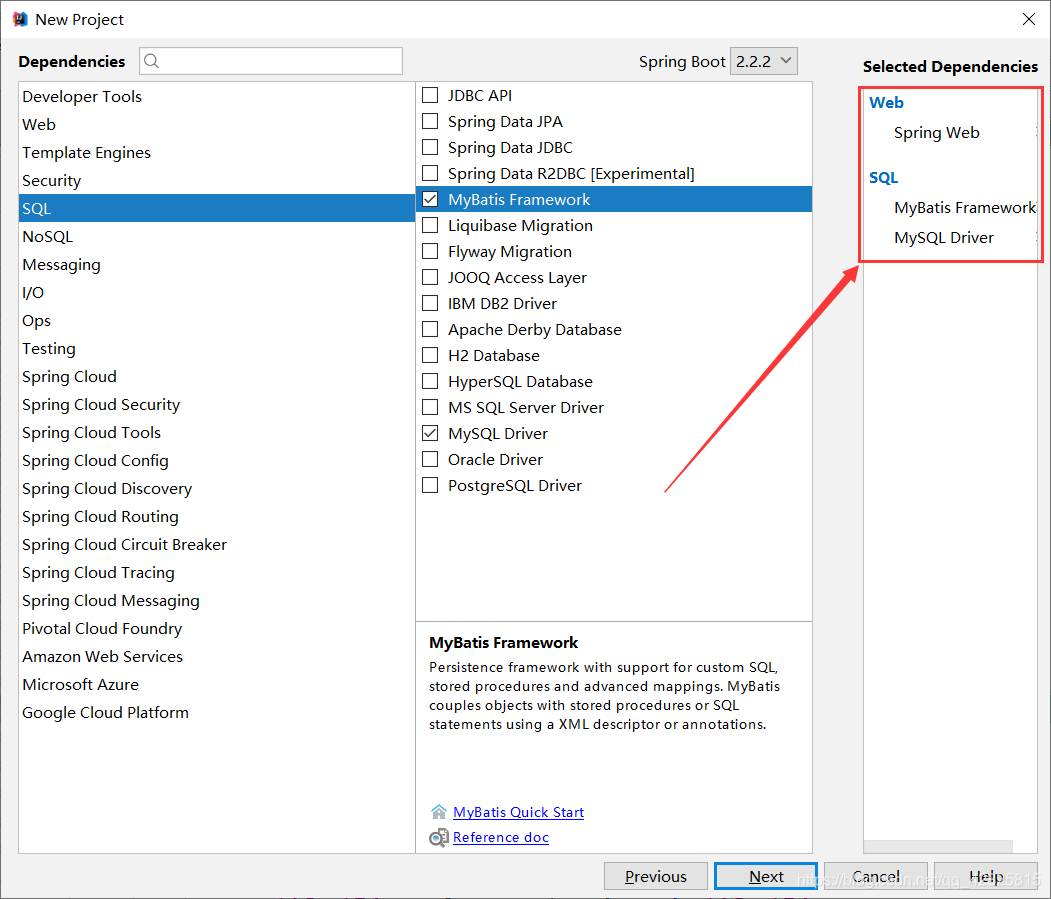
4、创建项目成功后,pom.xml文件中的依赖如下
4.0.0 org.springframework.boot spring-boot-starter-parent 2.2.2.RELEASE com.heny spring-boot-redis 0.0.1-SNAPSHOT spring-boot-redis Demo project for Spring Boot 1.8 org.springframework.boot spring-boot-starter-web org.mybatis.spring.boot mybatis-spring-boot-starter 2.1.1 mysql mysql-connector-java runtime org.springframework.boot spring-boot-starter-test test org.junit.vintage junit-vintage-engine org.springframework.boot spring-boot-maven-plugin
5、在pom.xml文件中添加redis的starter
org.springframework.boot spring-boot-starter-data-redis
6、创建JavaBean用于封装数据库数据,需要实现Serializable
package com.henya.springboot.bean; import java.io.Serializable; public class Employee implements Serializable{ private Integer id; private String lastName; private String email; private Integer gender; //性别 1男 0女 private Integer dId; public Employee() { super(); } public Employee(Integer id, String lastName, String email, Integer gender, Integer dId) { super(); this.id = id; this.lastName = lastName; this.email = email; this.gender = gender; this.dId = dId; } public Integer getId() { return id; } public void setId(Integer id) { this.id = id; } public String getLastName() { return lastName; } public void setLastName(String lastName) { this.lastName = lastName; } public String getEmail() { return email; } public void setEmail(String email) { this.email = email; } public Integer getGender() { return gender; } public void setGender(Integer gender) { this.gender = gender; } public Integer getdId() { return dId; } public void setdId(Integer dId) { this.dId = dId; } @Override public String toString() { return "Employee [id=" + id + ", lastName=" + lastName + ", email=" + email + ", gender=" + gender + ", dId=" + dId + "]"; } }
注意:
在写JavaBean对象时需要实现Serializable接口否则会报以下错误:
Cannot deserialize; nested exception is org.springframework.core.serializer.support.SerializationFailedException
7、整合Mybatis操作数据库,在application.properties配置文件中配置数据源信息
#serverTimezone用于指定时区,不然会报错 spring.datasource.url=jdbc:mysql://localhost:3306/cache?serverTimezone=UTC spring.datasource.username=root spring.datasource.password=123456 # 开启驼峰命名法规则 mybatis.configuration.map-underscore-to-camel-case=true #日志级别 logging.level.com.henya.springboot.mapper=debug
8、使用注解版Mybatis创建Mapper
package com.henya.springboot.mapper; import com.henya.springboot.bean.Employee; import org.apache.ibatis.annotations.*; @Mapper public interface EmployeeMapper { @Select("SELECT * FROM employee WHERE id=#{id}") public Employee getEmpById(Integer id); @Update("UPDATE employee SET lastName=#{lastName},email=#{email},gender=#{gender},d_id=#{dId} WHERE id=#{id}") public void updateEmp(Employee employee); @Delete("DELETE FROM emlpoyee WHERE id=#{id}") public void delEmpById(Integer id); @Insert("INSERT INTO employee(lastName, email, gender, d_id) VALUES (#{lastName}, #{email}, #{gender}, #{dId})") public Employee insertEmp(Employee employee); @Select("SELECT * FROM employee WHERE lastName=#{lastName}") public Employee getEmpByLastName(String lastName); }
注意:
需要使用使用@MapperScan注解扫描Mapper所在的接口,只需要加在主程序类上即可。除此之外,还要使用@EnableCaching用于开启缓存。
@MapperScan("com.henya.springboot.mapper") @SpringBootApplication @EnableCaching //开启缓存 public class SpringBootRedisApplication { public static void main(String[] args) { SpringApplication.run(SpringBootRedisApplication.class, args); } }
9、编写Service类,用于访问数据库或redis缓存
package com.henya.springboot.service; import com.henya.springboot.bean.Employee; import com.henya.springboot.mapper.EmployeeMapper; import org.springframework.beans.factory.annotation.Autowired; import org.springframework.cache.annotation.*; import org.springframework.stereotype.Service; @CacheConfig(cacheNames = "emp") //抽取缓存的公共配置 @Service public class EmployeeService { @Autowired EmployeeMapper employeeMapper; /** * @param id * @return */ @Cacheable(cacheNames = {"emp"},keyGenerator = "myKeyGenerator") public Employee getEmpById(Integer id) { System.err.println("开始查询"+ id +"号员工"); Employee employee = employeeMapper.getEmpById(id); return employee; } /** * @CachePut:既调用方法(这个方法必须要执行),又更新缓存数据 * @param employee * @return */ @CachePut(value = "emp",key = "#result.id") public Employee updateEmp(Employee employee){ System.err.println("开始更新" + employee.getId() + "号员工"); employeeMapper.updateEmp(employee); return employee; } /** * @CacheEvict:缓存清除 * @param id */ @CacheEvict(value = "emp",beforeInvocation = true) public void deleteEmp(Integer id){ System.err.println("删除" + id + "员工"); int i = 10/0; }
10、编写Controller类
package com.henya.springboot.controller; import com.henya.springboot.bean.Employee; import com.henya.springboot.service.EmployeeService; import org.springframework.beans.factory.annotation.Autowired; import org.springframework.web.bind.annotation.GetMapping; import org.springframework.web.bind.annotation.PathVariable; import org.springframework.web.bind.annotation.RestController; /** * @Description: * @Author:HenYa * @CreatTime:2019/12/1 12:44 */ @RestController public class EmployeeController { @Autowired EmployeeService employeeService; @GetMapping("/emp/{id}") public Employee getEmpById(@PathVariable("id") Integer id){ Employee employee = employeeService.getEmpById(id); return employee; } @GetMapping("/emp") public Employee updateEmp(Employee employee){ Employee emp = employeeService.updateEmp(employee); return emp; } }
1、在浏览器访问,也可以使用测试类,笔者使用了浏览器访问http://localhost:8080/emp/1进行测试,初次访问时,控制台会提示开始查询1号员工,如图所示。

2、再次访问时,控制台并没有sql日志,如图所示。

3、此时使用RedisDesktopManager工具查看redis时有数据,并且cacheName为emp,如图所示
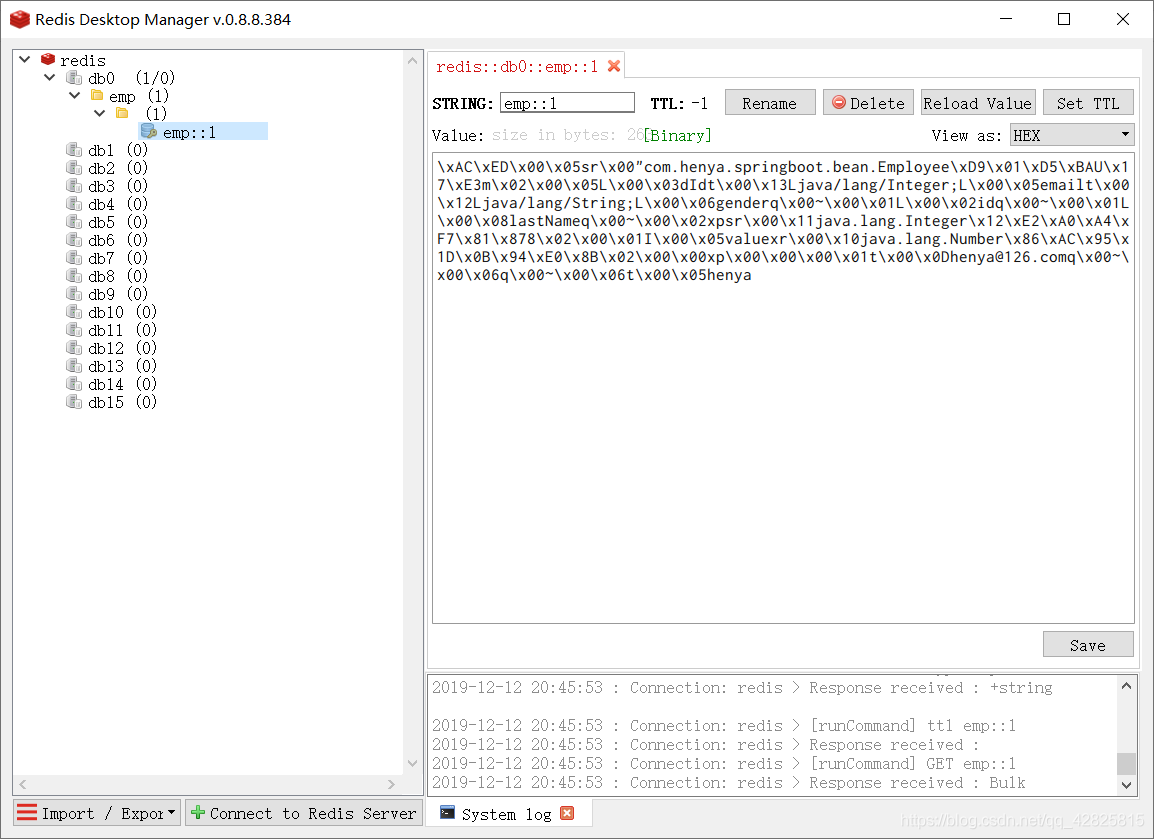
只是emp对象被序列化了。查看源码可知Redis默认使用Jdk进行序列化。
static RedisSerializer
查看RedisSerializer接口的实现有以下几种:

我们常用的就是以json的格式进行序列化。但是需要自定义RedisCacheManager。
package com.henya.springboot.config; import org.springframework.context.annotation.Bean; import org.springframework.context.annotation.Configuration; import org.springframework.data.redis.cache.RedisCacheConfiguration; import org.springframework.data.redis.cache.RedisCacheManager; import org.springframework.data.redis.cache.RedisCacheWriter; import org.springframework.data.redis.connection.RedisConnectionFactory; import org.springframework.data.redis.serializer.GenericJackson2JsonRedisSerializer; import org.springframework.data.redis.serializer.RedisSerializationContext; import org.springframework.data.redis.serializer.RedisSerializer; /** * @Description: * @Author:HenYa * @CreatTime:2019/12/6 20:50 */ @Configuration public class MyRedisConfig { @Bean public RedisCacheManager empCacheManager(RedisConnectionFactory redisConnectionFactory){ //RedisCacheManager redisCacheManager = new RedisCacheManager(redisConnectionFactory); RedisCacheWriter redisCacheWriter = RedisCacheWriter.nonLockingRedisCacheWriter(redisConnectionFactory); RedisSerializer
此时,Redis中缓存数据就以Json的格式进行序列化,如图所示。
Atas ialah kandungan terperinci 整合Redis框架搭建SpringBoot2.X的详细教程. Untuk maklumat lanjut, sila ikut artikel berkaitan lain di laman web China PHP!
 Penggunaan arahan sumber dalam linux
 Apakah yang perlu saya lakukan jika tetapan mula semula bahasa Cina vscode tidak berkuat kuasa?
 Apakah pangkalan data hubungan
 Kedudukan terkini sepuluh bursa teratas dalam bulatan mata wang
 keperluan konfigurasi perkakasan pelayan web
 Cara menggunakan fungsi pilih
 css menetapkan warna teks
 Bagaimana untuk menetapkan gaya bar skrol html


![[Web front-end] Permulaan pantas Node.js](https://img.php.cn/upload/course/000/000/067/662b5d34ba7c0227.png)


