这次给大家带来vuex state+mapState实战项目解析,vuex state+mapState的注意事项有哪些,下面就是实战案例,一起来看一下。
先使用vue cli构建一个自己的vue项目
1.npm i -g vue-cli
2.vue init webpack sell (sell是你的项目名)
3.一路回车(在这个过程中会提示你是否安装一些依赖包,比如vue-router,es6语法检查等等,这些根据你个人习惯或者癖好选择Y/N)
4.npm i (这个是安装项目的依赖包)
5.npm run dev(启动你的vue项目) 这个时候如果在页面上看到了vue的logo说明你的vue的项目基础构建已经完成,然后你可以删除掉没有用的组件
6.webpack sell默认没有安装vuex, 所以要安装vuex; 在命令行中按两次ctrl+c 结束服务器,npm install vuex –save 安装vuex.
7.在你的src目录下新建一个vue的组件,我们姑且命名为helloVuex(这个命名你自己随意,开心就好)这个组件主要用来做主容器只展示内容
8.接着新建一个随便叫什么鬼的组件(这里我就叫display组件吧)用来接受state中的状态
9.下来我们在src目录下新建一个文件夹叫做store,在store下面新建一个js文件,叫做test.js(这里的store就是我们的前端数据仓库)用vuex 进行状态管理,store 是vuex的核心,所以命名为store 在src 目录下新建store 文件,在store 目录下新建test.js 文件(如下)。可以看到使用vuex 之前,要告诉 vue 使用它,Vue.use(Vuex); 我们这里只有一个变量count 需要管理,所以在创建 store 对象的时候,给构造函数传参,state 下面只有一个count, 且初始化为0。
import Vue from 'vue'
import Vuex from 'vuex'
Vue.use(Vuex)
const store = new Vuex.Store({
 state: {
 count: 0
 }
export default store现在所有的状态,也就是变量都放到了test.js中,那我们组件怎么才能获取到状态修值呢?这里有两个步骤需要操作
1, vue 提供了注入机制,就是把我们的store 对象注入到根实例中。vue的根实例就是 new Vue 构造函数,然后在所有的子组件中,this.$store 来指向store 对象。在test.js 中,我们export store, 把store已经暴露出去了,new Vue() 在main.js中,所以直接在main.js 中引入store 并注入即可。
import Vue from 'vue'
import App from './App'
import router from './router'
import store from './store/test'
Vue.config.productionTip = false
/* eslint-disable no-new */
new Vue({
 el: '#app',
 router,
 store,
 template: '<App/>',
 components: { App }
})2, 在子组件中,用computed 属性, computed 属性是根据它的依赖自动更新的。所以只要store中的state 发生变化,它就会自动变化。在display.vue 中作下面的更改, 子组件中 this.$store 就是指向store 对象。我们把 test.js 里面的count 变为8, 页面中就变为了8。
<template>
 <p>
  <h3>Count is {{count}}</h3>
 </p>
</template>
<script>
 export default {
  computed: {
   count () {
    return this.$store.state.count
   }
  }
 }
</script>3, 通过computed属性可以获取到状态值,但是组件中每一个属性(如:count)都是函数,如果有10个,那么就要写10个函数,且重复写10遍return this.$store.state,不是很方便。vue 提供了 mapState 函数,它把state 直接映射到我们的组件中。
当然使用mapState 之前要先引入它。它两种用法,或接受一个对象,或接受一个数组。还是在display.vue 组件下。
对象用法如下:
<script>
 import {mapState} from "vuex"; // 引入mapState
 export default {
      // 下面这两种写法都可以
  computed: mapState({
   count: state => state.count // 组件内的每一个属性函数都会获得一个默认参数state, 然后通过state 直接获取它的属性更简洁
   count: 'count'         // 'count' 直接映射到state 对象中的count, 它相当于 this.$store.state.count,
  })
 }
</script>数组的方法如下:
<script>
 import {mapState} from "vuex";
 export default {
  computed: mapState([ // 数组
   "count"
  ])
 }
</script>4, 还有最后一个问题,如果我们组件内部也有computed 属性怎么办?它又不属于mapState 中。那就用到了对象分割,把mapState函数生成的对象再分割成一个个的,就像最开始的时候,我们一个一个罗列计算属性,有10个属性,我们就写10个函数。
es6中的... 就是分割用的,但是只能分割数组。在ECMAScript stage-3 阶段它可以分割对象,所以这时还要用到babel-stage-3; npm install babel-preset-stage-3 --save-dev, 安装完全后,一定不要忘记在babelrc 就是babel 的配置文件中,写入stage-3,
否则一直报错。在页面中添加个 p 标签,显示我们组件的计算熟悉
babelrc
{
 "presets": [
 ["env", {
  "modules": false,
  "targets": {
  "browsers": ["> 1%", "last 2 versions", "not ie <= 8"]
  }
 }],
 "stage-3"
 ],
 "plugins": ["transform-runtime"],
 "env": {
 "test": {
  "presets": ["env", "stage-3"],
  "plugins": ["istanbul"]
 }
 }
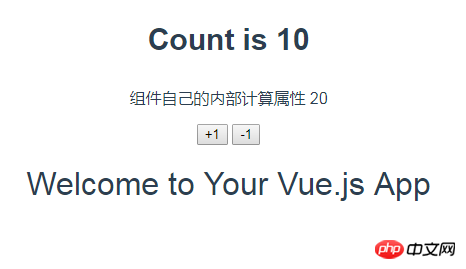
}display.vue 组件更改后
<template>
 <p>
  <h3>Count is {{count}}</h3>
  <p>组件自己的内部计算属性 {{ localComputed }}</p>
 </p>
</template>
<script>
 import {mapState} from "vuex";
 export default {
  computed: {
   localComputed () {
    return this.count + 10;
   },
   ...mapState({
    count: "count"
   })
  }
 }
</script>把test.js 中state.count 改为10, 查看一个效果

下面看下Vuex中mapState的用法
今天使用Vuex的时候遇到一个坑,也可以说是自己的无知吧,折腾了好久,终于发现自己代码的错误了。真是天雷滚滚~~~~~~
index.js
import Vue from 'vue'
import Vuex from 'vuex'
import mutations from './mutations'
import actions from './action'
import getters from './getters'
Vue.use(Vuex)
const state = {
 userInfo: { phone: 111 }, //用户信息
 orderList: [{ orderno: '1111' }], //订单列表
 orderDetail: null, //订单产品详情
 login: false, //是否登录
}
export default new Vuex.Store({
 state,
 getters,
 actions,
 mutations,
})
computed: {
   ...mapState([
    'orderList',
    'login'
   ]),
  },
  mounted(){
   console.log(typeof orderList); ==>undefind
   console.log(typeof this.orderList)==>object
}mapState通过扩展运算符将store.state.orderList 映射this.orderList 这个this 很重要,这个映射直接映射到当前Vue的this对象上。
相信看了本文案例你已经掌握了方法,更多精彩请关注php中文网其它相关文章!
推荐阅读:
Atas ialah kandungan terperinci vuex state+mapState实战项目解析. Untuk maklumat lanjut, sila ikut artikel berkaitan lain di laman web China PHP!


