装饰器模式又叫装饰者模式。装饰模式是在不必改变原类文件和使用继承的情况下,动态地扩展一个对象的功能。它是通过创建一个包装对象,也就是装饰来包裹真实的对象。本文主要和大家介绍PHP设计模式之装饰器模式,简单介绍了装饰器模式的概念、功能并结合实例形式详细分析了php实现与使用装饰器模式的相关操作技巧,需要的朋友可以参考下,希望能帮助到大家。
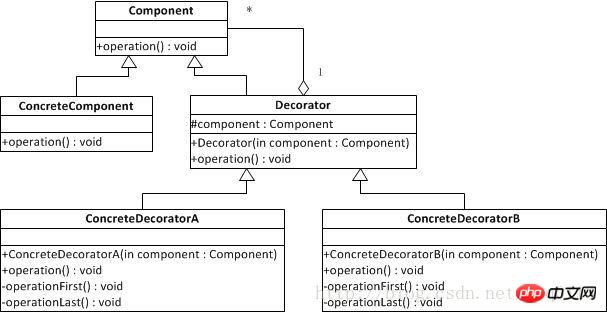
UML类图:

角色:
组件对象的接口:可以给这些对象动态的添加职责
所有装饰器的父类:需要定义一个与组件接口一致的接口,并持有一个Component对象,该对象其实就是被装饰的对象。
具体的装饰器类:实现具体要向被装饰对象添加的功能。用来装饰具体的组件对象或者另外一个具体的装饰器对象。
具体代码:
<?php
/**
 * Created by PhpStorm.
 * User: Jiang
 * Date: 2015/5/3
 * Time: 11:11
 */
/**组件对象接口
 * Interface IComponent
 */
interface IComponent
{
  function Display();
}
/**待装饰对象
 * Class Person
 */
class Person implements IComponent
{
  private $name;
  function __construct($name)
  {
    $this->name=$name;
  }
  function Display()
  {
    echo "装扮的:{$this->name}<br/>";
  }
}
/**所有装饰器父类
 * Class Clothes
 */
class Clothes implements IComponent
{
  protected $component;
  function Decorate(IComponent $component)
  {
    $this->component=$component;
  }
  function Display()
  {
    if(!empty($this->component))
    {
      $this->component->Display();
    }
  }
}
//------------------------------具体装饰器----------------
class PiXie extends Clothes
{
  function Display()
  {
    echo "皮鞋 ";
    parent::Display();
  }
}
class QiuXie extends Clothes
{
  function Display()
  {
    echo "球鞋 ";
    parent::Display();
  }
}
class Tshirt extends Clothes
{
  function Display()
  {
    echo "T恤 ";
    parent::Display();
  }
}
class Waitao extends Clothes
{
  function Display()
  {
    echo "外套 ";
    parent::Display();
  }
}调用客户端测试代码:
header("Content-Type:text/html;charset=utf-8");
//------------------------装饰器模式测试代码------------------
require_once "./Decorator/Decorator.php";
$Yaoming=new Person("姚明");
$aTai=new Person("A泰斯特");
$pixie=new PiXie();
$waitao=new Waitao();
$pixie->Decorate($Yaoming);
$waitao->Decorate($pixie);
$waitao->Display();
echo "<hr/>";
$qiuxie=new QiuXie();
$tshirt=new Tshirt();
$qiuxie->Decorate($aTai);
$tshirt->Decorate($qiuxie);
$tshirt->Display();适用场景:
1. 需要动态的给一个对象添加功能,这些功能可以再动态的撤销。
2. 需要增加由一些基本功能的排列组合而产生的非常大量的功能,从而使继承关系变的不现实。
3. 当不能采用生成子类的方法进行扩充时。一种情况是,可能有大量独立的扩展,为支持每一种组合将产生大量的子类,使得子类数目呈爆炸性增长。另一种情况可能是因为类定义被隐藏,或类定义不能用于生成子类。
相关推荐:
Javascript的装饰器模式与php、python对比用法详解
Atas ialah kandungan terperinci PHP装饰器模式详解. Untuk maklumat lanjut, sila ikut artikel berkaitan lain di laman web China PHP!
 Bagaimana untuk membuka fail php
 Bagaimana untuk mengalih keluar beberapa elemen pertama tatasusunan dalam php
 Apa yang perlu dilakukan jika penyahserialisasian php gagal
 Bagaimana untuk menyambungkan php ke pangkalan data mssql
 Bagaimana untuk menyambung php ke pangkalan data mssql
 Bagaimana untuk memuat naik html
 Bagaimana untuk menyelesaikan aksara bercelaru dalam PHP
 Bagaimana untuk membuka fail php pada telefon bimbit


