這篇文章主要介紹了關於Vue iview-admin框架二級菜單改為三級菜單的方法,有著一定的參考價值,現在分享給大家,有需要的朋友可以參考一下
最近在用iview-admin的Vue後台模板,從git上下載後發現左側導航欄最多支持到二級菜單,也發現很多童鞋在問如何實現三級菜單。在實際的應用場景中還是會出現三級菜單的需求的,木有其他好方法,只能自己手動改代碼了。
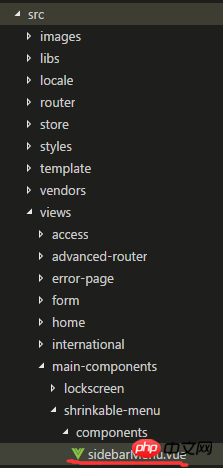
1. 第一步:先改寫VUE中的模板,修改sidebarMenu.vue文件,文件具體目錄建下圖:

將Menu導航選單組件的的二級嵌套結構改為三級嵌套,無非就是判斷二級路由頁面下是否有children屬性及是否含有子元素,有的話直接v-for循環生成子元素標籤,新結構如下:
<template>
    <menu>
        <template>
            <menuitem>
                <icon></icon>
                <span>{{ itemTitle(item.children[0]) }}</span>
            </menuitem>

            <submenu> 1" :name="item.name" :key="item.name">
                <template>
                    <icon></icon>
                    <span>{{ itemTitle(item) }}</span>
                </template>
                <template>
                    <!-- 添加条件判断是否还有三级菜单 v-if="child.children.length<=1"  -->
                    <menuitem>
                        <icon></icon>
                        <span>{{ itemTitle(child) }}</span>
                    </menuitem>
                    <!-- 以下为新增 添加条件判断如果有三级菜单 则增加三级菜单 -->
                    <submenu>
                         <template>
                             <icon></icon>
                              <span>{{ itemTitle(child) }}</span>
                         </template>
                         <template>
                              <menuitem>
                                   <icon></icon>
                                   <span>{{ itemTitle(son) }}</span>
                              </menuitem>
                         </template>
                    </submenu>
                    <!-- 以上为新增 -->
                </template>
            </submenu>
        </template>
    </menu>
</template>
元件中methods下新增一個方法isThirdLeveMenu,判斷是否含有children屬性:
methods: {
    changeMenu(active) {
      this.$emit("on-change", active);
    },
    itemTitle(item) {
      if (typeof item.title === "object") {
        return this.$t(item.title.i18n);
      } else {
        return item.title;
      }
    },
    isThirdLeveMenu(child){
       if(child.children){
           if(child.children.length>0)return true;
           else  return false;
       }
       else {
         return false;
       }
    }
  },
第二步:修改建立目前path路徑的邏輯方法:setCurrentPath ,在libs資料夾下util.js檔案中:
util.setCurrentPath = function (vm, name) {
    let title = '';
    let isOtherRouter = false;
    vm.$store.state.app.routers.forEach(item => {
        if (item.children.length === 1) {
            if (item.children[0].name === name) {
                title = util.handleTitle(vm, item);
                if (item.name === 'otherRouter') {
                    isOtherRouter = true;
                }
            }
        } else {
            item.children.forEach(child => {
                if (child.name === name) {
                    title = util.handleTitle(vm, child);
                    if (item.name === 'otherRouter') {
                        isOtherRouter = true;
                    }
                }
            });
        }
    });
    let currentPathArr = [];
    //去首页
    if (name === 'home_index') {
        currentPathArr = [
            {
                title: util.handleTitle(vm, util.getRouterObjByName(vm.$store.state.app.routers, 'home_index')),
                path: '',
                name: 'home_index'
            }
        ];
    }
    //去导航菜单一级页面或者OtherRouter路由中的页面
    else if ((name.indexOf('_index') >= 0 || isOtherRouter) && name !== 'home_index') {
        currentPathArr = [
            {
                title: util.handleTitle(vm, util.getRouterObjByName(vm.$store.state.app.routers, 'home_index')),
                path: '/home',
                name: 'home_index'
            },
            {
                title: title,
                path: '',
                name: name
            }
        ];
    }
    //去导航菜单二级页面或三级页面
    else {
        let currentPathObj = vm.$store.state.app.routers.filter(item => {

            var hasMenu;
            if (item.children.length  {
                return  child.name === name;
            })[0];

           // let thirdLevelObj =
           console.log(childObj)
           //二级页面
            if (childObj) {
                currentPathArr = [
                    {
                        title: '首页',
                        path: '/home',
                        name: 'home_index'
                    },
                    {
                        title: currentPathObj.title,
                        path: '',
                        name: currentPathObj.name
                    },
                    {
                        title: childObj.title,
                        path: currentPathObj.path + '/' + childObj.path,
                        name: name
                    }
                ];
            }
            //childobj为undefined,再从三级页面中遍历
            else {
                let thirdObj;
                let childObj = currentPathObj.children.filter((child) => {
                    let hasChildren;
                    hasChildren = child.name === name;
                    if (hasChildren) return hasChildren

                    if (child.children) {
                        let sonArr = child.children;
                        for (let n = 0; n <p><strong>第三個步驟:建立三級頁面test-child.vue,testcaca.vue和三級路由的容器組件artical-publish-center.vue</strong><br><strong>artical-publish-center.vue結構如下圖:  要有<rout-view>標籤</rout-view></strong></p><p><img src="https://img.php.cn//upload/image/524/766/974/1531115697133053.png" title="1531115697133053.png" alt="Vue iview-admin框架二級選單改為三級選單的方法"></p><p>##其他兩個三級頁面vue隨便寫了:</p><p><img src="https://img.php.cn//upload/image/142/703/339/1531115707261749.png" title="1531115707261749.png" alt="Vue iview-admin框架二級選單改為三級選單的方法"></p><p><strong>#第四步:到這裡,容器可以實現期待已久三級選單了,^_^. 在router裡新增三級頁面路由,router資料夾下router.js中:</strong><br>加到appRouter中吧,可以放到title: '元件'的children數組中: </p><pre class="brush:php;toolbar:false">{
                path: 'artical-publish',
                title: '用户配置',
                name: 'artical-publish',
                icon: 'compose',
                component: () => import('@/views/test/artical-publish-center.vue'), //引用三级页面的中间容器层
                children:[
                    {
                        path: 'testcaca',
                        icon: 'ios-pause',
                        name: 'testcaca',
                        title: 'test4',
                        component: () => import('@/views/test/testcaca.vue')
                    },
                    {
                        path: 'test-child',
                        icon: 'ios-pause',
                        name: 'test-child',
                        title: 'test-child',
                        component: () => import('@/views/test/test-child.vue')
                    }
                ]
            }
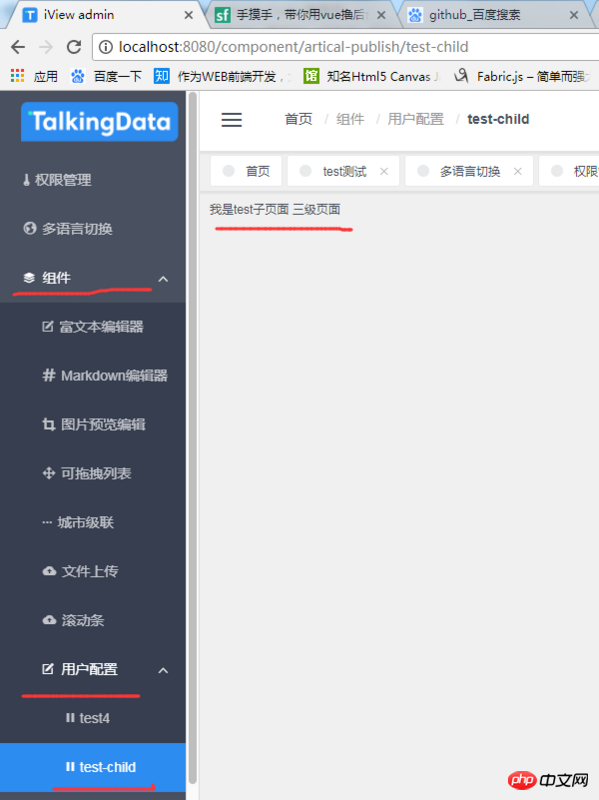
最後儲存,運行你的項目,看下三級選單出來了:

以上是Vue iview-admin框架二級選單改為三級選單的方法的詳細內容。更多資訊請關注PHP中文網其他相關文章!