Home > Article > Web Front-end > Detailed explanation of JavaScript implementation of event delegation method
This article talks about the JavaScript implementation of the event delegation method. If you don’t know about the JavaScript implementation of the event delegation method or are interested in the JavaScript implementation of the event delegation method, then let’s take a look at this article. Okay, let’s cut the nonsense and get to the point
Event delegation, in layman’s terms, is to delegate an The function of an element responding to events (click, keydown...) is delegated to another element;
Generally speaking, events of one or a group of elements are delegated to its parent layer Or on the outer element, it is the outer element that actually binds the event. When the event responds to the element that needs to be bound, it will trigger the binding event of its outer element through the event bubbling mechanism, and then the outer element will be bound. layer element to execute the function.
For example, if a courier arrives at the same time for classmates in the dormitory, one way is to stupidly pick it up one by one. Another way is to entrust the matter to the dormitory director and let one person Go out and pick up all the couriers, and then distribute them to each dormitory student one by one according to the recipient;
Here, picking up the couriers is an event, and each student refers to the DOM element that needs to respond to the event, and The dormitory leader who goes out to collect the express delivery is the element of the agent, so it is this element that actually binds the event. The process of distributing the express delivery according to the recipient is in the event execution. It needs to be judged that the current response event should match the element in the proxy element. Which one or which ones.
Event bubbling
As mentioned earlier, the implementation of event delegation in DOM uses the event bubbling mechanism, so what is event bubbling?
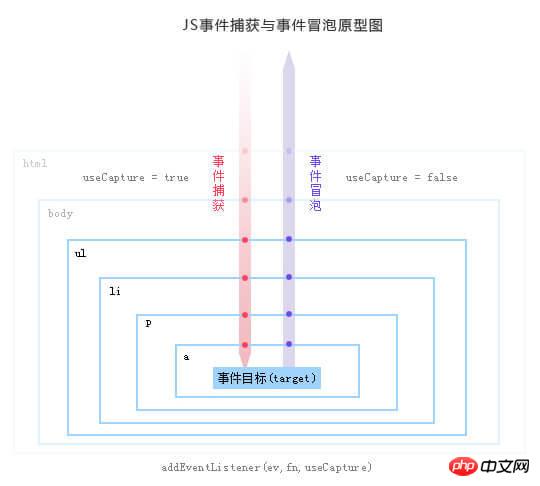
When document.addEventListener we can set the event model: event bubbling, event capturing, generally speaking, the event bubbling model is used;

As shown in the figure above, the event model is divided into three stages:
1, Capture stage: In the event bubbling model, the capture phase will not respond to any events;
2, Target phase: The target phase means that the event responds to the lowest element that triggers the event;
3, Bubbling phase: The bubbling phase means that the triggering response of the event will go from the bottom target to the outermost layer (root node) layer by layer. The event agent uses the event to bubble up. The bubble mechanism binds events that the inner layer needs to respond to to the outer layer;
EventsAdvantages of delegation
1. Reduce memory consumption
Imagine if we have a list with a large number of list items, we need to respond to an event when the list item is clicked;2. Dynamically binding events
For example, in the above example, there are only a few list items, and we bind events to each list item;
###在很多时候,我们需要通过 AJAX 或者用户操作动态的增加或者去除列表项元素,那么在每一次改变的时候都需要重新给新增的元素绑定事件,给即将删去的元素解绑事件;
如果用了事件委托就没有这种麻烦了,因为事件是绑定在父层的,和目标元素的增减是没有关系的,执行到目标元素是在真正响应执行事件函数的过程中去匹配的;
所以使用事件在动态绑定事件的情况下是可以减少很多重复工作的。
jQuery 中的事件委托相信很多人都用过,它主要这几种方法来实现:
1、$.on: 基本用法: $('.parent').on('click', 'a', function () { console.log('click event on tag a'); }),它是 .parent 元素之下的 a 元素的事件代理到 $('.parent') 之上,只要在这个元素上有点击事件,就会自动寻找到 .parent 元素下的 a 元素,然后响应事件;
2、$.delegate: 基本用法: $('.parent').delegate('a', 'click', function () { console.log('click event on tag a'); }),同上,并且还有相对应的 $.delegate 来删除代理的事件;
3、$.live: 基本使用方法: $('a', $('.parent')).live('click', function () { console.log('click event on tag a'); }),同上,然而如果没有传入父层元素 $(.parent),那事件会默认委托到 $(document) 上;(已废除)
基本实现
比如我们有这样的一个 HTML 片段:
我们来实现把 #list 下的 li 元素的事件代理委托到它的父层元素也就是 #list 上:
// 给父层元素绑定事件document.getElementById('list').addEventListener('click', function (e) {
  // 兼容性处理
  var event = e || window.event;
  var target = event.target || event.srcElement;
  // 判断是否匹配目标元素
  if (target.nodeName.toLocaleLowerCase === 'li') {
    console.log('the content is: ', target.innerHTML);
  }});
在上述代码中, target 元素则是在 #list 元素之下具体被点击的元素,然后通过判断 target 的一些属性(比如:nodeName,id 等等)可以更精确地匹配到某一类 #list li 元素之上;
使用 Element.matches 精确匹配
如果改变下 HTML 成:
这里,我们想把 #list 元素下的 li 元素(并且它的 class 为 class-1)的点击事件委托代理到 #list 之上;
如果通过上述的方法我们还需要在 `if (target.nodeName.toLocaleLowerCase === 'li')` 判断之中在加入一个判断 `target.nodeName.className === 'class-1'`;
但是如果想像 CSS 选择其般做更加灵活的匹配的话,上面的判断未免就太多了,并且很难做到灵活性,这里可以使用 Element.matches API 来匹配;
Element.matches API 的基本使用方法: Element.matches(selectorString),selectorString 既是 CSS 那样的选择器规则,比如本例中可以使用 target.matches('li.class-1'),他会返回一个布尔值,如果 target 元素是标签 li 并且它的类是 class-1 ,那么就会返回 true,否则返回 false;
当然它的兼容性还有一些问题,需要 IE9 及以上的现代化浏览器版本;
我们可以使用 Polyfill 来解决兼容性上的问题:
if (!Element.prototype.matches) {
  Element.prototype.matches =
    Element.prototype.matchesSelector ||
    Element.prototype.mozMatchesSelector ||
    Element.prototype.msMatchesSelector ||
    Element.prototype.oMatchesSelector ||
    Element.prototype.webkitMatchesSelector ||
    function(s) {
      var matches = (this.document || this.ownerDocument).querySelectorAll(s),
        i = matches.length;
      while (--i >= 0 && matches.item(i) !== this) {}
      return i > -1;
    };}
加上 Element.matches 之后就可以来实现我们的需求了:
if (!Element.prototype.matches) {
  Element.prototype.matches =
    Element.prototype.matchesSelector ||
    Element.prototype.mozMatchesSelector ||
    Element.prototype.msMatchesSelector ||
    Element.prototype.oMatchesSelector ||
    Element.prototype.webkitMatchesSelector ||
    function(s) {
      var matches = (this.document || this.ownerDocument).querySelectorAll(s),
        i = matches.length;
      while (--i >= 0 && matches.item(i) !== this) {}
      return i > -1;
    };}document.getElementById('list').addEventListener('click', function (e) {
  // 兼容性处理
  var event = e || window.event;
  var target = event.target || event.srcElement;
  if (target.matches('li.class-1')) {
    console.log('the content is: ', target.innerHTML);
}});在应对更多场景上我们可以把事件代理的功能封装成一个公用函数,这样就可以重复利用了。
结合上面的例子来实现一个函数 eventDelegate,它接受四个参数:
1、[String] 一个选择器字符串用于过滤需要实现代理的父层元素,既事件需要被真正绑定之上;
2、[String] 一个选择器字符串用于过滤触发事件的选择器元素的后代,既我们需要被代理事件的元素;
3、[String] 一个或多个用空格分隔的事件类型和可选的命名空间,如 click 或 keydown.click ;
4、[Function] 需要代理事件响应的函数;
这里就有几个关键点:
1、对于父层代理的元素可能有多个,需要一一绑定事件;
2、对于绑定的事件类型可能有多个,需要一一绑定事件;
3、在处理匹配被代理的元素之中需要考虑到兼容性问题;
4、在执行所绑定的函数的时候需要传入正确的参数以及考虑到 this 的问题;
function eventDelegate (parentSelector, targetSelector, events, foo) {
  // 触发执行的函数
  function triFunction (e) {
    // 兼容性处理
    var event = e || window.event;
    var target = event.target || event.srcElement;
    // 处理 matches 的兼容性
    if (!Element.prototype.matches) {
      Element.prototype.matches =
        Element.prototype.matchesSelector ||
        Element.prototype.mozMatchesSelector ||
        Element.prototype.msMatchesSelector ||
        Element.prototype.oMatchesSelector ||
        Element.prototype.webkitMatchesSelector ||
        function(s) {
          var matches = (this.document || this.ownerDocument).querySelectorAll(s),
            i = matches.length;
          while (--i >= 0 && matches.item(i) !== this) {}
          return i > -1;
        };
    }
    // 判断是否匹配到我们所需要的元素上
    if (target.matches(targetSelector)) {
      // 执行绑定的函数,注意 this
      foo.call(target, Array.prototype.slice.call(arguments));
    }
  }
  // 如果有多个事件的话需要全部一一绑定事件
  events.split('.').forEach(function (evt) {
    // 多个父层元素的话也需要一一绑定
    Array.prototype.slice.call(document.querySelectorAll(parentSelector)).forEach(function ($p) {
      $p.addEventListener(evt, triFunction);
    });
  });}
以上就是本篇文章的所有内容,大家要是还不太了解的话,可以自己多实现两边就很容易掌握了哦!
相关推荐:
The above is the detailed content of Detailed explanation of JavaScript implementation of event delegation method. For more information, please follow other related articles on the PHP Chinese website!