
Home > Article > Web Front-end > Explanation of the sliding focus carousel diagram in practical implementation of encapsulated motion framework

This article mainly brings you a focus carousel diagram (example) that encapsulates the movement framework and actually slides left and right and up and down. The editor thinks it’s pretty good, so I’ll share it with you now and give it as a reference. Let’s follow the editor to take a look, I hope it can help everyone.
In this articleBuilding a universal uniform motion framework (explanation with examples), a uniform motion framework is encapsulated. On the basis of this framework, we add the buffering motion effect, Then use the motion frame to make the slideshow (up and down, left and right).

Buffer movement usually has two common manifestations: for example, letting a p move from 0 to 500, one is when the event is triggered, the speed is very fast, the other is When the event is triggered, it is slow, and then slowly speeds up. Let's implement blocking first and then slowing down. A common way is to drive. For example, a car that just got off the highway is 120km/h, and then enters the ramp and becomes 40km/h. Or Entering the community at 40km/h, and finally parking, it becomes 0km/h. From 120km/h->40km/h, or 40km->0km/h, the speed first slows down and then slows down. How can I use a program to do this kind of exercise? What does it mean?
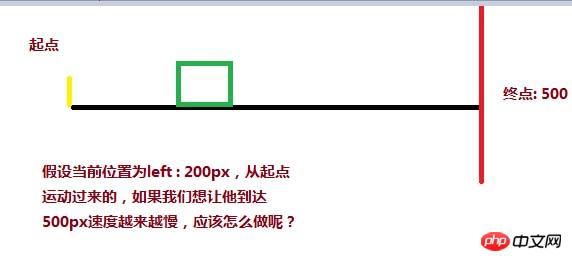
You can use the target distance (500) - current distance (200) / a coefficient (such as 12) to achieve a speed change from block to slow. The current distance is between At the starting point, the numerator (500 - 0) is the largest, so the speed is the largest. If the current distance is close to 500, the molecule is the smallest, and the speed after division is also the smallest.
However, p will not stop at the target position of 500px, but will eventually stop at 497.375px. Just check the current speed and the current value to know The reason
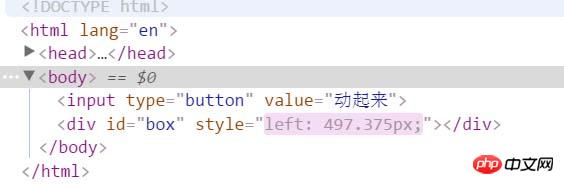
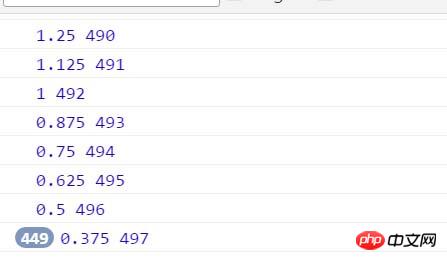
You will find that the speed always stops at 0.375, and the current distance obtained stops at 497px? There is a problem here. Doesn’t our p stop at 497.375px? How can we get it without the decimal 0.375? Computers suffer a loss of precision when processing floating point numbers. We can do a small test separately:
You will find that the left offset obtained by this code is 30px instead of 30.2px written in the interline style. Because decimals are rounded off when obtaining the current position, the speed will always stop at 0.375px, and the position will always stop at 497. Therefore, in order to reach the target, we have to change the speed to 1 and round the speed up ( Math .ceil ), we can change the speed to 1, and p can also reach 500
oBtn.onclick = function(){
timer = setInterval( function(){
speed = ( 500 - oBox.offsetLeft ) / 8;
if( speed > 0 ) {
speed = Math.ceil( speed );
}
console.log( speed, oBox.offsetLeft );
oBox.style.left = oBox.offsetLeft + speed + 'px';
}, 30 );
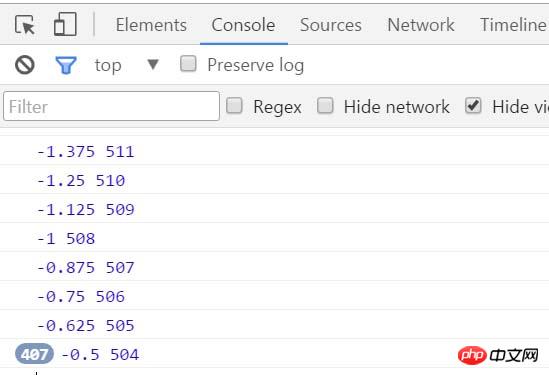
}The second question, if the position of p is at 900, that is to say From 900 to 500, is there such a demand? There must be one, the carousel picture looks like this from right to left.
The final target stops at 503.5px, the speed is negative at this time, and the final speed stops at -0.5. For the speed in the opposite direction, we need to change it to -1 to reach the target, so use rounding down (Math.floor)
##
oBtn.onclick = function(){
 timer = setInterval( function(){
 speed = ( 500 - oBox.offsetLeft ) / 8;
 if( speed > 0 ) {
  speed = Math.ceil( speed );
 }else {
  speed = Math.floor( speed );
 }
 console.log( speed, oBox.offsetLeft );
 oBox.style.left = oBox.offsetLeft + speed + 'px';
 }, 30 );
}
Then we integrate this buffering movement When we reach the uniform motion frame, it becomes:
function css(obj, attr, value) {
 if (arguments.length == 3) {
 obj.style[attr] = value;
 } else {
 if (obj.currentStyle) {
  return obj.currentStyle[attr];
 } else {
  return getComputedStyle(obj, false)[attr];
 }
 }
}

function animate(obj, attr, fn) {
 clearInterval(obj.timer);
 var cur = 0;
 var target = 0;
 var speed = 0;
 obj.timer = setInterval(function () {
 var bFlag = true;
 for (var key in attr) {
  if (key == 'opacity ') {
  cur = css(obj, 'opacity') * 100;
  } else {
  cur = parseInt(css(obj, key));
  }
  target = attr[key];
  speed = ( target - cur ) / 8;
  speed = speed > 0 ? Math.ceil(speed) : Math.floor(speed);
  if (cur != target) {
  bFlag = false;
  if (key == 'opacity') {
   obj.style.opacity = ( cur + speed ) / 100;
   obj.style.filter = "alpha(opacity:" + ( cur + speed ) + ")";
  } else {
   obj.style[key] = cur + speed + "px";
  }
  }
 }
 if (bFlag) {
  clearInterval(obj.timer);
  fn && fn.call(obj);
 }
 }, 30 );
}
With this uniform motion frame, we will make a slideshow: HTML for upper and lower slides Style file:
slide - by ghostwu


* {
 margin: 0;
 padding: 0;
}
li {
 list-style-type: none;
}
#slide {
 width: 800px;
 height: 450px;
 position: relative;
 margin:20px auto;
}
#slide-img {
 position: relative;
 width: 800px;
 height: 450px;
 overflow: hidden;
}
#img-container {
 position: absolute;
 left: 0px;
 top: 0px;
 height: 2250px;
 /*font-size:0px;*/
}
#img-container img {
 display: block;
 float: left;
}
#slide-nums {
 position: absolute;
 right:10px;
 bottom:10px;
}
#slide-nums li {
 float: left;
 margin:0px 10px;
 background: white;
 width: 20px;
 height: 20px;
 text-align: center;
 line-height: 20px;
 border-radius:10px;
 text-indent:-999px;
 opacity:0.6;
 filter:alpha(opacity:60);
 cursor:pointer;
}
#slide-nums li.active {
 background: red;
}
animate.js file:
function css(obj, attr, value) {
 if (arguments.length == 3) {
 obj.style[attr] = value;
 } else {
 if (obj.currentStyle) {
  return obj.currentStyle[attr];
 } else {
  return getComputedStyle(obj, false)[attr];
 }
 }
}

function animate(obj, attr, fn) {
 clearInterval(obj.timer);
 var cur = 0;
 var target = 0;
 var speed = 0;
 obj.timer = setInterval(function () {
 var bFlag = true;
 for (var key in attr) {
  if (key == 'opacity ') {
  cur = css(obj, 'opacity') * 100;
  } else {
  cur = parseInt(css(obj, key));
  }
  target = attr[key];
  speed = ( target - cur ) / 8;
  speed = speed > 0 ? Math.ceil(speed) : Math.floor(speed);
  if (cur != target) {
  bFlag = false;
  if (key == 'opacity') {
   obj.style.opacity = ( cur + speed ) / 100;
   obj.style.filter = "alpha(opacity:" + ( cur + speed ) + ")";
  } else {
   obj.style[key] = cur + speed + "px";
  }
  }
 }
 if (bFlag) {
  clearInterval(obj.timer);
  fn && fn.call(obj);
 }
 }, 30 );
}
slide.js file:
window.onload = function () {
 function Slide() {
 this.oImgContainer = document.getElementById("img-container");
 this.aLi = document.getElementsByTagName("li");
 this.index = 0;
 }

 Slide.prototype.bind = function () {
 var that = this;
 for (var i = 0; i < this.aLi.length; i++) {
  this.aLi[i].index = i;
  this.aLi[i].onmouseover = function () {
  that.moveTop( this.index );
  }
 }
 }

 Slide.prototype.moveTop = function (i) {
 this.index = i;
 for( var j = 0; j < this.aLi.length; j++ ){
  this.aLi[j].className = '';
 }
 this.aLi[this.index].className = 'active';
 animate( this.oImgContainer, {
  "top" : -this.index * 450,
  "left" : 0
 });
 }

 var oSlide = new Slide();
 oSlide.bind();

}
You only need to change the style of the left and right slidesStyle file :
* {
 margin: 0;
 padding: 0;
}
li {
 list-style-type: none;
}
#slide {
 width: 800px;
 height: 450px;
 position: relative;
 margin:20px auto;
}
#slide-img {
 position: relative;
 width: 800px;
 height: 450px;
 overflow: hidden;
}
#img-container {
 position: absolute;
 left: 0px;
 top: 0px;
 width: 4000px;
}
#img-container img {
 display: block;
 float: left;
}
#slide-nums {
 position: absolute;
 right:10px;
 bottom:10px;
}
#slide-nums li {
 float: left;
 margin:0px 10px;
 background: white;
 width: 20px;
 height: 20px;
 text-align: center;
 line-height: 20px;
 border-radius:10px;
 text-indent:-999px;
 opacity:0.6;
 filter:alpha(opacity:60);
 cursor:pointer;
}
#slide-nums li.active {
 background: red;
}
js calling file:
window.onload = function () {
 function Slide() {
 this.oImgContainer = document.getElementById("img-container");
 this.aLi = document.getElementsByTagName("li");
 this.index = 0;
 }

 Slide.prototype.bind = function () {
 var that = this;
 for (var i = 0; i < this.aLi.length; i++) {
  this.aLi[i].index = i;
  this.aLi[i].onmouseover = function () {
  that.moveLeft( this.index );
  }
 }
 }

 Slide.prototype.moveLeft = function (i) {
 this.index = i;
 for( var j = 0; j < this.aLi.length; j++ ){
  this.aLi[j].className = '';
 }
 this.aLi[this.index].className = 'active';
 animate( this.oImgContainer, {
  "left" : -this.index * 800
 });
 }

 var oSlide = new Slide();
 oSlide.bind();

}
Related recommendations: How to create a universal uniform motion framework
A way to write a JS package motion frame
An example of JavaScript implementing a buffer motion frame
The above is the detailed content of Explanation of the sliding focus carousel diagram in practical implementation of encapsulated motion framework. For more information, please follow other related articles on the PHP Chinese website!