Home >Web Front-end >Vue.js >How to use VueRouter4.x? Quick start guide
How to use VueRouter4.x? The following article will share with you a quick tutorial and introduce how to quickly get started with VueRouter4.x in 10 minutes. I hope it will be helpful to everyone!

Vue Router is a routing plug-in developed by the Vue team that is deeply integrated with the core of Vue.js, making it very simple to build single-page programs with Vue; The latest version of Vue Router is 4.X, which is also the recommended version for Vue3. In this article, we will learn about Vue Router 4.X. (Learning video sharing: vue video tutorial)
There are two types of history## in Vue Router # (Record historical routing), respectively URL.hash and History provided in HTML5.
file://), or when the configuration server cannot handle arbitrary URLs, but hashing is very poor for SEO;
npm i vue-routerThen in
main.js Write the following code:
import { createApp } from 'vue'
import App from './App.vue'
// 1 引入 createRouter
import { createRouter, createWebHistory } from 'vue-router'
// 2 定义路由映射表
const routes = [
  /* more router */
]
// 3 创建路由实例,并传递对应配置
const router = createRouter({
  // history 模式 这里使用createWebHistory
  history: createWebHistory(),
  // 传递路由映射表
  routes
})
createApp(App).use(router).mount('#app')
If there are too many routes in the above code, you can define a router.js file and extract it, sample code As follows:
router.js
export default [
  /* more router */
]
main.js
import { createApp } from 'vue'
import App from './App.vue'
// 2 引入路由映射表
import routes from './router'

// 1 引入 createRouter
import { createRouter, createWebHistory } from 'vue-router'
// 3 创建路由实例,并传递对应配置
const router = createRouter({
  // history 模式 这里使用createWebHistory
  history: createWebHistory(),
  // 传递路由映射表
  routes
})
createApp(App).use(router).mount('#app')
or **directly in ****# Directly export a routing instance in ##router.js and use it in main.js**( This method is more commonly used).
is not used in Vue, because will be reset after changing the URL. Loading the page but will not; for details about which properties the component supports, please refer to the documentation. router-view
<template>
  <router-link to="/hello"
    ><img alt="Vue logo" src="./assets/logo.png"
  /></router-link>
  <router-view></router-view>
</template>
Then our router.js code is as follows:
import RootComponent from './components/root.vue'
export default [
  {
    path: '/',
    // 引入组件
    component: RootComponent
  },
  {
    path: '/hello',
    // 路由懒加载引入组件
    component: () => import('./components/HelloWorld.vue')
  }
]
For other configuration items, you can refer to the documentation.
The code running results are as follows:
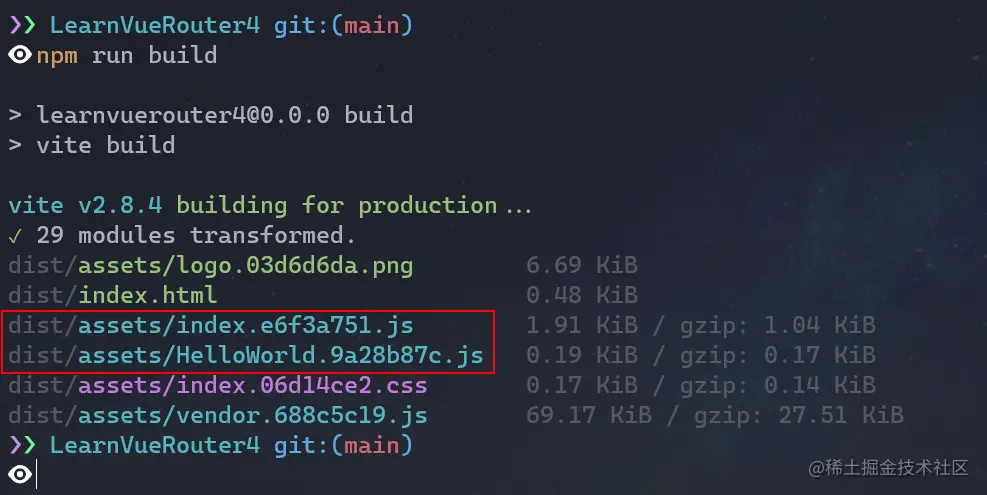
Routing lazy loading
component: () => import('./components/HelloWorld.vue')
Then the packaging (webpack, Vite) tool will package these dynamically imported components separately, as shown in the following figure:
Dynamic routing
. For example: <pre class="brush:js;toolbar:false;">{
path: &#39;/user/:id&#39;,
component: () => import(&#39;@/components/User&#39;)
}</pre> Jump in the template as follows:
<router-link to="/user/10010"></router-link>
Or use the
pushmethod provided by
useRouter For example: <pre class="brush:js;toolbar:false;">import { useRouter } from &#39;vue-router&#39;
const {push} = useRouter()
push({
path: &#39;/user&#39;,
params: { id: 10010 }
})
// 或者
let id = 10010
push(&#39;/user/&#39; + id)</pre> You can obtain the routing address through the useRoute hook. The usage is consistent with
. Match all routes
{
  path: '/:pathMatch(.*)',
  component: () => import('./components/Page404.vue'),
},
The current route If the match is unsuccessful, this route will be matched. 这个时候路由嵌套的就发挥作用了,其实路由嵌套比较简单,就是通过路由配置中的一个children属性来实现,示例代码如下:
HelloWorld.vue
<template>
  <h1>Hello World</h1>
  <div
    style="
      display: flex;
      justify-content: space-between;
      width: 240px;
      margin: 0 auto;
    "
  >
    <router-link to="about">about</router-link>
    <router-link to="user">user</router-link>
  </div>
  <router-view></router-view>
</template>
router.js
{
  path: '/hello',
  // 路由懒加载引入组件
  component: () => import('./components/HelloWorld.vue'),
  children: [
    {
      path: 'about',
      component: () => import('./components/about.vue'),
    },
    {
      path: 'user',
      component: () => import('./components/user.vue'),
    },
  ],
},子组件比较简单,只有一个<h1></h1>标签,最终效果如下:

这篇文章到这就结束了,总的来说比较简单没有什么太深入的东西,比较适合入门。
The above is the detailed content of How to use VueRouter4.x? Quick start guide. For more information, please follow other related articles on the PHP Chinese website!