Home >Backend Development >PHP Tutorial >How does HBuilder configure the PHP environment?
Configuration method: 1. Create a php project in the www directory; 2. Install the "aptana php" plug-in; 3. Click "Run - Set up web server - External web server settings - New", edit Web server configuration; 4. Change the PHP web server to the set external server URL.

HBuilder's code prompt function is very powerful. It is definitely a good assistant for web front-end development code. It may not be the best for developing PHP files. Yes, but its built-in "view while changing mode" is definitely rare, but it still requires some configuration (code configuration), which is difficult and time-consuming. Let’s introduce it in detail below:
Prerequisites:
##● Windows system ● HBuilder editor ● wampserver (not limited to version), make sure port 80 is not occupied by other programs Let’s start with the steps on how to configure the PHP running environment in HBuilder:Create a PHP project
Create a PHP project, which can be created from wampserver or HBuilder. Note: It must be created in the www directory under the wampserver directory, and the custom name cannot be Chinese.Here's how to create it from HBuilder:
Select: File->New->web project

##HBuider PHP running server configurationBecause HBuider does not integrate the PHP running environment, it depends on wampserver. In fact, HBuider is an editor, but it only needs to implement PHP code prompts and real-time automatic browser updates. It just needs to be configured.
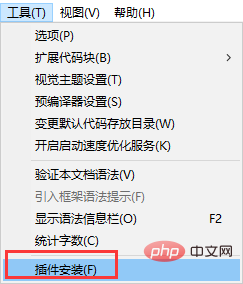
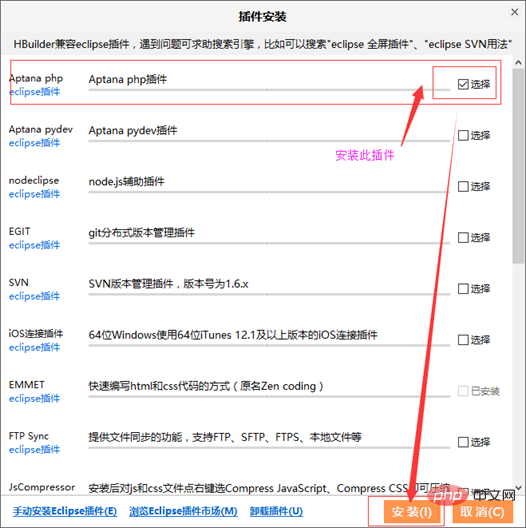
1. First you need to install the plug-in:1), select the tool——>Plug-in installation
# #2), check "aptana php" to install the plug-in. 
 2. Configure
Select: Run——>Set web server——>External web server settings ——>New

url contains the project name: choose not to include it (to avoid errors, if it is included, the following php must be removed from the above url. For smoothness, I can choose "not included").
As for the start command and stop command, there is no need to set them, and there will be no impact.
Finally "OK" to save.
Next, change the php web server to the external server URL just set:
Click the drop-down box to select the newly built external server. Finally "OK" to save the settings.
As shown in the figure:
In this way, the external server of php is configured.
<?php
phpinfo();
?>
After writing ctrl s, save it, and see if it can be done in the "View while changing mode" A page similar to the one that appeared at the beginning of the tutorial will appear.
If not, close the editor and reopen it. Or run - Chrome to see if the browser can open the phpinfo page. That’s it. Even if you open it with a browser, it can be updated automatically in real time (after the file is saved). It’s a lot easier to write.
The effect is as follows:
At this point, the PHP environment configuration under HBuilder has been successful.The above is the entire content of this article, I hope it will be helpful to everyone's study. For more exciting content, you can pay attention to the relevant tutorial columns of the PHP Chinese website! ! !
The above is the detailed content of How does HBuilder configure the PHP environment?. For more information, please follow other related articles on the PHP Chinese website!