
CSS image stitching technology
Image stitching
Image stitching is a collection of single images.
Web pages with many images may take a long time to load and generate requests to multiple servers.
Using image stitching will reduce the number of server requests and save bandwidth.
Image stitching - simple example
Instead of using three separate images, let’s use a single image like this:

With CSS, we can display only the part of the image we need.
Instance
<!DOCTYPE html>
<html>
<head>
<meta charset="utf-8">
<title>php中文网(php.cn)</title>
<style>
.home {
    width: 46px;
    height: 44px;
    background: url("https://img.php.cn/upload/image/903/855/589/1550121182683639.gif") 0 0;
}

.next {
    width: 43px;
    height: 44px;
    background: url("https://img.php.cn/upload/image/903/855/589/1550121182683639.gif") -91px 0;
}
</style>
</head>
<body>

<p class="home"></p><br><br>
<p class="next"></p>
</body>
</html>
Run Instance»
Click the "Run Instance" button to view the online instance
Example analysis:
- ##width: 46px; height: 44px; -- Define the part of the image we use
- background: url("https://img.php.cn/upload/image/903/855/589/1550121182683639.gif")
0 0; - Define the background image and its position (left 0px , top 0px)
Image stitching - Create a navigation listWe want to use stitched images ("https://img.php.cn/upload/image/903/855/589/1550121182683639 .gif") to create a navigation list. We will use an HTML list since it can be linked and also supports background images:
<!DOCTYPE html>
<html>
<head>
<meta charset="utf-8">
<title>php中文网(php.cn)</title>
<style>
#navlist{position:relative;}
#navlist li{margin:0;padding:0;list-style:none;position:absolute;top:0;}
#navlist li, #navlist a{height:44px;display:block;}

#home{left:0px;width:46px;}
#home{background:url('https://img.php.cn/upload/image/903/855/589/1550121182683639.gif') 0 0;}

#prev{left:63px;width:43px;}
#prev{background:url('https://img.php.cn/upload/image/903/855/589/1550121182683639.gif') -47px 0;}

#next{left:129px;width:43px;}
#next{background:url('https://img.php.cn/upload/image/903/855/589/1550121182683639.gif') -91px 0;}
</style>
</head>

<body>
<ul id="navlist">
  <li id="home"><a href="/"></a></li>
  <li id="prev"><a href="/css/"></a></li>
  <li id="next"><a href="/css/"></a></li>
</ul>
</body>
</html>
Run Instance»Click the "Run Instance" button to view the online instance
Example analysis:
navlist{position:relative;} - Set the relative positioning to make the absolute positioning inside
#navlist li{margin:0;padding:0;list-style:none;position:absolute;top:0;} - margin and padding are set to 0, the list style is removed, and all list items are absolute Positioning
#navlist li, #navlist a{height:44px;display:block;} - the height of all images is 44px
now Start positioning and styling each specific section:
#home{left:0px;width:46px;} - positioned to the far left, and the width of the image is 46px
#home{background:url("https://img.php.cn/upload/image/903/855/589/1550121182683639.gif
") 0 0;} - Define background image and its position (0px left, 0px top)#prev{left:63px;width:43px;} - Position right 63px (#home width 46px + item some extra space between), with a width of 43px.
#prev{background:url('https://img.php.cn/upload/image/903/855/589/1550121182683639.gif
') -47px 0;} - Define the background image 47px to the right (#home width 46px + 1px of the divider)#next{left:129px;width:43px;} - Position the right 129px(# prev 63px + #prev width is 43px + remaining space), width is 43px.
#next{background:url('https://img.php.cn/upload/ image/903/855/589/1550121182683639.gif
') no-repeat -91px 0;} - Define 91px on the right side of the background image (#home 46px+1px dividing line + #prev wide 43px+1px dividing line)
Image Splices - Hover Effect
Now, we want to add a hover effect to our navigation list.
 | :hover selector is used to display the effect of the mouse hovering over the element Tip: :hover selector can be applied to all elements. |
|---|
Our new image ("https://img.php.cn/upload/course/000/000/015/5c64fdaa5b0ba752.gif") contains three navigation images and three images:
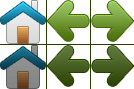
Because this is a single image rather than 6 separate image files, there will be no lazy loading when the user hovers over the image.
We only add three lines of code to add the hover effect:
Instance
<!DOCTYPE html>
<html>
<head>
<meta charset="utf-8">
<title>php中文网(php.cn)</title>
<style>
#navlist{position:relative;}
#navlist li{margin:0;padding:0;list-style:none;position:absolute;top:0;}
#navlist li, #navlist a{height:44px;display:block;}

#home{left:0px;width:46px;}
#home{background:url('https://img.php.cn/upload/course/000/000/015/5c64fdaa5b0ba752.gif') 0 0;}
#home a:hover{background: url('https://img.php.cn/upload/course/000/000/015/5c64fdaa5b0ba752.gif') 0 -45px;}

#prev{left:63px;width:43px;}
#prev{background:url('https://img.php.cn/upload/course/000/000/015/5c64fdaa5b0ba752.gif') -47px 0;}
#prev a:hover{background: url('https://img.php.cn/upload/course/000/000/015/5c64fdaa5b0ba752.gif') -47px -45px;}

#next{left:129px;width:43px;}
#next{background:url('https://img.php.cn/upload/course/000/000/015/5c64fdaa5b0ba752.gif') -91px 0;}
#next a:hover{background: url('https://img.php.cn/upload/course/000/000/015/5c64fdaa5b0ba752.gif') -91px -45px;}
</style>
</head>

<body>
<ul id="navlist">
  <li id="home"><a href="default.asp"></a></li>
  <li id="prev"><a href="css_intro.asp"></a></li>
  <li id="next"><a href="css_syntax.asp"></a></li>
</ul>
</body>
</html>
Run Example»
Click the "Run Instance" button to view the online instance
Instance analysis:
Since the list item contains a link, we You can use: hover pseudo-class
#home a:hover{background: transparent url("https://img.php.cn/upload/course/000/000/015/ 5c64fdaa5b0ba752.gif
") 0 -45px;} - For all three hover images, we specify the same background position, just 45px further down each


