그러나 시스템과 함께 제공되는 PHP에는 기본 구성만 있습니다. PHP 개발을 하려면 여전히 Xdebug가 필요합니다. macOS에서 시스템과 함께 제공되는 PHP에 Xdebug 모듈을 추가하는 방법은 다음과 같습니다. 하이 시에라. [추천: PHP7 튜토리얼]
기본 환경(macOS 및 PHP 정보)macOS High Sierra: v10.13.3PHP: v7.1.7
- Xdebug 설치
- Xdebug 공식 홈페이지 설치 문서 MAC에서 권장하는 방법이 있습니다. 시스템에는 PHP
이 함께 제공되므로 선택 시 php71-xdebug 설치 패키지를 선택해야 합니다.
또한 Brew의 php71-xdebug
은php71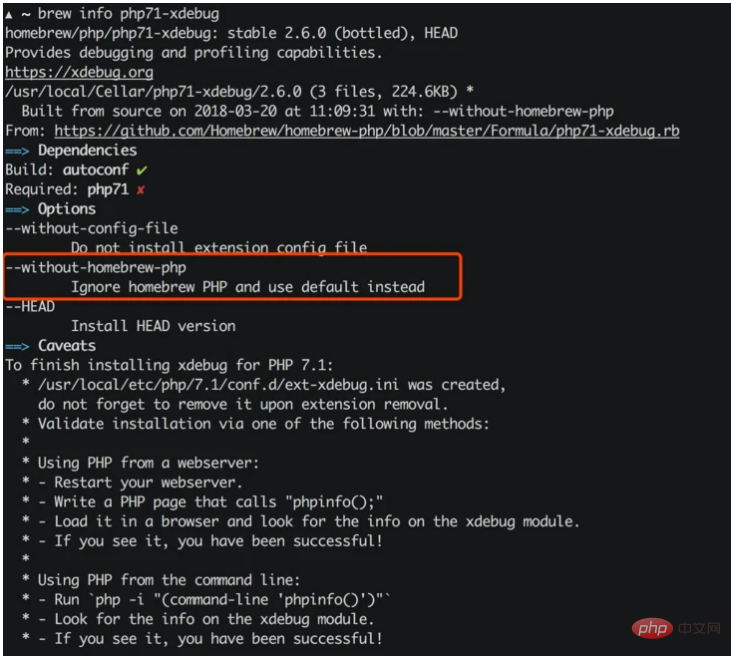 에 의존하므로
 --without-homebrew-php 매개변수를 추가하는 것이 좋습니다. 설치
. brew install php71-xdebug --without-homebrew-php
phpize
grep: /usr/include/php/main/php.h: No such file or directory
grep: /usr/include/php/Zend/zend_modules.h: No such file or directory
grep: /usr/include/php/Zend/zend_extensions.h: No such file or directory
Configuring for:
PHP Api Version:
Zend Module Api No:
Zend Extension Api No:
phpize가 제대로 작동하지 않음을 나타냅니다. PHP 확장 라이브러리의 컴파일 환경에 관해서는 이론적으로 시스템에 딸려오는 PHP에 phpize가 있어야 하는데, /usr/include/php/*에는 없습니다. code>.module, <code>/usr/include를 검색해보니 이 디렉터리가 전혀 존재하지 않는 것으로 나타났습니다. --without-homebrew-php这个参数,这样的话brew就会忽略安装php71。
sudo ln -s /Applications/Xcode.app/Contents/Developer/Platforms/MacOSX.platform/Developer/SDKs/MacOSX.sdk/usr/include /usr/include
不过这个时候,或许你会碰到下面这样的报错:
ln: /usr/include: Operation not permitted
提示缺失依赖,从而导致phpize无法正常工作,phpize是用来准备 PHP 扩展库的编译环境的,理论上系统自带的PHP应该是有phpize的,但是没有在/usr/include/php/*里面找到它需要的模块,并且检索/usr/include时发现这个目录根本不存在。
Google了一圈,解决问题,就需要在/usr/include中补全相关的内容,在OSX v10.10以前系统,需要手动做软链来解决:
xcode-select --install
但是v10.11以后的系统重写了安全策略,所以会遇到权限问题(sudo也不行):
brew install php71-xdebug --without-homebrew-php
不过好在Apple为开发人员准备了Xcode,这是一个很强大的工具,但是体积也很大(下载安装有点慢),而一般我们只需要它提供的Command Line Tools就够了,上面的问题,其实只要安装Command Line Tools就可以解决:
To finish installing xdebug for PHP 7.1:
  * /usr/local/etc/php/7.1/conf.d/ext-xdebug.ini was created,
    do not forget to remove it upon extension removal.
  * Validate installation via one of the following methods:
  *
  * Using PHP from a webserver:
  * - Restart your webserver.
  * - Write a PHP page that calls "phpinfo();"
  * - Load it in a browser and look for the info on the xdebug module.
  * - If you see it, you have been successful!
  *
  * Using PHP from the command line:
  * - Run `php -i "(command-line 'phpinfo()')"`
  * - Look for the info on the xdebug module.
  * - If you see it, you have been successful!
接下来,跟着提示做,安装、同意协议...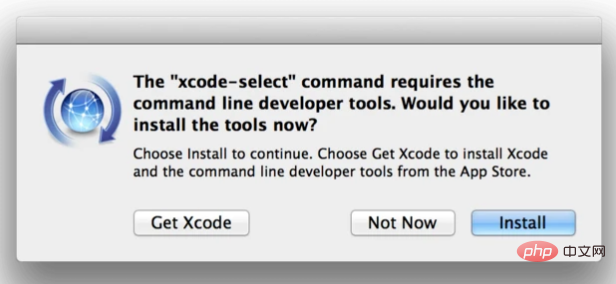
等待安装结束以后,再用 brew 来安装 php71-xdebug:
[xdebug]
zend_extension="/usr/local/opt/php71-xdebug/xdebug.so"
xdebug.remote_enable = 1
xdebug.remote_autostart = 1
xdebug.remote_connect_back = 1
xdebug.remote_port = 9000
xdebug.scream = 0
xdebug.show_local_vars = 1
一切结束以后,brew会给出提示:
# 关闭php-fpm
sudo killall php-fpm

# 启动php-fpm
sudo php-fpm
开启PHP的Xdebug
经过上面步骤,系统里面是有Xdebug了,但是在php.ini配置文件中不一定有,因此需要手动添加Xdebug的配置项:
xdebug
...
xdebug.remote_autostart => On => On
xdebug.remote_connect_back => On => On
xdebug.remote_cookie_expire_time => 3600 => 3600
xdebug.remote_enable => On => On
xdebug.remote_handler => dbgp => dbgp
xdebug.remote_host => localhost => localhost
xdebug.remote_log => no value => no value
xdebug.remote_mode => req => req
xdebug.remote_port => 9000 => 9000
xdebug.remote_timeout => 200 => 200
xdebug.scream => Off => Off
...
然后就是重启php-fpm:
[XDebug]
xdebug.remote_enable = 1
xdebug.remote_autostart = 1
运行php -i "(command-line 'phpinfo()')" | grep xdebug后,你就可以看到关于Xdebug的配置内容了:
Visual Studio Code - PHP Debug
VSCode是目前最流行的开发工具之一,虽然轻量,但是对标各类IDE毫不逊色,微软良心之作,通过安装不同的插件可以扩展它的能力,其中有一款 PHP Debug 的插件,可以作为Xdebug的桥梁,方便直接通过Xdebug调试PHP,官方的描述十分贴切:
PHP Debug Adapter for Visual Studio Code
官网的指导也写的相当不错:
Install XDebug
I highly recommend you make a simpletest.phpfile, put aphpinfo();statement in there, then copy the output and paste it into the XDebug installation wizard. It will analyze it and give you tailored installation instructions for your environment.
In short:
- On Windows: Download the appropiate precompiled DLL for your PHP version, architecture (64/32 Bit), thread safety (TS/NTS) and Visual Studio compiler version and place it in your PHP extension folder.
- On Linux: Either download the source code as a tarball or clone it with git, then compile it.
- Configure PHP to use XDebug by adding
Google 검색 후 문제를 해결하려면zend_extension=path/to/xdebugto your php.ini.
The path of your php.ini is shown in yourphpinfo()/usr/include에 해당 내용을 작성해야 합니다. OSX v10.10 이전 시스템에서는 문제 해결을 위한 소프트 링크를 수동으로 만들어야 합니다. 문제:- rrreee
그러나 v10.11 이후 시스템에서는 보안 정책을 다시 작성했기 때문에 권한 문제가 발생합니다(
rrreee🎜다행히 Apple은 Xcode를 준비했습니다. 이는 매우 강력한 도구이지만 용량도 매우 크고(다운로드 및 설치가 약간 느림) 일반적으로 이 도구가 제공하는 🎜명령줄 도구🎜만 있으면 위의 문제를 해결할 수 있습니다. 🎜Command Line Tools🎜 설치하기: 🎜 rrreee🎜다음으로 프롬프트에 따라 설치하고 계약에 동의하세요...sudo는 작동하지 않음):🎜🎜설치가 완료될 때까지 기다린 후 🎜brew🎜를 사용하여 설치하세요. 🎜php71-xdebug🎜:🎜rrreee🎜 모든 작업이 완료되면 Brew에서 다음 팁을 제공합니다: 🎜rrreee 🎜🎜Enable Xdebug in PHP🎜🎜🎜위 단계를 수행한 후 시스템에는 Xdebug가 있지만
php.ini에는 없을 수 있습니다. 구성 파일이므로 Xdebug 구성 항목을 수동으로 추가해야 합니다: 🎜rrreee 🎜그런 다음php-fpm을 다시 시작합니다: 🎜rrreee🎜php -i "(command-line 'phpinfo() 실행 후) ')" | grep xdebug를 보면 이제 Xdebug를 구성할 시간입니다. 🎜rrreee🎜🎜Visual Studio Code - PHP Debug🎜🎜🎜VSCode는 현재 가장 인기 있는 개발 도구 중 하나입니다. 가볍지만 , 모든 종류의 IDE보다 열등하지 않습니다. 이는 Microsoft의 양심적 작업이며, 그 중에는 Xdebug에 대한 브리지로 사용할 수 있는 🎜PHP Debug🎜 플러그인이 있습니다. Xdebug를 통해 직접 PHP 디버깅을 용이하게 하려면 공식 설명이 매우 적절합니다: 🎜Visual Studio Code용 PHP 디버그 어댑터🎜공식 웹사이트의 지침도 매우 좋습니다: 🎜🎜 🎜XDebug 설치
🎜간단한test.php code> 파일을 만들고 거기에 <code>phpinfo();문을 넣은 다음 출력하여 XDebug 설치 마법사에 붙여넣으면 분석되어 사용자 환경에 맞는 설치 지침이 제공됩니다. em>🎜
요약:🎜🎜🎜Windows의 경우: 미리 컴파일된 적절한 DLL을 다운로드하세요. PHP 버전, 아키텍처(64/32비트), 스레드 안전성(TS/NTS) 및 Visual Studio 컴파일러 버전을 PHP 확장 폴더에 저장하세요.🎜🎜Linux: 소스 코드를 tarball로 다운로드하거나 다음을 사용하여 복제하세요. git, 그런 다음 컴파일하세요.🎜🎜🎜🎜php.ini에zend_extension=path/to/xdebug를 추가하여 XDebug를 사용하도록 PHP를 구성하세요.<br>php.ini의 경로가 표시됩니다. "Loaded Configuration File" 아래의 <code>phpinfo()출력에서.🎜🎜🎜php.ini에서 원격 디버깅을 활성화하세요:🎜[XDebug] xdebug.remote_enable = 1 xdebug.remote_autostart = 1로그인 후 복사로그인 후 복사There are other ways to tell XDebug to connect to a remote debugger than
remote_autostart, like cookies, query parameters or browser extensions. I recommendremote_autostartbecause it "just works". There are also a variety of other options, like the port (by default 9000), please see the XDebug documentation on remote debugging for more information.- If you are doing web development, don't forget to restart your webserver to reload the settings
- Verify your installation by checking your
phpinfo()output for an XDebug section.
这里需要注意的是它推荐开启Xdebug配置项中的remote_autostart这一项。
好了,经过上面的操作,你应该可以跟Demo里面一样在VSCode中调试PHP了。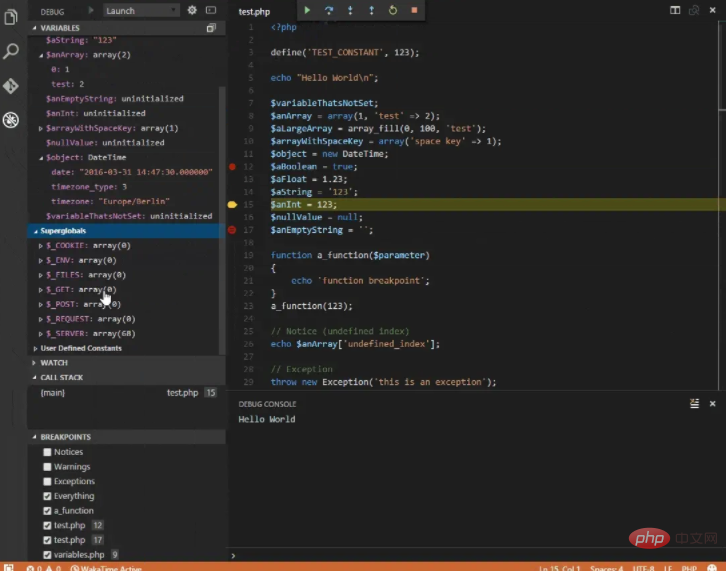






![[웹 프런트엔드] Node.js 빠른 시작](https://img.php.cn/upload/course/000/000/067/662b5d34ba7c0227.png)


