이 글은 Vue iview-admin 프레임워크에서 2단계 메뉴를 3단계 메뉴로 변경하는 방법을 주로 소개합니다. 이제는 필요한 친구들이 참고할 수 있도록 공유합니다.
저는 최근 iview-admin을 사용하고 있습니다. git에서 Vue 백엔드 템플릿을 다운로드한 후 왼쪽 네비게이션 바가 2단계 메뉴까지 지원하는 것을 발견했습니다. 또한 많은 아이들이 3단계 구현 방법을 묻는 것을 발견했습니다. 메뉴. 실제 애플리케이션 시나리오에서는 여전히 3단계 메뉴가 필요합니다. 코드를 직접 변경하는 것 외에는 다른 좋은 방법이 없습니다.
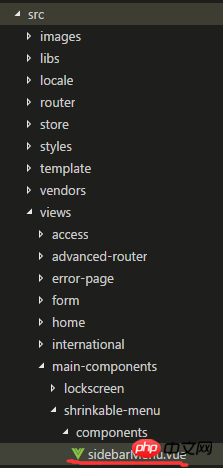
1단계: 먼저 VUE에서 템플릿을 다시 작성하고 sidebarMenu.vue 파일을 수정합니다. 파일의 특정 디렉터리는 다음과 같습니다.

메뉴 탐색 메뉴 구성 요소의 보조 중첩 구조를 변경합니다. 3레벨 중첩은 하위 라우팅 페이지 아래에 하위 속성이 있는지 여부와 하위 요소가 포함되어 있는지 여부를 결정하는 것 이상입니다. 그렇다면 v-for 루프가 직접 하위 요소 태그를 생성합니다.
<template>
    <menu>
        <template>
            <menuitem>
                <icon></icon>
                <span>{{ itemTitle(item.children[0]) }}</span>
            </menuitem>

            <submenu> 1" :name="item.name" :key="item.name">
                <template>
                    <icon></icon>
                    <span>{{ itemTitle(item) }}</span>
                </template>
                <template>
                    <!-- 添加条件判断是否还有三级菜单 v-if="child.children.length<=1"  -->
                    <menuitem>
                        <icon></icon>
                        <span>{{ itemTitle(child) }}</span>
                    </menuitem>
                    <!-- 以下为新增 添加条件判断如果有三级菜单 则增加三级菜单 -->
                    <submenu>
                         <template>
                             <icon></icon>
                              <span>{{ itemTitle(child) }}</span>
                         </template>
                         <template>
                              <menuitem>
                                   <icon></icon>
                                   <span>{{ itemTitle(son) }}</span>
                              </menuitem>
                         </template>
                    </submenu>
                    <!-- 以上为新增 -->
                </template>
            </submenu>
        </template>
    </menu>
</template>구성 요소의 메소드 아래에 isThirdLeveMenu 메소드를 추가하고 하위 속성이 포함되어 있는지 확인합니다.
methods: {
    changeMenu(active) {
      this.$emit("on-change", active);
    },
    itemTitle(item) {
      if (typeof item.title === "object") {
        return this.$t(item.title.i18n);
      } else {
        return item.title;
      }
    },
    isThirdLeveMenu(child){
       if(child.children){
           if(child.children.length>0)return true;
           else  return false;
       }
       else {
         return false;
       }
    }
},2단계: libs 폴더 아래의 util.js 파일에 현재 경로 setCurrentPath를 생성하도록 논리적 메소드를 수정합니다.
util.setCurrentPath = function (vm, name) {
    let title = '';
    let isOtherRouter = false;
    vm.$store.state.app.routers.forEach(item => {
        if (item.children.length === 1) {
            if (item.children[0].name === name) {
                title = util.handleTitle(vm, item);
                if (item.name === 'otherRouter') {
                    isOtherRouter = true;
                }
            }
        } else {
            item.children.forEach(child => {
                if (child.name === name) {
                    title = util.handleTitle(vm, child);
                    if (item.name === 'otherRouter') {
                        isOtherRouter = true;
                    }
                }
            });
        }
    });
    let currentPathArr = [];
    //去首页
    if (name === 'home_index') {
        currentPathArr = [
            {
                title: util.handleTitle(vm, util.getRouterObjByName(vm.$store.state.app.routers, 'home_index')),
                path: '',
                name: 'home_index'
            }
        ];
    }
    //去导航菜单一级页面或者OtherRouter路由中的页面
    else if ((name.indexOf('_index') >= 0 || isOtherRouter) && name !== 'home_index') {
        currentPathArr = [
            {
                title: util.handleTitle(vm, util.getRouterObjByName(vm.$store.state.app.routers, 'home_index')),
                path: '/home',
                name: 'home_index'
            },
            {
                title: title,
                path: '',
                name: name
            }
        ];
    }
    //去导航菜单二级页面或三级页面
    else {
        let currentPathObj = vm.$store.state.app.routers.filter(item => {

            var hasMenu;
            if (item.children.length  {
                return  child.name === name;
            })[0];

           // let thirdLevelObj =
           console.log(childObj)
           //二级页面
            if (childObj) {
                currentPathArr = [
                    {
                        title: '首页',
                        path: '/home',
                        name: 'home_index'
                    },
                    {
                        title: currentPathObj.title,
                        path: '',
                        name: currentPathObj.name
                    },
                    {
                        title: childObj.title,
                        path: currentPathObj.path + '/' + childObj.path,
                        name: name
                    }
                ];
            }
            //childobj为undefined,再从三级页面中遍历
            else {
                let thirdObj;
                let childObj = currentPathObj.children.filter((child) => {
                    let hasChildren;
                    hasChildren = child.name === name;
                    if (hasChildren) return hasChildren

                    if (child.children) {
                        let sonArr = child.children;
                        for (let n = 0; n <p><strong>3단계: 세 번째 수준 페이지 만들기 test-child.vue, testcaca.vue 및 세 번째 수준 라우팅 컨테이너 구성 요소 예술적인-publish-center.vue</strong><br><strong>artical-publish-center.vue의 구조는 다음과 같습니다. 다음과 같습니다: <rout-view> 태그가 있어야 합니다</rout-view></strong></p><p><img src="https://img.php.cn//upload/image/524/766/974/1531115697133053.png" title="1531115697133053.png" alt="Vue iview-admin 프레임워크에서 두 번째 수준 메뉴를 세 번째 수준 메뉴로 변경하는 방법"> </p><p>Vue는 다른 두 개의 3단계 페이지를 자연스럽게 작성했습니다. </p><p><img src="https://img.php.cn//upload/image/142/703/339/1531115707261749.png" title="1531115707261749.png" alt="Vue iview-admin 프레임워크에서 두 번째 수준 메뉴를 세 번째 수준 메뉴로 변경하는 방법"></p><p><strong>이 시점에서 컨테이너는 긴 -기다려진 3단계 메뉴 ^_^. 라우터 폴더 아래의 router.js에서 3단계 페이지 라우팅을 추가하세요. </strong><br>appRouter에 추가하세요. 제목의 하위 배열에 넣을 수 있습니다. Component': </p><pre class="brush:php;toolbar:false">{
                path: 'artical-publish',
                title: '用户配置',
                name: 'artical-publish',
                icon: 'compose',
                component: () => import('@/views/test/artical-publish-center.vue'), //引用三级页面的中间容器层
                children:[
                    {
                        path: 'testcaca',
                        icon: 'ios-pause',
                        name: 'testcaca',
                        title: 'test4',
                        component: () => import('@/views/test/testcaca.vue')
                    },
                    {
                        path: 'test-child',
                        icon: 'ios-pause',
                        name: 'test-child',
                        title: 'test-child',
                        component: () => import('@/views/test/test-child.vue')
                    }
                ]
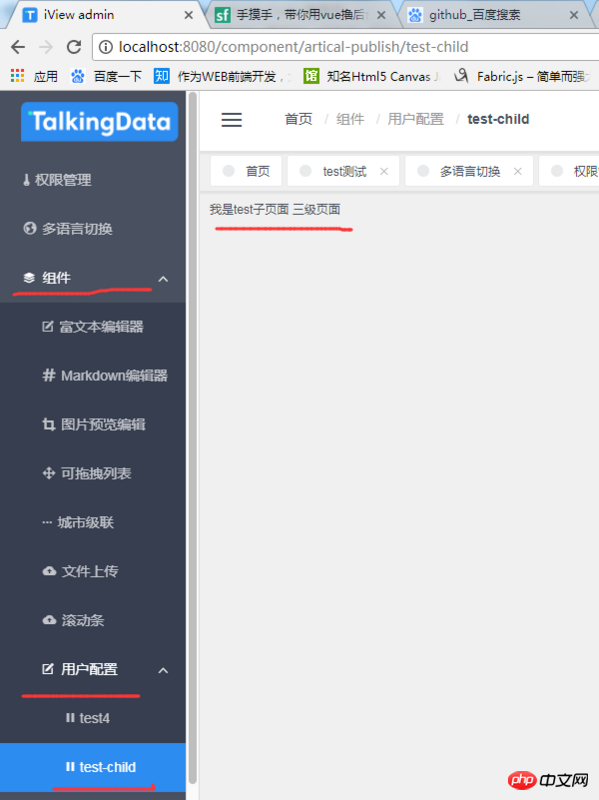
}마지막으로 저장하고 프로젝트를 실행하면 3차 메뉴가 나오는 것을 확인하실 수 있습니다. :

위 내용이 모든 분들께 도움이 되기를 바랍니다. 더 많은 관련 내용을 보시려면 PHP 중국어 웹사이트를 주목해주세요!
관련 권장 사항:
mixin을 사용하여 자체 제작한 vue 구성 요소 통신 플러그인용 플러그인 작성
Vue 활동 생성 프로젝트 도로 설계 및 탐색 모음 개발
위 내용은 Vue iview-admin 프레임워크에서 두 번째 수준 메뉴를 세 번째 수준 메뉴로 변경하는 방법의 상세 내용입니다. 자세한 내용은 PHP 중국어 웹사이트의 기타 관련 기사를 참조하세요!